33 articles
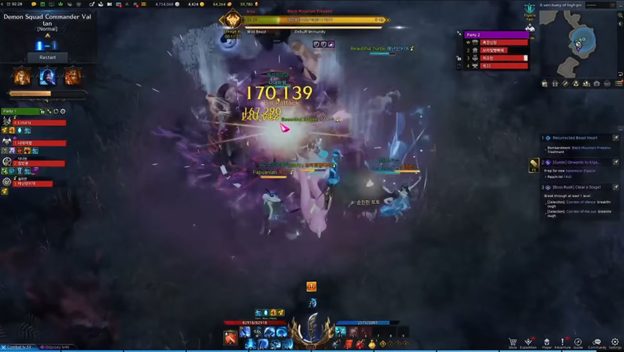
The release of the latest May update has brought forth a new class to the western Lost Ark release in the form of the Destroyer. However, it also introduced the first ever Legion Raid which has players going up against the very first Legion Commander they encounter in the game, Valtan.
As opposed to Guardian Raids and Abyss Raids, Legion Raids are way, way harder. They will require an 8-man party, each having a gear score of at least 1415 for the Normal difficulty and 1445 for the Hard difficulty.
There’s no difference in both difficulties when it comes to the mechanics of the boss. However, Legion Commanders will hit a lot harder and will be tougher to take down.
Legion Raids will normally have “gates” which act as checkpoints where you can take a break from the raid without having to forfeit any reward or progress you might have. They also act as a starting point in the event your entire team get wiped out.
 Lost Ark: Things to Do to Prepare for BreakerMar 12, 2024
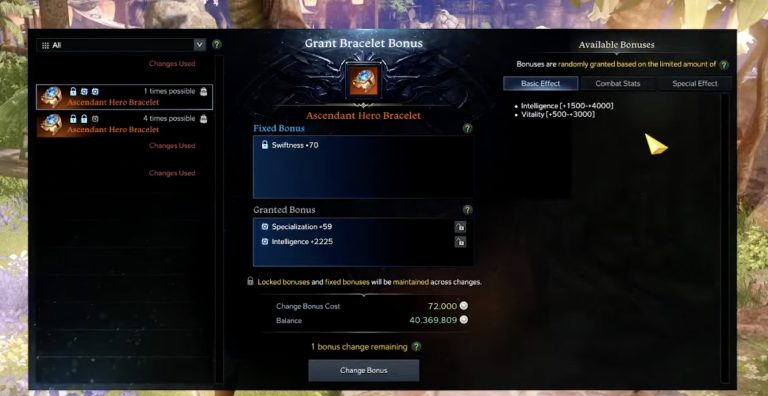
 Lost Ark Bracelet GuideApr 5, 2023
 Lost Ark: How to Get to the Flowering OrchardApr 4, 2023
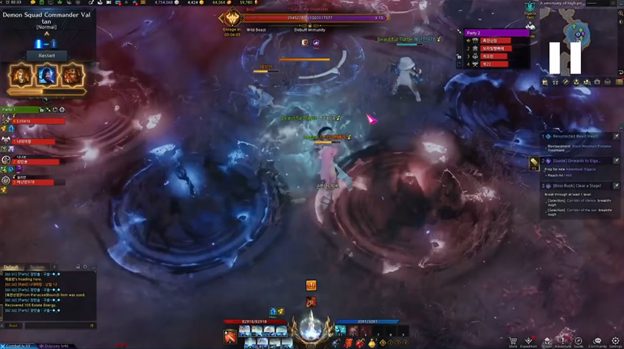
In the Valtan Legion Raid, there are two “gates” that are available, and in this guide, I’ll be covering the first one.
Legion Raid Guide for Valtan Gate 1 in Lost Ark
As mentioned, gates let you take a break from a Legion Raid without losing progress or rewards. If you clear a gate, you’ll be to vote whether to continue forward to or to leave the raid. However, you can still resume your progress from that Legion Raid until the weekly reset.
In the first gate, you’ll be up against the Dark Mountain Predator. Unlike the other bosses in the game thus far, this one has a massive x50 health pool. Throughout the entire fight, the boss will have various mechanics that are determined by his remaining health. What you want to keep in mind is that a boss mechanic will trigger once the boss hits x30 and x15 health.
Sidereal Skills

One major mechanic that sets Legion Raids apart from other raids comes in the form of the Sidereal skills. These are pretty powerful skills that are crucial for clearing both Valtan Raid gates.
There are a total of 3 Sidereal skills which can be charged slowly each time you complete a boss mechanic or perform a successful counterattack.
However, keep in mind that only the leader can activate any of these skills, so communication is key to use them effectively. In the event the raid leader dies, he can pass leadership to another member who will then be able to activate a skill.
These Sidereal skills has its own unique features, and they’re as follows:
- Thirain – Deals heavy damage and armor destruction
- Wei – Deals decent damage but very massive stagger damage
- Balthorr – Grants Push Immunity and protect your team from certain boss wipe mechanics
Positioning and Recommended Battle Items
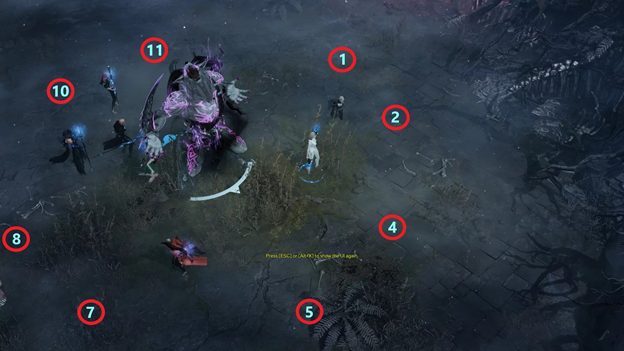
A wipe mechanic will occur when the boss reaches x30 and x15 HP. To avoid this, you want to position the party properly in accordance to the hands of a clock. Players should be positioned at 1, 2, 4, 5, 7, 8, 10, and 11 o’clock, with the raid leader at number 1 followed by members who have the highest staggers.
Also, you want to prepare the following Battle Items:
- Time Stop Potion
- Whirlwind Grenades
- Panacea/Sacred Charms
- HP Potions
Starting the Fight
You’ll start the fight against the Purple Wolf at x50 HP. This one has no major mechanics and is fairly easy to deal with. Most of its attacks will come on the front, so positioning yourself at the back spot is ideal.
The boss’s attack patterns during this stage are pretty straightforward, so you and your team should be able to survive no problem.
Once it hits x45 health, a major boss mechanic will occur and the boss will enter its second phase. During this stage, the boss will spawn two orbs and then split into two. Make sure to get away from these orbs as they will damage you once the boss’s transformation is over.
Phase Two Fight
The second phase begins with your team going up against the Red Wolf, Leader Lugaru. In this fight, you’ll want to make sure you avoid his scratches if possible. Each scratch will apply a bleeding stack, and once it reaches 3 stacks, Lugaru will perform a line that deals damage to you and your teammates.
It’s for this reason why you want to bring a Panacea or Sacred Charm to keep the stacks below 3 at all times. Otherwise, this mechanic might end up quickly killing your team.
Once the Red Wolf reaches x40 health, the Blue Wolf, Destroyer Lucas, will join the fight as well. During this stage, two of your teammates will be randomly marked with a blue and red marker. The teammate who got marked by the red marker will be targeted by the Red Wolf. As such, he/she has to move to the northern side of the battlefield.
Meanwhile, the teammate who is marked blue should move to the southern side.
The reason for this is because if the two wolves are close together, they will take massively reduced damage which makes them harder to deal with. As for the other team members, 3 of them will receive a golden buff while the remaining 3 will receive none. Those with the golden buff should aim for the Red Wolf while the other 3 members should aim for the Blue Wolf.
After reaching x35 health, the Blue Wolf will leave the arena. At this point, your team should focus all of their attacks on the Red Wolf. During this part, he will also apply a Darkness debuff to a random player, and once it reaches 5 stacks, Lugaru will teleport to that player and grab him/her.
This part right here is a very important DPS check, as you’ll want to bring down the boss’s health to 30 as quickly as possible. If your team is lacking DPS, this will usually cause the player being grabbed to die and the rest of your team to slowly get wiped as well.
Phase Two Stagger Check
At x30 health, Lugaru will teleport to the middle and channel a spell which summons blue and red orbs. This is where the positioning mentioned earlier comes into play. During this time, your team needs to take the orbs in turn and in alternate order. This means red, blue, red, blue, and so on until all 8 orbs have been absorbed.
Once a player has taken an orb, he should then proceed to do a stagger check. If a player takes two orbs, the order is incorrect, or the team fails the stagger check, then a wipe out occurs. Also, a player can only take one orb, as it will then apply a debuff. If the same player takes two orbs, he/she will die instantly.
It’s possible to circumvent this by using a panacea to remove the debuff, allowing the said player to take another orb. If you have completed the Hall of the Twisted Warlord Abyss dungeon before, then this mechanic will be pretty familiar.
Due to the boss’s massive stagger health, it’s important to use the Wei Sidereal skill for this mechanic. This is why the raid leader has to be in the number 1 spot to perform it.
Also, the more orbs you take, the easier it will be to stagger the boss. This is why it’s important to take all 8 orbs to pull this off.
Phase Three Fight
The boss will enter the third phase after performing a successful stagger check. The Blue Wolf then joins the fight with the Red Wolf entering at x25 health. This is similar to the second phase where you have to separate the two from each other.
The only difference is the golden buff. Instead of targeting the Red Wolf, those with the golden buff should target the Blue Wolf while those without should deal with the Red Wolf. When the Blue Wolf reaches x15 health, the Red Wolf will then leave the arena and another stagger check occurs.
Phase Three Stagger Check
There’s no difference in this stagger check from the first one. As long as you and your teammates have memorized the mechanic, you should be fine. If Sidereal Wei is ready, then it should be easier.
Final Phase
After a successful stagger check, the boss will enter its last phase. This phase will combine all of the attacks the boss and its clone performed in the previous phases. The boss will also transform back into the Purple Wolf. However, this also includes a new wipe out mechanic that will require perfect teamwork.
After around two minutes, the boss will smash the ground and inflict Fear to the farthest member in the team. Within a few seconds, the boss will then teleport to that player and grab him/her, triggering a stagger check.
During this time, players have to stagger the boss, otherwise, the feared player will die.
If you failed the first stagger check, the boss will perform the mechanic the second time. If your party still fails the second stagger check, then you will all be wiped out. It’s important to communicate to all members that whoever gets grab should spam the ping so everyone will know where they are.
A strategy for this is to not stray too far from the boss. This will make it easier for the entire party to help the feared player. As long as done right, you and your teammates should be able to finish Gate 1 of the Valtan Raid.
ALSO READ: Vampire The Masquerade – Swansong: How to Solve Rotating Floor Puzzle