 15 articles
The Shimizu Residence is one of the many areas you’ll go through in Silent Hill f. In fact, this is one of the latest areas in the game, being pretty close to the game’s finale! As such, it’s no surprise that it’s a challenging area full of deadly monsters and some clever puzzles. In this guide, we’ll tell you what you need to do to go through this section!
Shimizu Residence Walkthrough | Silent Hill f
As soon as you first enter the residence, you’ll want to go straight forward to the end of the hallway. Well, after the little phone call probably scared you, that is! You’ll find a door with 3 slots for crests there, which will be the main puzzle for this section. However, you can’t do much here at the time. Just keep it in mind for now.
For now, you just need to head to the southwestern corner of the residence. You’ll find a red door there, with a Calendar outside. Grab that Calendar, then return back to where the crests door was.
Face the crests door and then look at the wall to your left. You should spot a hook on the wall, interact with it to place the Calendar. This will light up the door to your left, allowing you to pass through to another version of the residence.
 Silent Hill f Scarecrow Field Puzzle Solution (All Difficulties)Sep 28, 2025
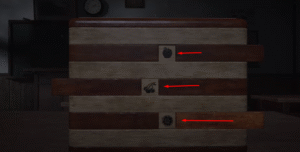 Silent Hill f – Secret Box Classroom Puzzle Solution (All Difficulties)Sep 28, 2025
 Silent Hill f: All Ema Locations (Character Upgrades)Sep 28, 2025
Scale Puzzle
Now that you’re in the Shimizu Residence II, you just need to head to the northwesternmost room. You’ll find a table with a scale and some kokeshi dolls there, interact with it to start a simple puzzle.
The solution for this puzzle seems not to change based on difficulty, at least as far as we can tell. Instead, it seems to vary based on which ending you’re currently aiming for.
If this is your first time doing this puzzle, you just need to place the broken doll on one plate and the remaining 4 dolls on the other plate. This will even them out, unlocking a secret compartment with the Scales Plate.
For the other New Game+ exclusive endings, there are these potential solutions:
- The Fox Wets Its Tail – School Girl and Half-Mask Girl on one plate. Old Man, Fox Mask, and Headless on the other.
- Fox’s Wedding – Old Man, Fox Mask, School Girl on one plate. Headless, and Half-Mask Girl on the other.
- Ebisugaoka in Silence – School Girl on one plate. All remaining 4 dolls on the other plate.
Get the Photo and Second Calendar
With the first crest in your possession, you now need to find two more items in this version of the residence. The first is the Picture Frame, which should be in the storage room in the southeastern corner. It’s more than just the frame, though!
After that, go to the living room in the very center of the residence. Enter it to witness a cutscene, then grab a second Calendar from the table. As before, bring this Calendar to the northwesternmost door in the residence and place it on a hook. This will allow you to enter Shimizu Residence III.
Shimizu Residence III
Once you enter this third version of the residence, go straight ahead and past the Hokora. Enter the first openable room to your right. It’s where the crest door was in the first residence.
Inside that room, check the shelf in the corner opposite of the entrance. Examine the book at the very bottom of the shelf to open it and obtain the Block of Wax.
Then, leave the room and continue going west to circle back around to the kitchen, which is the southernmost room. Grab the Propane Tube from the bloodied table in front of you as you enter the kitchen.
While you’re at it, also make sure to grab the Furoshiki next to the entrance! It’s one of the few inventory upgrade items in the game.
Once you’re done here, go back to the northwesternmost door and cross it to return to Shimizu Residence I. No need for a Calendar this time around!
Ominous Photo Puzzle
Back in Shimizu Residence I, you want to go to the photo room. It’s the one marked on the map above, in the northwestern part of the residence.
Hang the Photo Frame you found in the empty spot on the wall, then inspect the group photo in the western wall of the room. Pay attention to which people have had their heads marked off, as this will tell you how to solve the puzzle.
Basically, you just need to figure out who has been marked and then walk up to their photo. Interact with those people’s photos to flip them around so that they’re upside down. Repeat this for every marked person and you’re done! The solution seems to vary based on which ending you’re going for, but these are the potential solutions:
- Coming Home to Roost (Standard Ending) – Flip Hinako’s photo.
- The Fox Wets Its Tail – Flip Rinko’s and Hinako’s photos.
- Fox’s Wedding – Flip Rinko’s, Shu’s, and Sakuko’s photos.
- Ebisugaoka in Silence – Flip all photos except Hinako’s.
If you did this right, you’ll hear and see the group photo fall. This will reveal the White Bird and Fox Plate, which is the second crest you need!
Fletchling Key and Room
With that done, you need to go to the kitchen in the Shimizu Residence I. Like before, it’s the southernmost room in the residence.
Interact with the stove there to connect the Propane Tube, then interact again to melt the Block of Wax you got earlier. This will reveal the Fletchling Key, which was stuck in the wax all along!
With that in your possession, use the northwesternmost Calendar door again. Go through Shimizu Residence II as well so that you loop back to Shimizu Residence III.
In Shimizu Residence III, you have to go to the locked door on the southernmost part of the residence. It’s directly opposite of where the kitchen is. Interact with the fletchling door to use your Fletchling Key and open it.
Go into the room to witness yet another traumatic memory for poor Hinako. At the same time, make sure to grab the Black Bird and Sword Plate from the table. There are also other goodies in the room, such as a Yokan, if you need it!
The Crests | My Room Puzzle
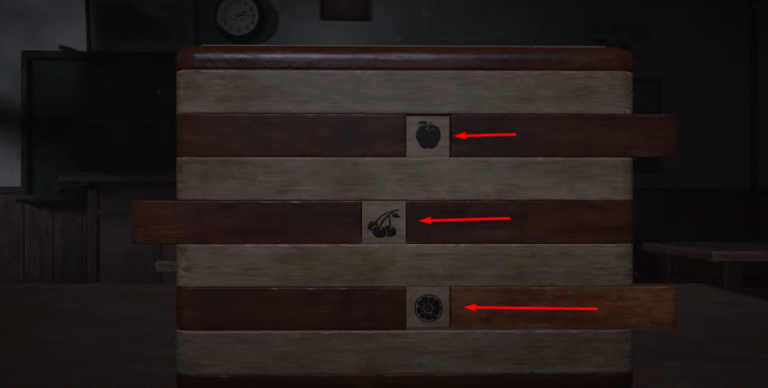
You now have all three crests required for the crest door you saw at the start of this area. So, use the calendar doors to loop back to Shimizu Residence I and interact with the door to place the crests.
Now, as for the solution to this puzzle, it’s similar to previous puzzles in this section of the game. That means, the solution varies based on which ending you’re aiming for! Here are the potential solutions:
- Coming Home to Roost
- Top: Heavens
- Left: Swords
- Right: Fox
- Bottom: Blank (Scales)
- The Fox Wets Its Tail
- Top: Swords
- Left: White Bird
- Right: Scales
- Bottom: Blank (Heavens)
- Fox’s Wedding
- Top: Fox
- Left: Scales
- Right: Black Bird
- Bottom: Blank (Heavens)
- Ebisugaoka in Silence
- Top: Blank (Scales)
- Left: White Bird
- Right: Black Bird
- Bottom: Heavens
Remember, all of the crests have two faces! You’ll need to flip at least one of them for every solution, so keep that in mind as you attempt to solve this puzzle.
Once you’re done with the puzzle, Hinako’s room will open up. Simply walk up to her desk and grab the Pine Tree Emblem. Then, leave the room.
After that, you just need to go back to the red door where you got the first Calendar. Use the Pine Tree Emblem to open that door and then you just need to continue down the hallways!
Do be sure to grab the supplies along the way and use the Horoka you find along the way. A boss awaits you at the end of the hallway, though it shouldn’t pose too much of a threat. Defeating that boss will make a cutscene play out, automatically finishing this section of the game.
That’s all you need to know to be able to go through the Shimizu Residence in Silent Hill f! Now, we did mention there are multiple endings and that they affect the puzzles in this section. Want to know more about those endings? Well, we have a guide on how to get all endings, too!