
 2 articles
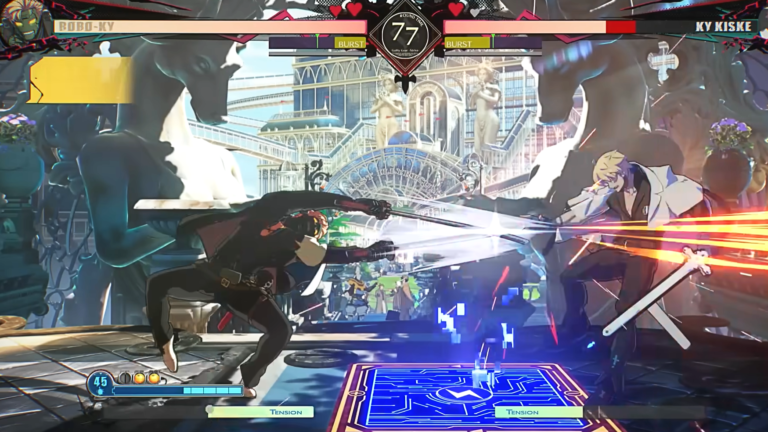
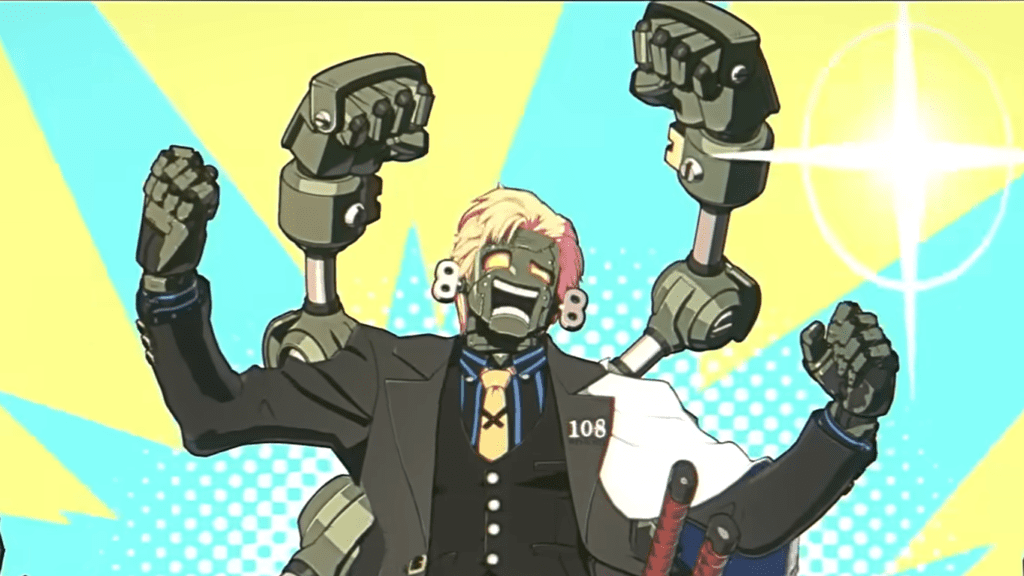
Robo-Ky arrives in Guilty Gear Strive as part of the Season 5 Pass, and he is not the Ky Kiske clone the name might suggest. While he is designed to imitate Ky on the surface, his actual moveset plays completely differently.
He brings unique mobility options that double as attacks, a trap-based game plan, and projectiles that work in tandem with those traps to make approaching him a genuinely frustrating experience for opponents. In this guide, I will break down his best moves and skills so you can hit the ground running.
Complete Starter’s Guide For Robo-Ky
Robo-Ky comes with a varied moveset that can trip up opponents pretty easily if they are not familiar with how he plays. A big part of what makes him unique is the Electric Gauge. This gauge powers a number of his moves and is a key component in mastering Robo-KY.
Managing that gauge and knowing which moves feed into it and which ones drain it is a core part of playing him well.
 Guilty Gear Strive: How to Unlock ColorsMar 29, 2022
On top of that, his moveset includes traps that work in tandem with his projectiles to control space and make approaching him a genuine challenge for opponents. I will go over each of his best and most important moves in more detail below.
Electric Gauge
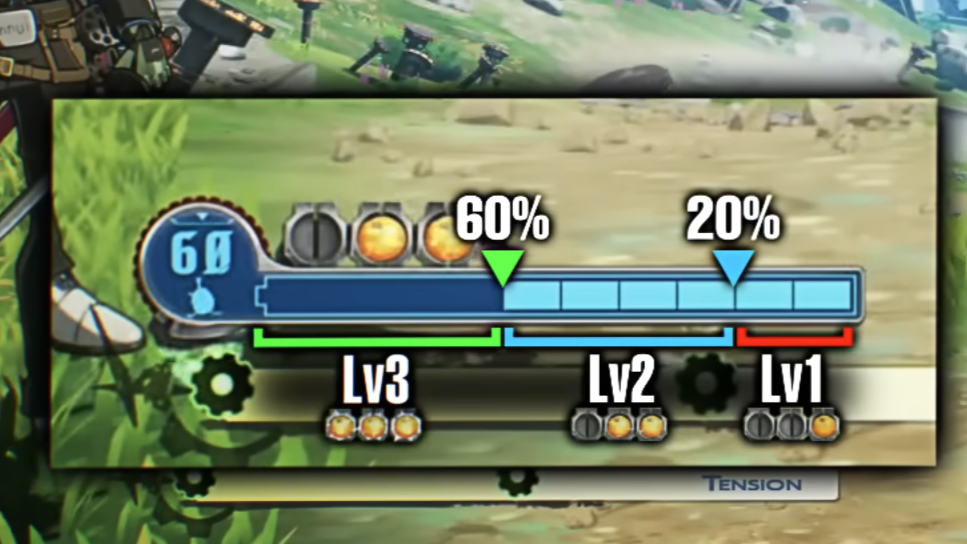
The Electric Gauge is Robo-Ky’s unique resource and it sits just above the standard Tension Gauge on the screen. Unlike the Tension Gauge which builds up through general gameplay, the Electric Gauge fills and drains through specific actions tied to Robo-Ky’s moveset.
Managing it effectively is a big part of playing him well since the level it sits at directly affects how powerful his special moves are.
The gauge has three distinct levels. Level 1 kicks in at 20% fill, Level 2 at 60%, and anything above that is considered Level 3. The higher the level, the stronger Robo-Ky’s special moves become.
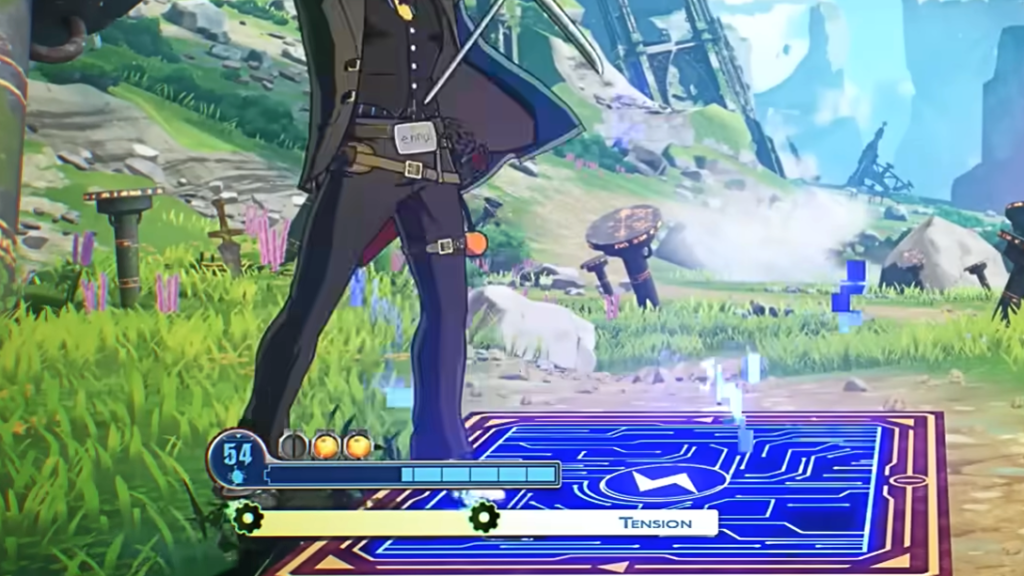
Gimmic-KY
To trigger this move, input “Down + Down + Heavy Slash“. Robo-Ky places a blue square mat on the ground and as long as he is standing on top of it, the Electric Gauge charges up passively.
It is a simple concept but the timing of when you place it is what makes it effective. The best situations to use this are when you have created distance between yourself and the opponent and are playing the neutral with projectiles.
Standing on the mat while throwing out projectiles lets you charge the gauge while still applying pressure from range. The other great window is immediately after you knock down an opponent.
The knockdown gives you a brief moment where your opponent cannot punish you, and using that time to stand on the mat and charge the Electric Gauge before they wake up is one of the cleanest ways to keep your gauge topped up throughout a match.
Jun-KY Bargain
To trigger this move, input “Down, Down-Forward, Forward + Slash” It can also be performed in the air, giving it a lot of flexibility in how you work it into your game plan. The move has Robo-Ky launching a rocket punch projectile straight at the opponent.
What makes Jun-KY Bargain particularly interesting is how it scales with the Electric Gauge. At Level 2 or above, the projectile gains a degree of tracking and will follow the opponent to some extent rather than travelling in a straight line.
At Level 3 the move transforms entirely, splitting into three projectiles and dealing significantly more damage. This makes it both a solid neutral tool at lower gauge levels and a genuine threat at Level 3 that opponents need to actively respect and account for.
In terms of how to use it, Jun-KY Bargain works well as a poke to keep opponents at bay and control the space between you. At higher gauge levels it becomes a strong combo ender or a threatening neutral tool that forces your opponent to think twice about approaching.
Pairing it with Gimmic-KY to keep your Electric Gauge consistently high means this move can perform at its stronger levels for longer stretches of the match.
KY-zen Blitz
To trigger this move, input “Down, Down-Backward, Backward + Slash“. KY-zen Blitz is a forward lunging attack that consumes Electric Gauge upon execution, so keep that in mind when deciding when to use it. The move does not just deal damage on hit though.
It also triggers an automatic follow up attack that kicks in after the initial lunge connects. What makes KY-zen Blitz particularly interesting is how the follow up attack behaves depending on your current Electric Gauge level.
If the gauge is at Level 2 or below when the follow up triggers, it will recharge the Electric Gauge, which helps offset the cost of using the move in the first place. This makes it a relatively safe move to throw out at lower gauge levels since you are partially refunding the resource you spent.
At Level 3 however, the follow up attack does not recharge the gauge. Instead it becomes significantly stronger and sends the opponent into a hard knockdown.
That knockdown is extremely valuable since it gives you a window to set up Gimmic-KY and start charging the Electric Gauge back up while your opponent is on the ground. At Level 3, KY-zen Blitz becomes a high damage combo piece that also sets up your next sequence perfectly.

Spar-KY Surprise
To trigger this move,, input “Forward, Down-Forward, Down, Down-Backward, Backward + Kick“. Spar-KY Surprise has Robo-Ky lunge forward a short distance and strike the opponent with dual electric batons. On a successful hit, the move recovers Electric Gauge which makes it a useful tool for keeping your resource topped up mid-combo or during a pressure sequence.
The most important thing to know about Spar-KY Surprise is that it cannot be blocked. This makes it a genuine threat that opponents have to actively dodge or avoid rather than simply holding block.
However the trade off is significant. If the move whiffs and misses the opponent entirely, Robo-Ky is left completely wide open for a counter attack. The recovery on a whiff is punishable enough that a good opponent will make you pay for it every time.
With that in mind, distance management is everything when it comes to deciding when to throw this out. Use it when you are confident the opponent is in range and does not have a clean escape option.

Luc-KY Launcher
To trigger this move in Guilty Gear Strive, input “Down, Down-Backward, Backward + Heavy Slash“. Luc-KY Launcher does exactly what the name suggests. It launches the opponent up into the air and consumes Electric Gauge upon execution.
On its own that sounds straightforward, but the real value of this move comes from what it opens up depending on your current gauge level.
At Level 2 or above, the launch gives you enough time and height to follow up with additional attacks before the opponent comes back down. This is where Luc-KY Launcher starts becoming a genuine combo piece rather than just a standalone move. The window it creates at Level 2 is solid and gives you enough time to extend your combo meaningfully.
At Level 3 the move becomes even more potent. The opponent gets launched significantly higher into the air which extends the juggle window further and allows you to squeeze in even more hits before they land.
The higher the opponent goes, the more creative you can get with your follow ups and the more damage you can stack in a single combo sequence.
This is one of the most valuable moves in Robo-Ky’s kit for players who want to maximize their damage output. Building your Electric Gauge up to Level 3 before landing this move is the goal since it opens up his most damaging combo routes and really showcases what Robo-Ky can do when his gauge is properly managed.

Beautiful S-KY Today
To trigger this move, input “Down, Down-Forward, Forward + Heavy Slash“. It can also be performed in the air. Beautiful S-KY Today is Robo-Ky’s command movement skill.
Upon activation it launches him upward and from there you can use the directional inputs to move around freely for a set duration. It consumes Electric Gauge upon use so keep that in mind when deciding when to activate it.
What makes this move particularly versatile is that it doubles as both a movement and offensive option at the same time. The freedom to reposition mid-air while your opponent is trying to read your next move creates a lot of mix-up potential and makes Robo-Ky genuinely difficult to pin down when this move is used well.
At Level 2 or above the move opens up even more options. After activation you can instantly follow up with attacks, which is where the real mind game begins. The movement makes it look like you are repositioning or retreating, baiting the opponent into thinking you are backing off.
If they drop their guard or try to chase you down, you can immediately punish them with a follow up attack they were not expecting.
Against a blocking opponent, the same movement can trick them into dropping their block to challenge you, opening them up for punishment the moment they commit to that decision.

What’s Useless Will Always Be So
This is Robo-Ky’s first Overdrive skill and it is triggered by inputting “Forward, Down-Forward, Down, Down-Backward, Backward + Forward + Heavy Slash“. It consumes 50% of your Tension Gauge upon activation.
Once activated, Robo-Ky unleashes a relentless series of punches and strikes on the opponent. What makes this Overdrive particularly interesting is the direct relationship it has with the Electric Gauge.
The move actively consumes the Electric Gauge as it runs, and the amount of gauge you have at the time of activation directly determines how many hits the move delivers. The more Electric Gauge you have going into this move, the longer the sequence of hits and the more damage it deals overall.
The move will continue running until one of two things happens. Either the Electric Gauge hits zero and the sequence ends automatically, or you manually stop it early by pressing Heavy Slash yourself.
This gives you some control over when to end the move, which can be useful in situations where you want to preserve a small amount of Electric Gauge for a follow up rather than draining it completely.
Ris-KY Lovers
This is Robo-Ky’s second Overdrive skill, and it is triggered by inputting “Forward, Down-Forward, Down, Down-Backward, Backward + Forward + Slash“. It consumes 50% of your Tension Gauge upon activation just like other Overdrive skills.
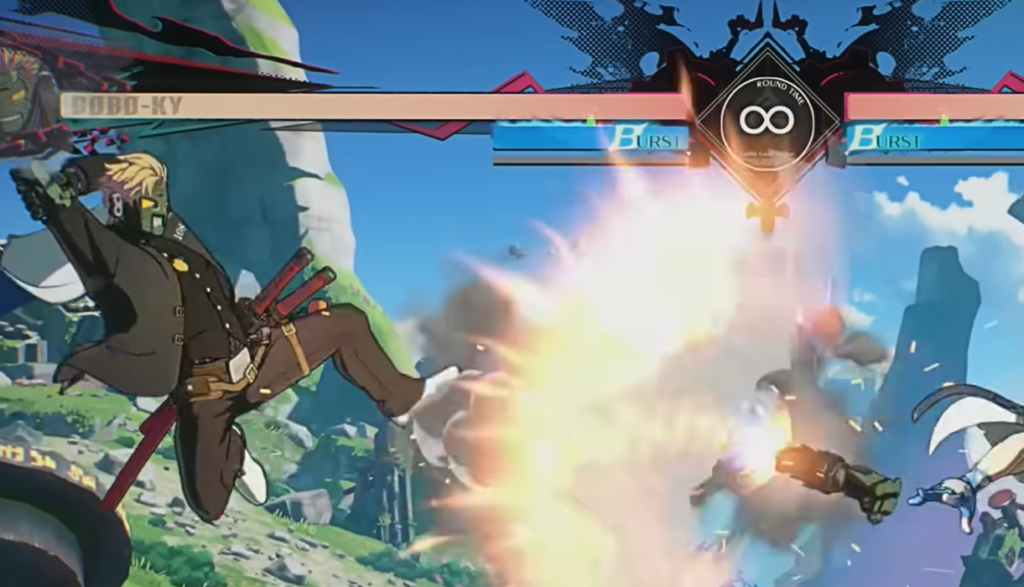
Once activated, Robo-Ky enters a full overdrive state. His Electric Gauge changes color and instantly fills up to 100% before beginning to constantly deplete on its own.
During this window, Robo-Ky has access to the most powerful versions of all his moves, since the gauge is effectively locked at its highest level for the entire duration. This means every special move he uses during Ris-KY Lovers performs at peak power without needing to manually build the gauge up first.
The pressure this creates is enormous. Your opponent has to deal with the strongest version of every tool in Robo-Ky’s kit all at once. And since the gauge is constantly draining, you have a natural incentive to stay aggressive and keep the hits coming rather than playing conservatively.
Once the Electric Gauge fully depletes, Robo-Ky will explode. This explosion deals damage to Robo-Ky himself. Also, if the opponent is close enough when it triggers, they will also take damage from the blast.
It is worth keeping track of how much gauge is left during this Overdrive so you can position yourself near the opponent as it approaches zero. This way you can turn the explosion into one final parting hit rather than just taking the damage alone.

Wrapping Up
Robo-Ky is a character that rewards players who stay disciplined with their resource management. Every move in his kit ties back to the Electric Gauge in some way. Whether this is by charging it, consuming it, or performing differently depending on what level it is sitting at.
The players who get the most out of him are the ones who always know where their gauge is. And are actively building towards Level 3 before committing to their biggest moves. Get that loop running smoothly and Robo-Ky becomes one of the most damaging and unpredictable characters in Guilty Gear Strive.


Found another tip?
Share your extra strategy, correction, or question below. Helpful comments can make this guide better for everyone.