
Guides
Wuthering Waves: Riccioli Islands 100% Exploration Progress Guide
Journey through the seas and explore these islands to their fullest extent!
The Riccioli Islands are a sub-region of Rinascita in Wuthering Waves 2.1, and they come with their own Exploration Progress counter you can get to 100%.
Riccioli Islands encompasses five separate main islands, as well as some smaller islets. If you wish to completely explore this region, you’ll need to find the following: 2 Resonance Beacons, 7 Treasure Spots, 4 Musicflies, and 5 Overflowing Palette puzzles. It’s not a lot, all things considered, but all of these are spread across the 3 main islands. As such, be ready for a lot of traveling!
When you’re ready to set out on your journey, read on. We’ll tell you everything you need to do to get the Exploration Progress to 100% completion in the Riccioli Islands region of Wuthering Waves.
Riccioli Islands 100% Exploration Progress Guide | Wuthering Waves 2.1
Port of Riccioli
Resonance Beacon
Let’s kick things off by activating the first Resonance Beacon in the Riccioli Islands. You can find it in the northwestern part of the Port of Riccioli. It’s at the top of the tall cliff, overlooking the port town below.
You only need to activate 2 Resonance Beacons to get 100% Exploration Progress in the Riccioli Islands in Wuthering Waves. As such, this simple step is already a pretty good chunk of the Exploration Progress completion!
Treasure Spot
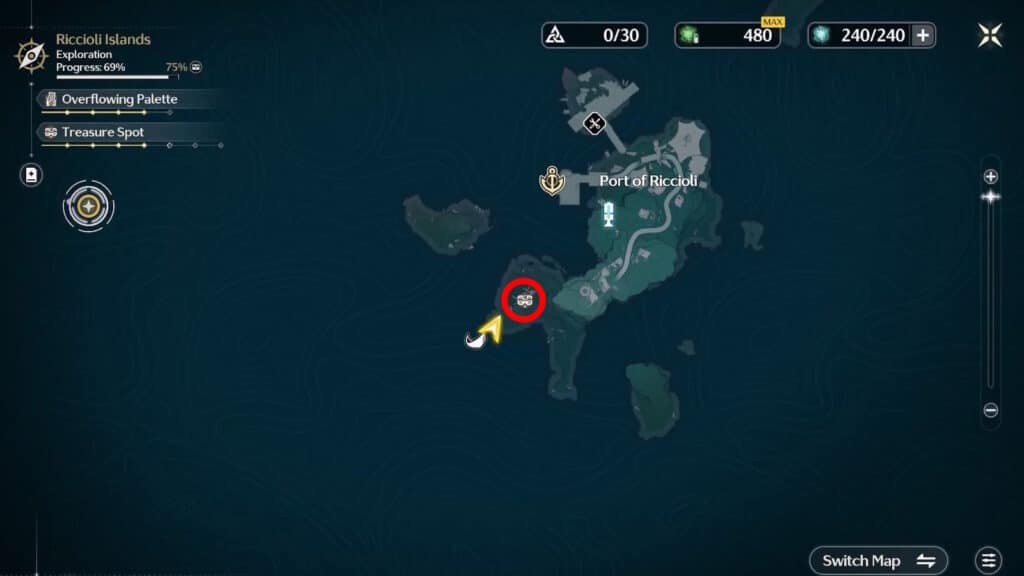
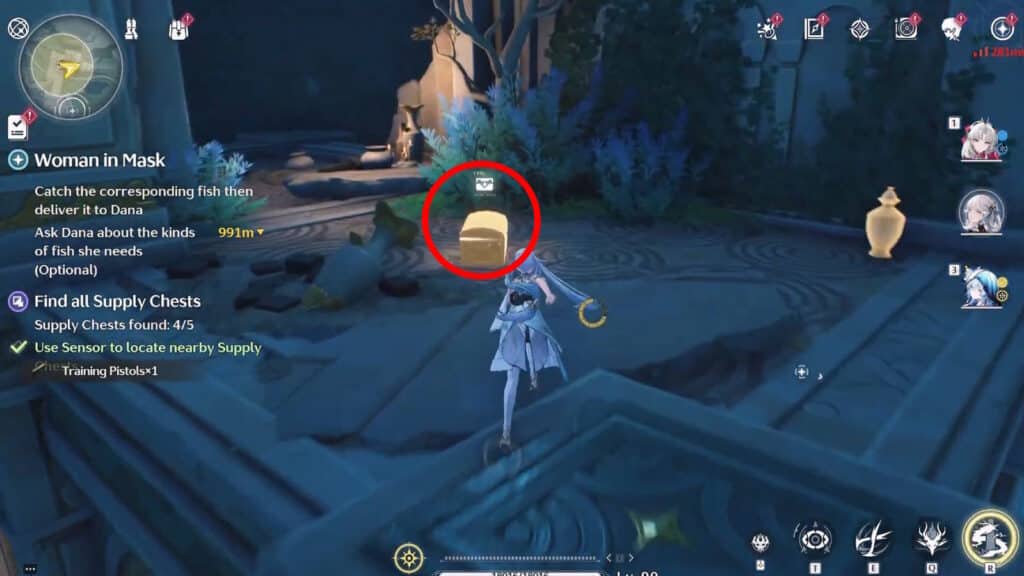
There’s only one Treasure Spot in all of Port of Riccioli. It’s in the southwestern part of the island and it has a total of 5 Supply Chests for you to find.

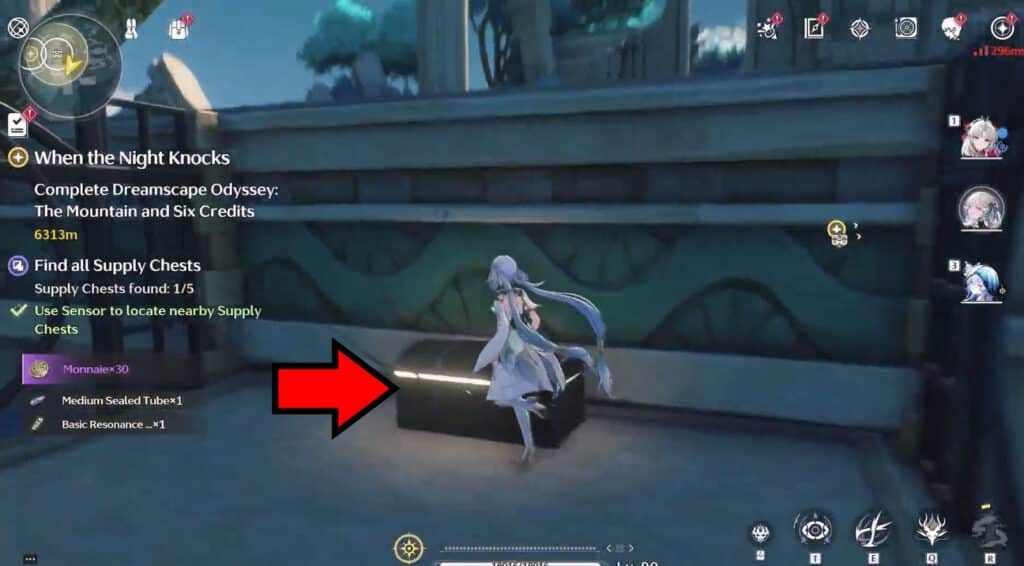
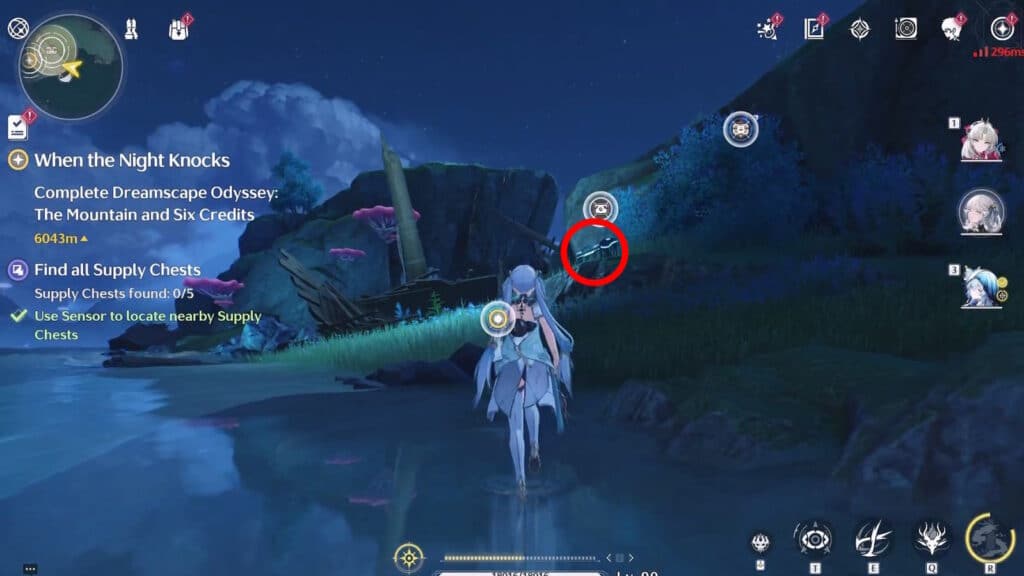
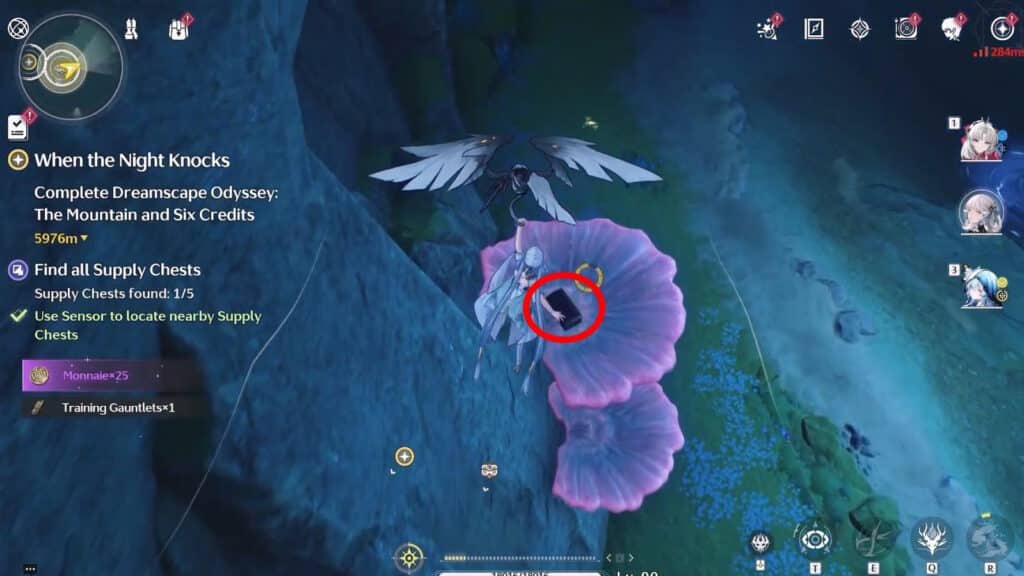
We’ll start from the southeastern corner of the search area. Just go there and you’ll find the first chest sitting atop a large coral by the shore.
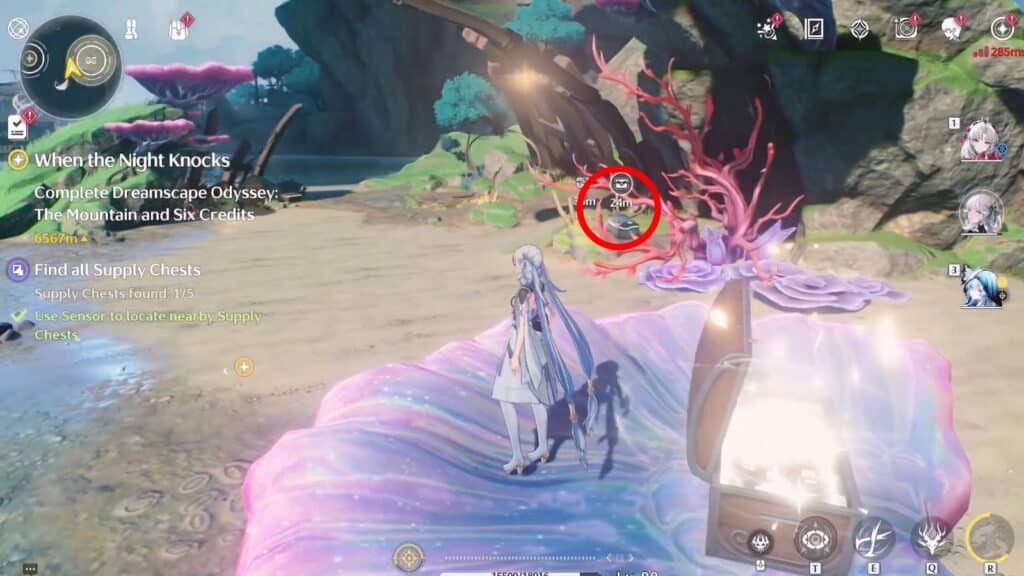
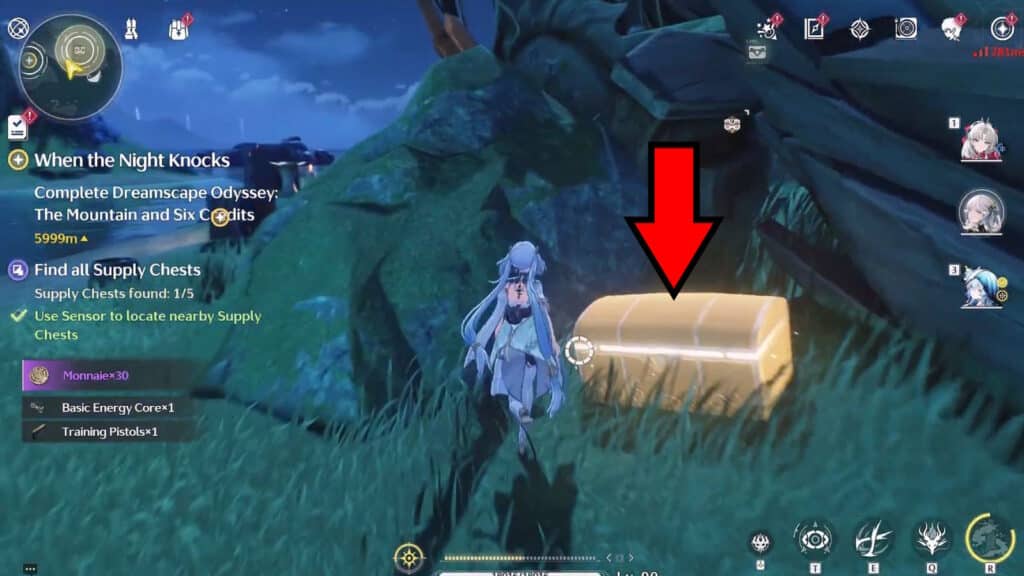
After you grab the first Supply Chest, turn to face east. You’ll spot the second Supply Chest atop some planks. It’s under a ledge and next to a large spiraling coral.

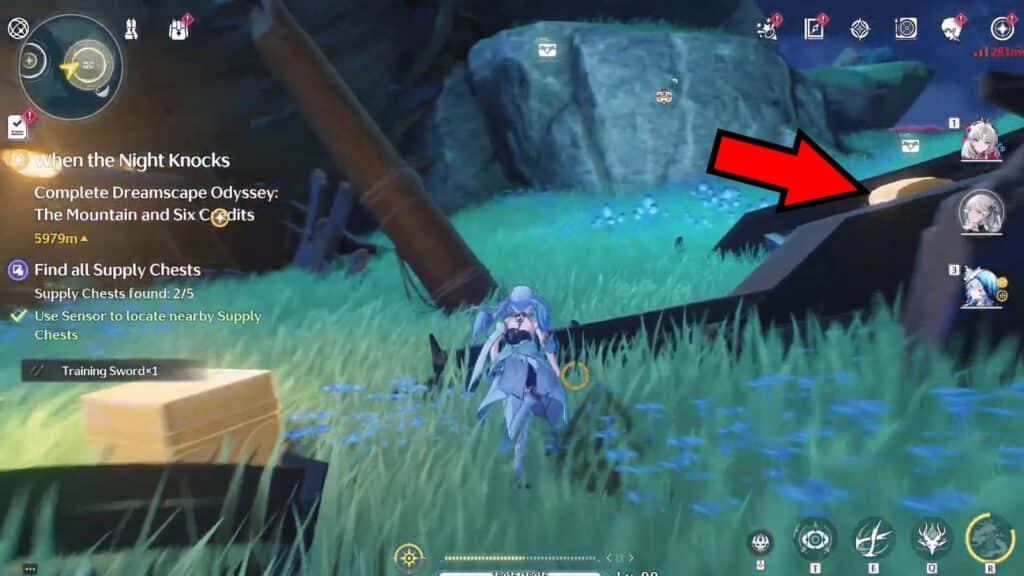
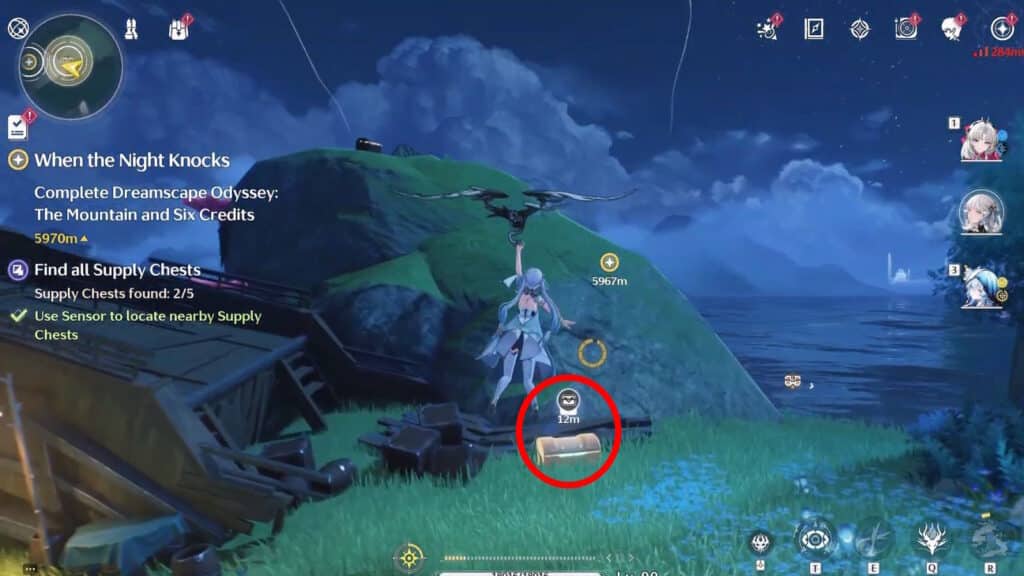
Right after the second chest, turn to face the north. The third Supply Chest will be directly in front of you, next to a rock by some bits of a shipwreck.
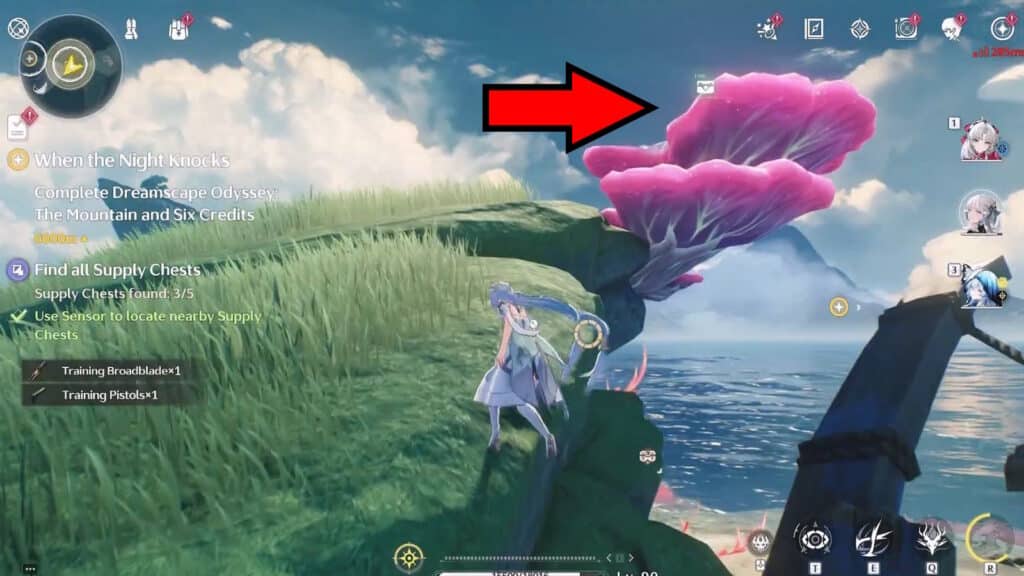
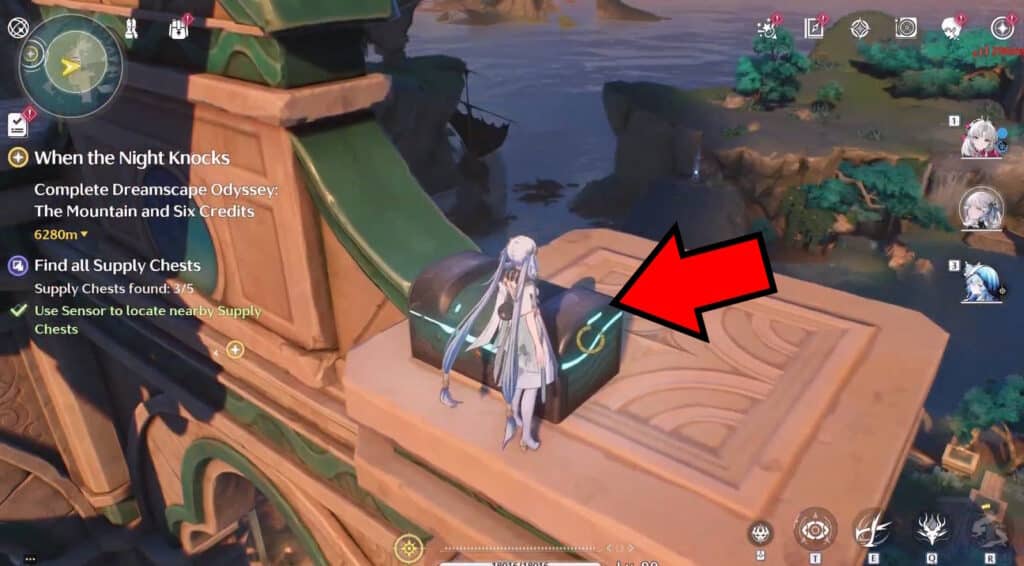
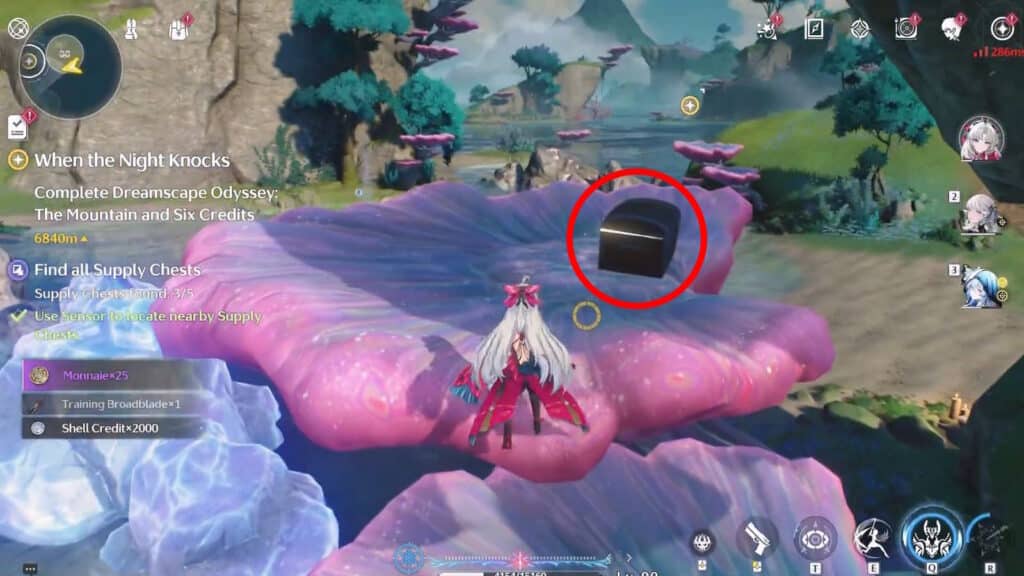
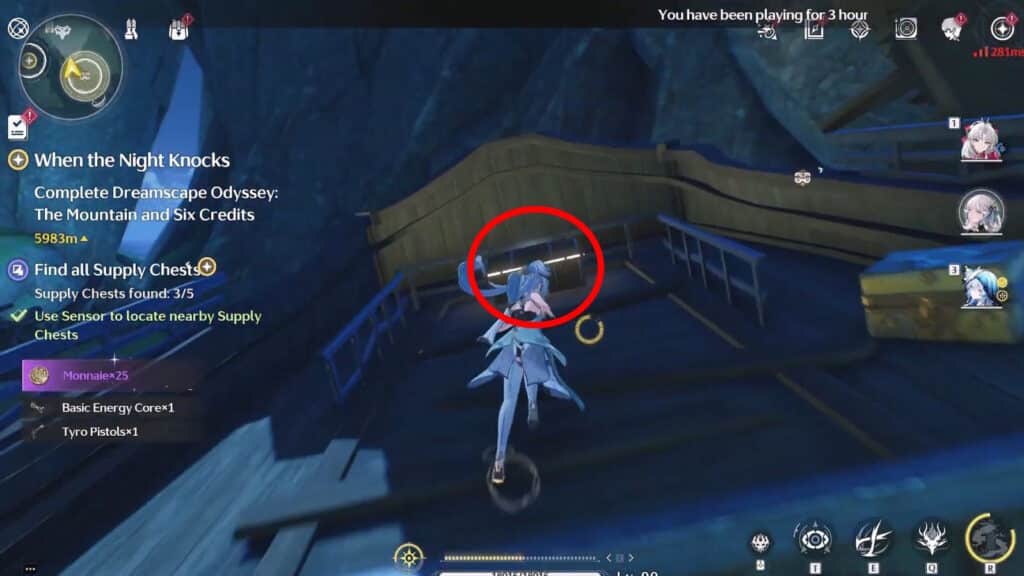
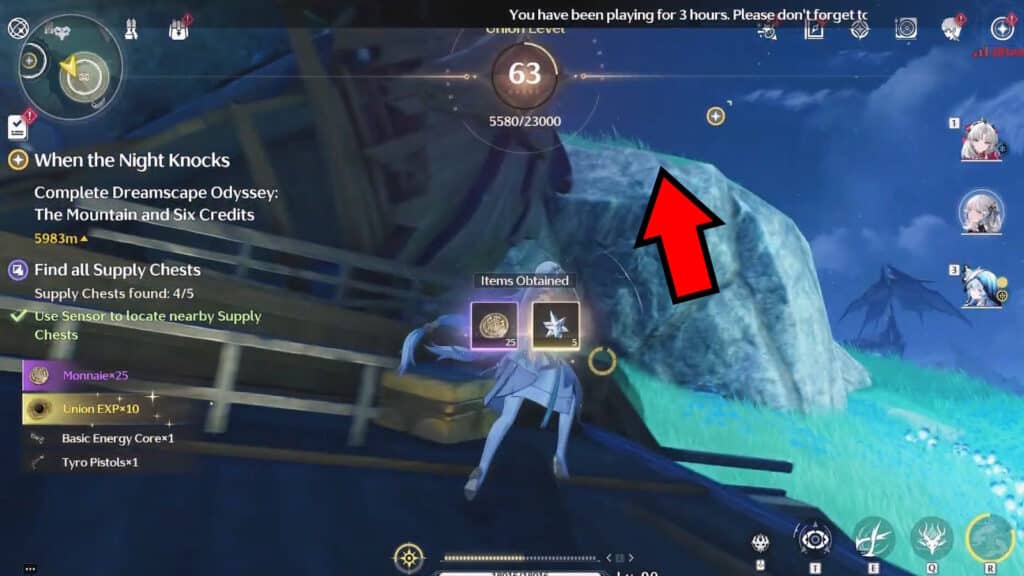
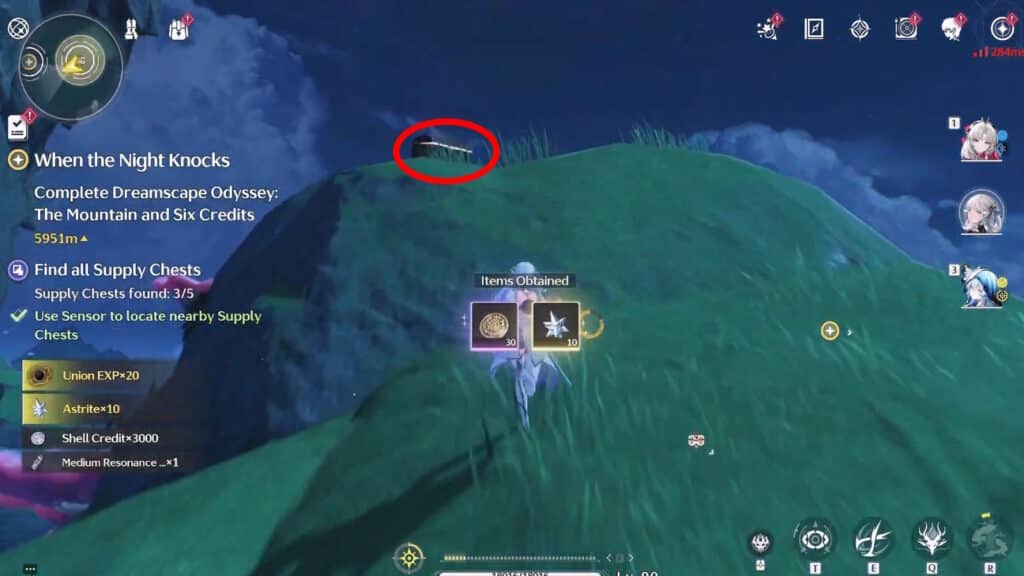
Next up, go to the very center of the Treasure Spot search area. You should spot a hill that ends with a large piece of coral. The fourth Supply Chest is atop the coral there. For further reference, the coral is directly above the second Supply Chest from before.
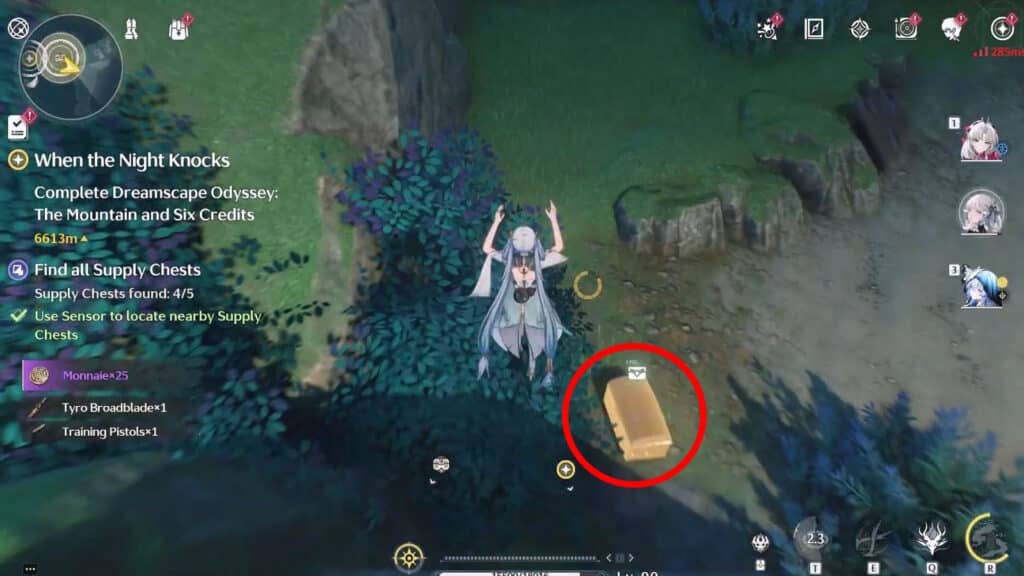
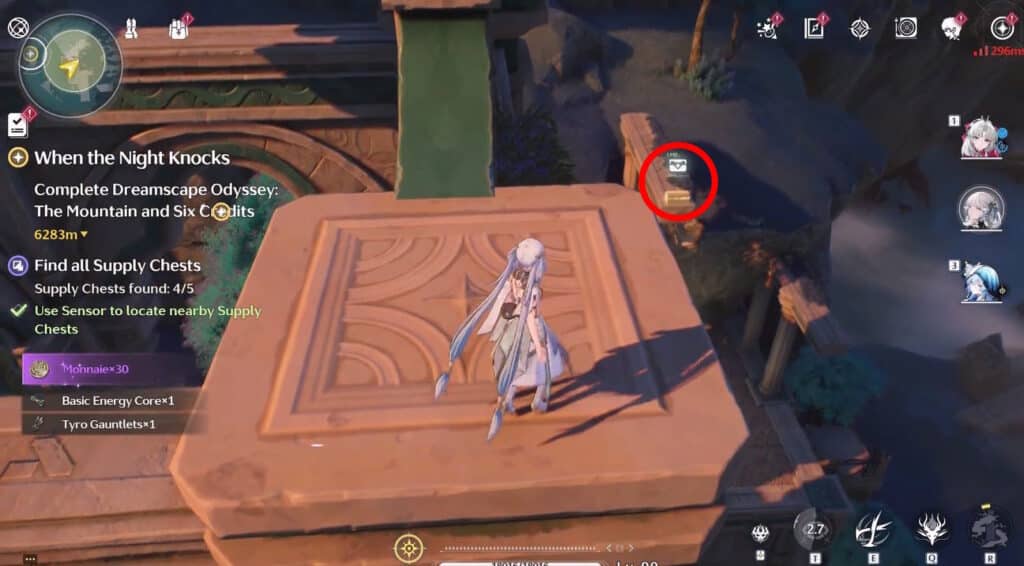
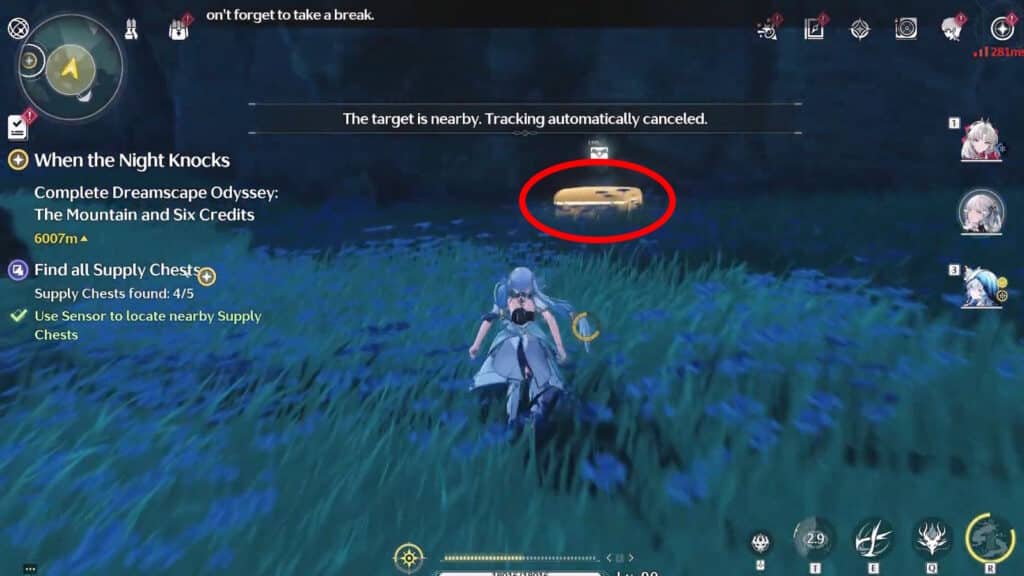
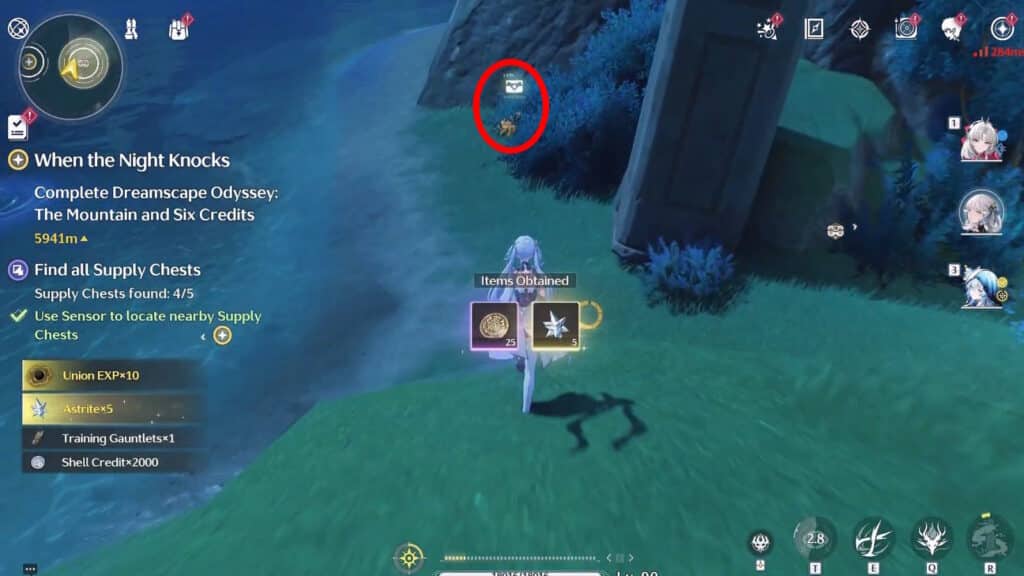
Last up, go to the southeastern part of the Treasure Spot area. The fifth and final Supply Chest here is next to a large rock, facing the shore. It’s a very nondescript spot, truthfully!
Overflowing Palette

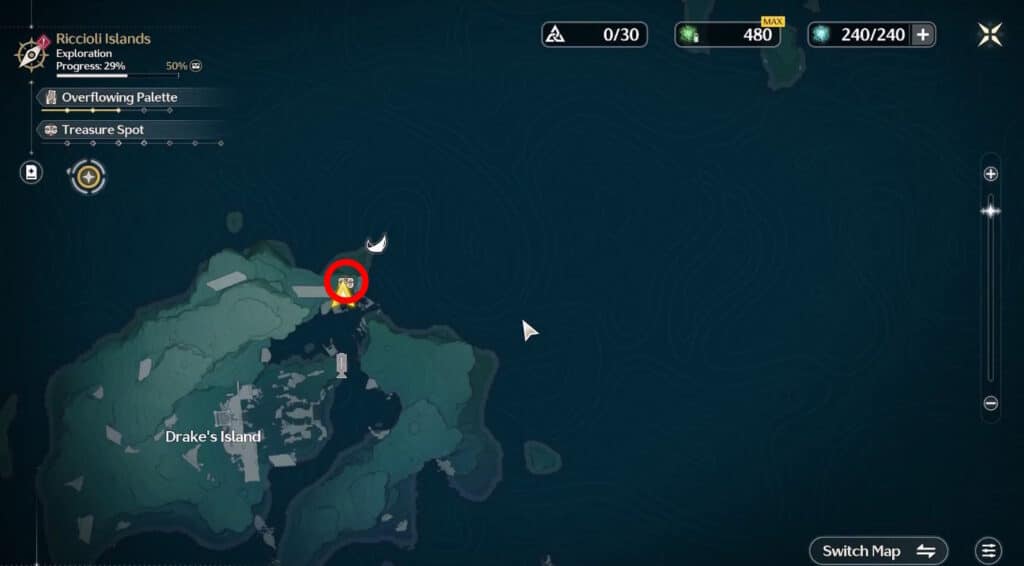
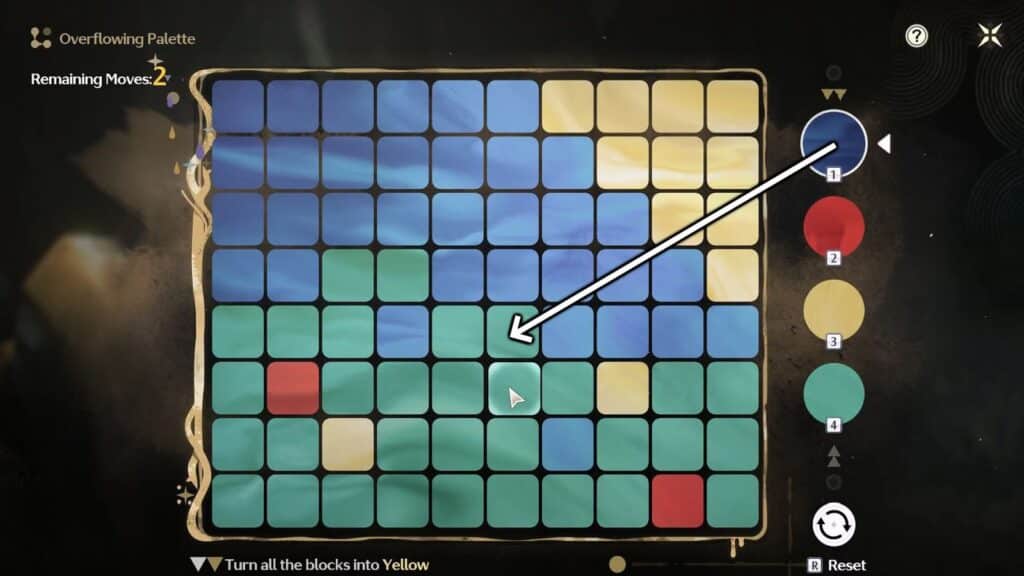
You can find this Overflowing Palette puzzle in the southeastern corner of Port of Riccioli, in the Riccioli Islands region. Like most other Overflowing Palette puzzles, it’s a large mirror-like contraption out in the happen. You can also recognize it by the surrounding area being devoid of color.
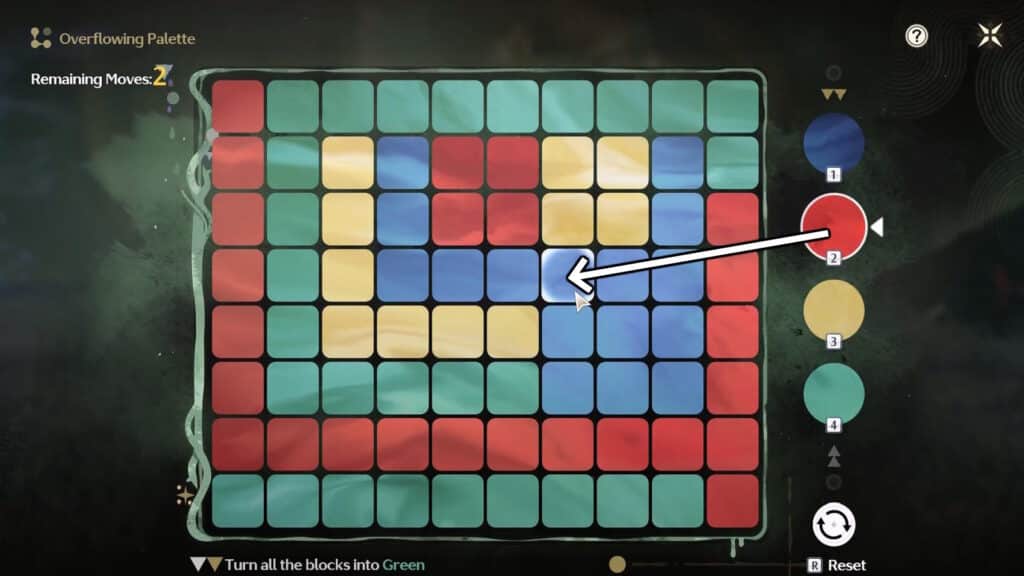
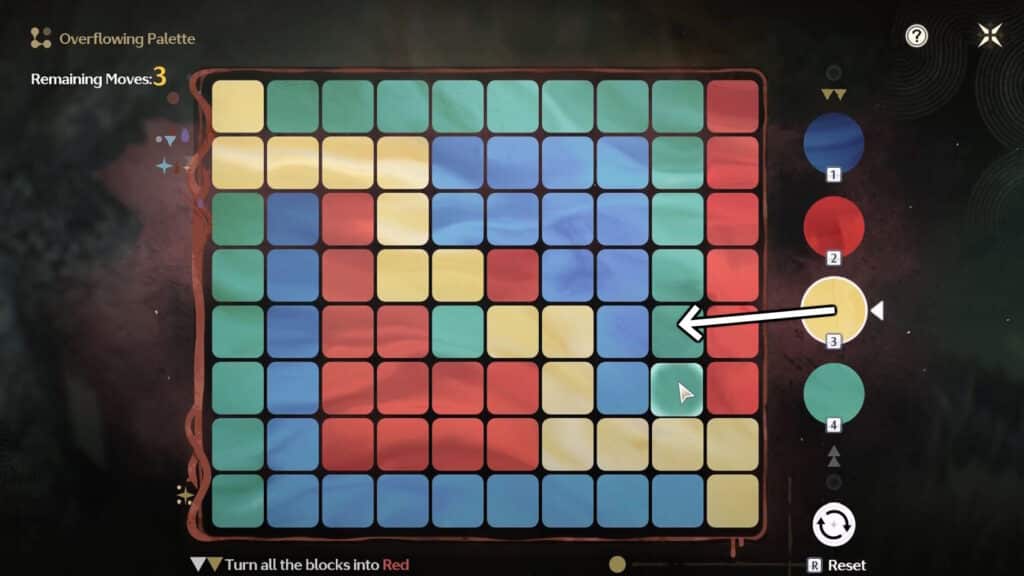
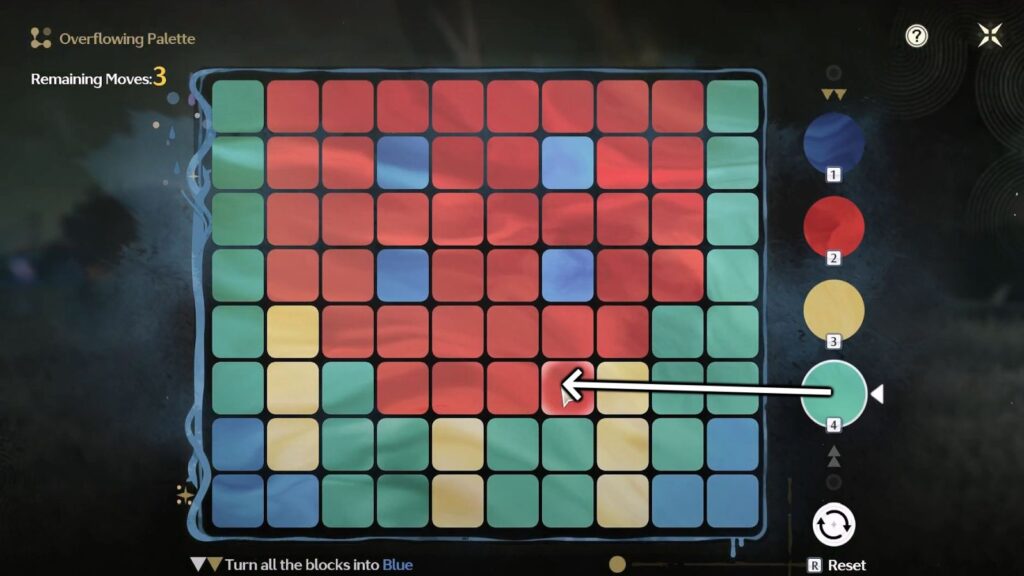
To solve this puzzle, you need to turn all of the squares green within 3 moves. For your first move, turn the blue squares in the middle red.
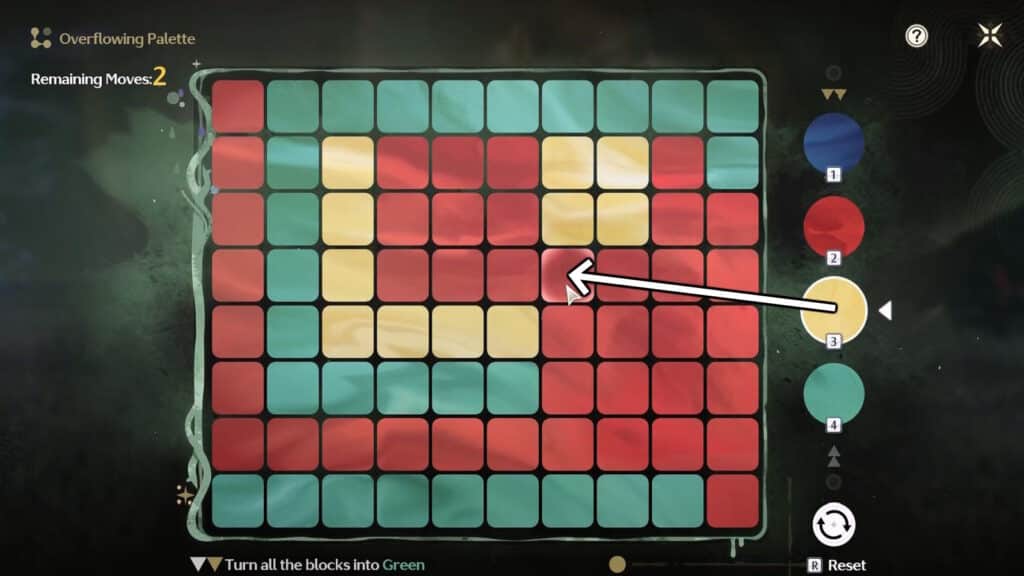
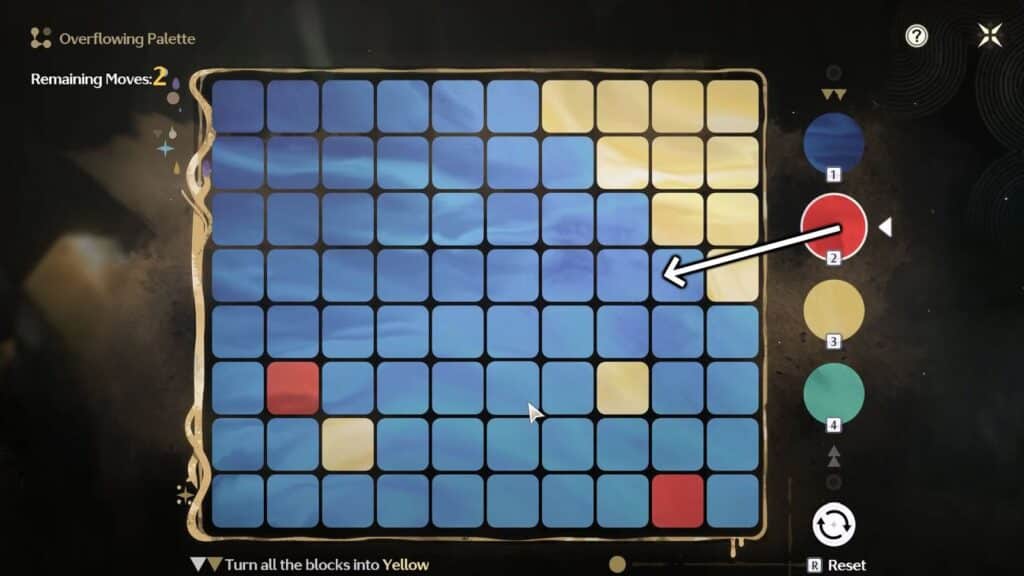
Then, turn all of the red squares yellow. This will connect the disjointed yellow sections the puzzle has from the start.

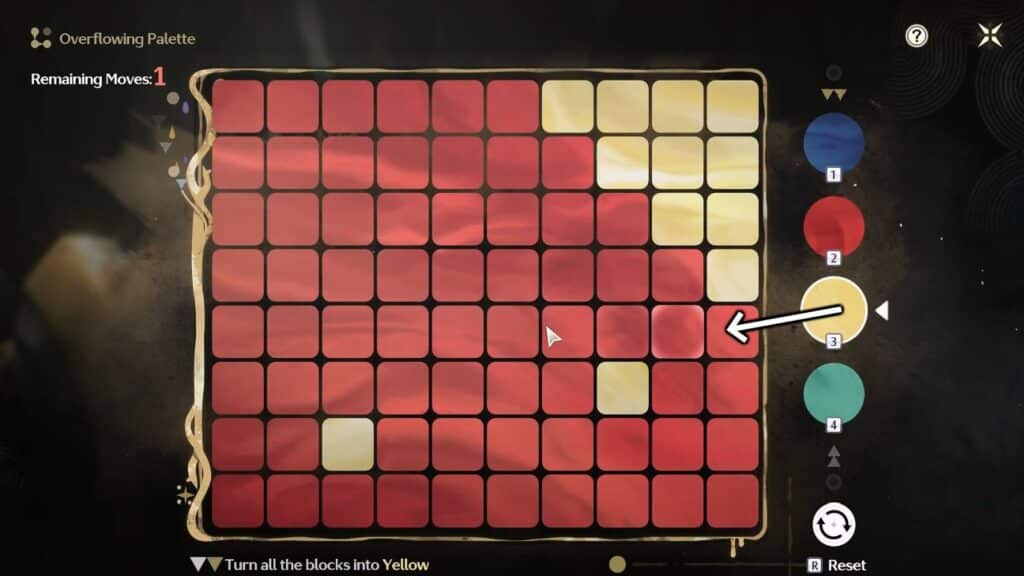
Lastly, finish up by painting all of the yellow squares green. Puzzle solved! Port of Riccioli becomes colorful again! It’s a pretty nice view, isn’t it?
Drake’s Island
Resonance Beacon
The second and last of the Resonance Beacons in the Riccioli Islands. This one is in a sort of cliff islet in the northeastern part of Drake’s Island. It’s pretty easy to spot since it’s out in the open, like most other Resonance Beacons.
Treasure Spots
Northern Beach
Our first Treasure Spot location is on the northernmost part of Drake’s Island. This Treasure Spot has a total of 5 Supply Chests for you to find.
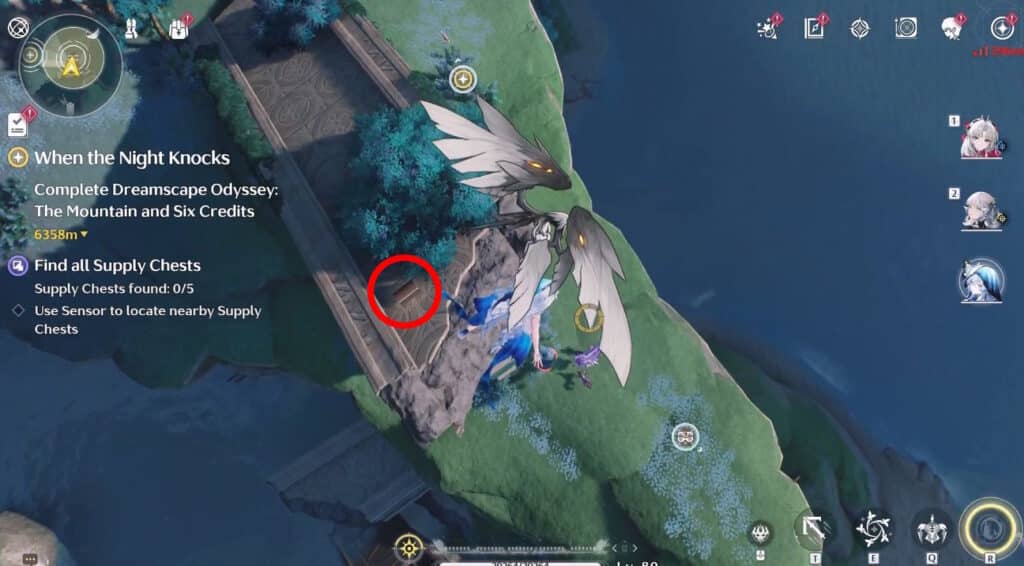
We’ll start from the top and make our way to the bottom for these chests. As such, our first Supply Chest is on the bridge-like ruins at the top of the island. It’s near the eastern edge of the ruins there.
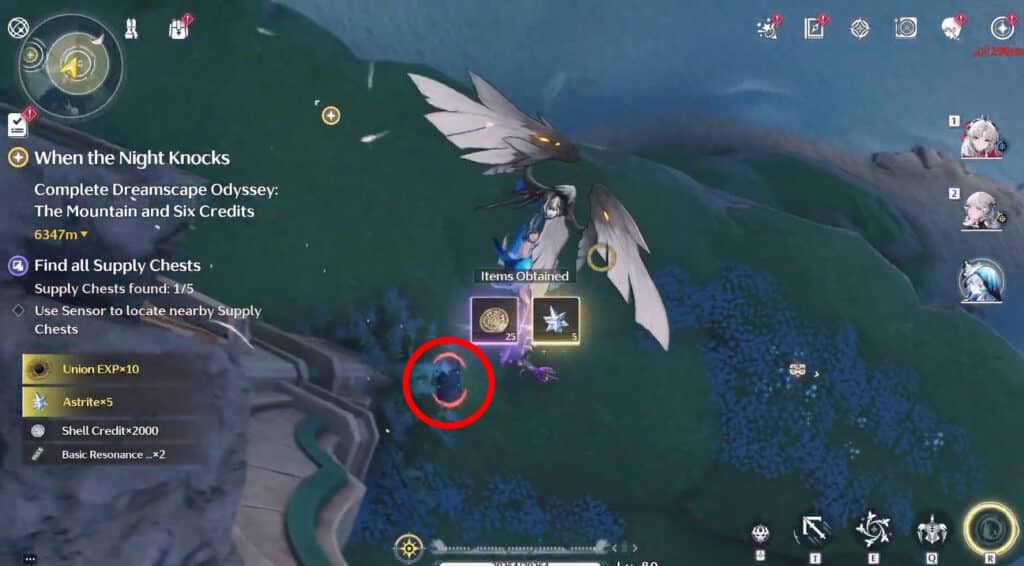
As soon as you collect the previous Supply Chest, jump off the eastern part of the ruins and drop down. You should spot a chest protected by a Chop Chop. Take down the Chop Chop and you’ll be able to open the chest.
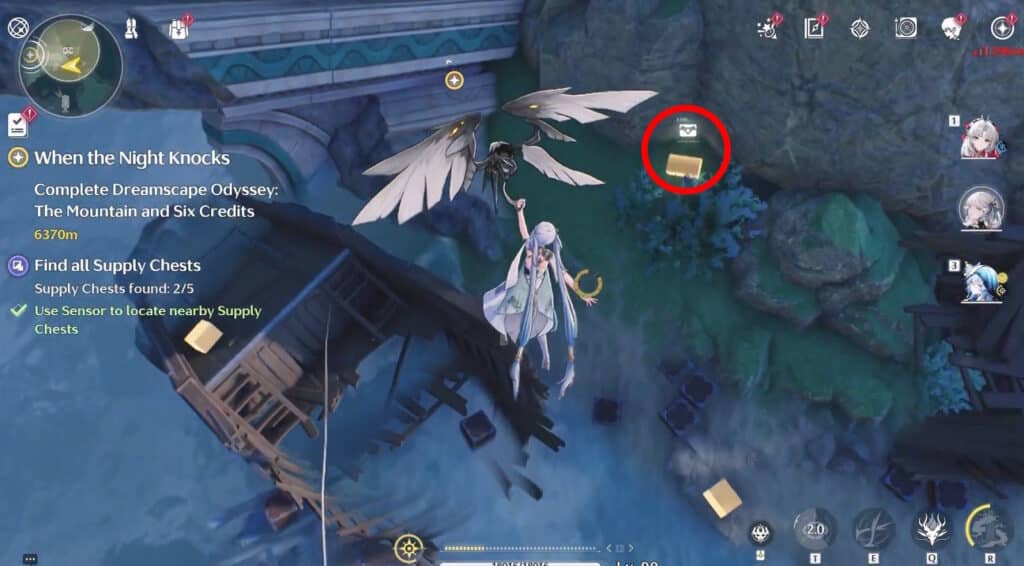
Next up, go south from the second Supply Chest and jump off the cliff onto the large shipwreck below. Glide down and face north to find the third chest next to the cliff you jumped from.
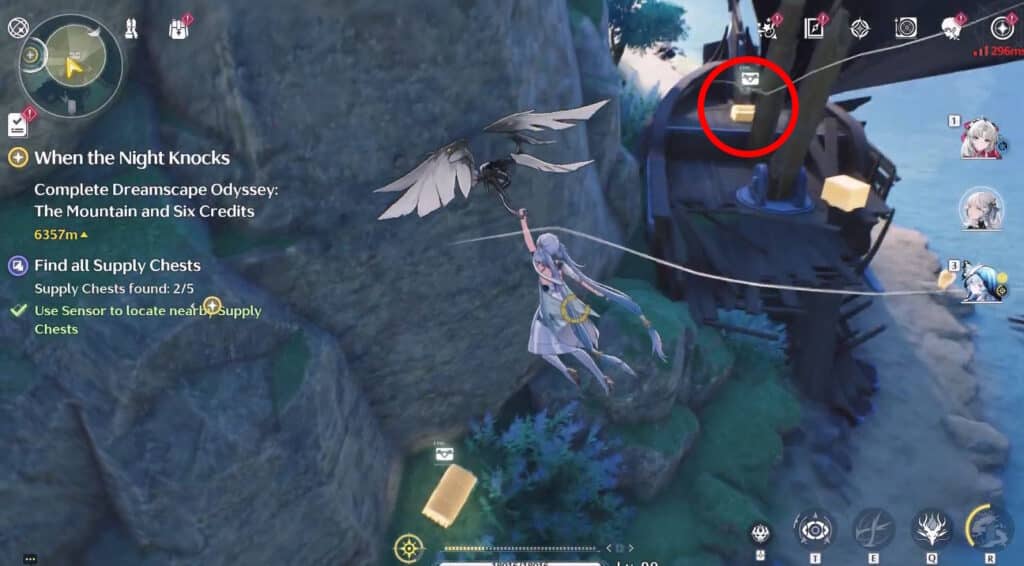
After that, go east and get atop the bow of the wrecked ship. The chest is on the ship’s deck, next to the bowsprit.
For the last Supply Chest here, go northwest from the wrecked ship’s bow. You should spot the chest right below the cliff, facing the beach. That’s all of the Supply Chest locations in this Drake’s Island Treasure Spot in Wuthering Waves 2.1!
Central Ruins
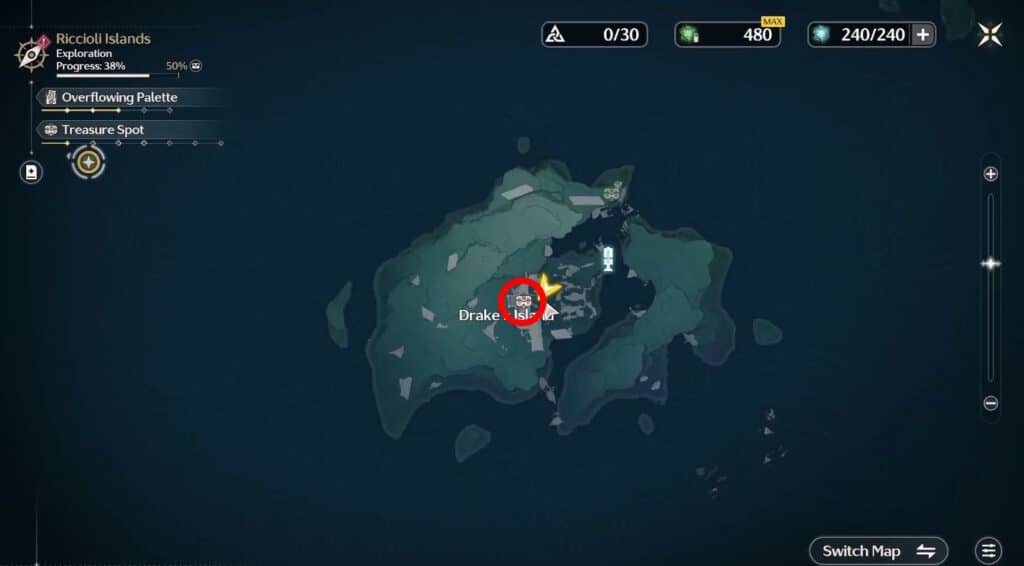
The second and last Treasure Spot on Drake’s Island we’ll go to is the one smack dab in the center of the island. It’s right by the ruins in the middle, directly above the “Island” text on your map. Just like before, this Treasure Spot also has 5 Supply Chests for you to find.
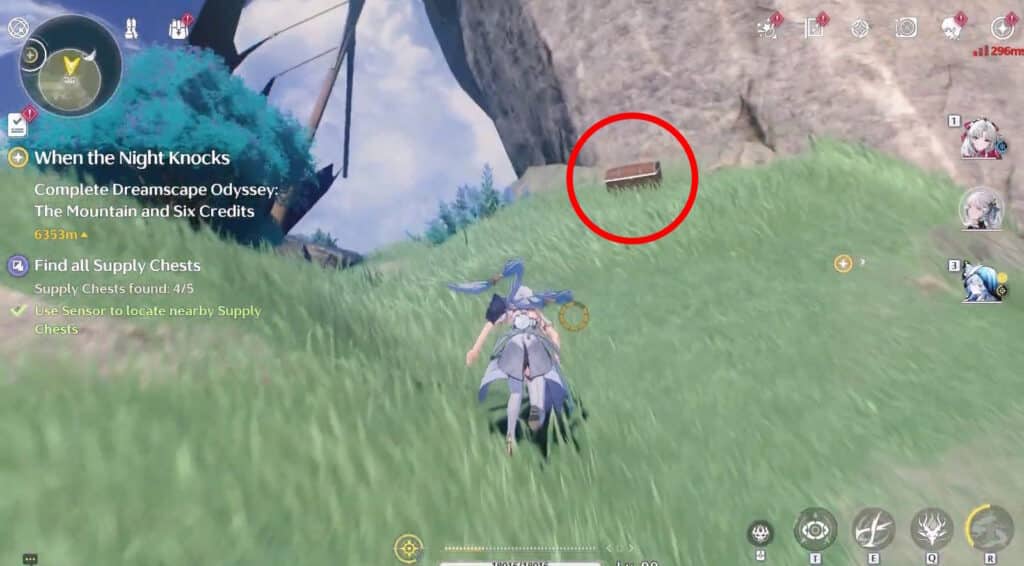
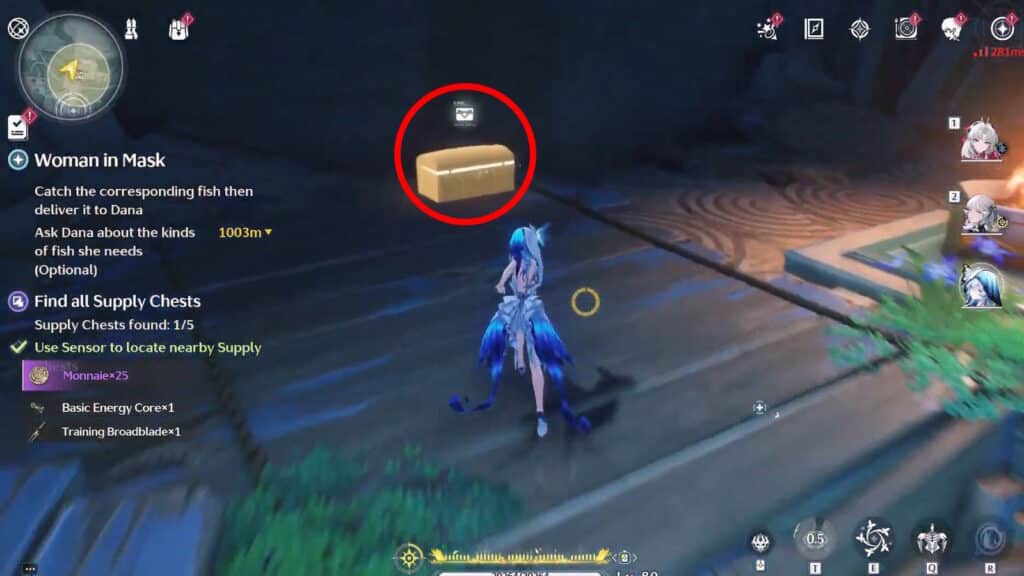
For the first Supply Chest, approach the central part of the Treasure Spot from the east. You should spot the chest in the dark corner next to the main section of the ruins.
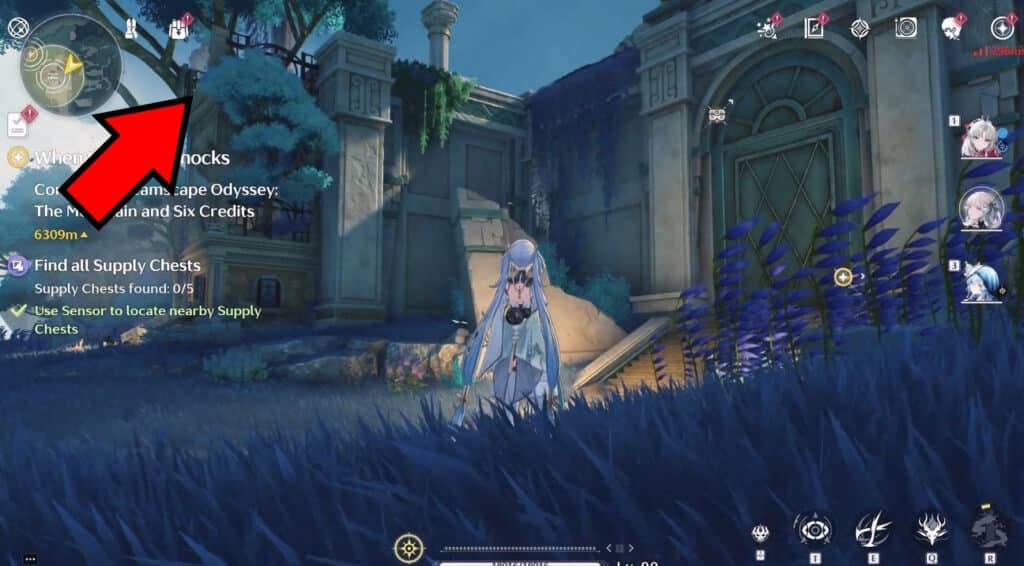
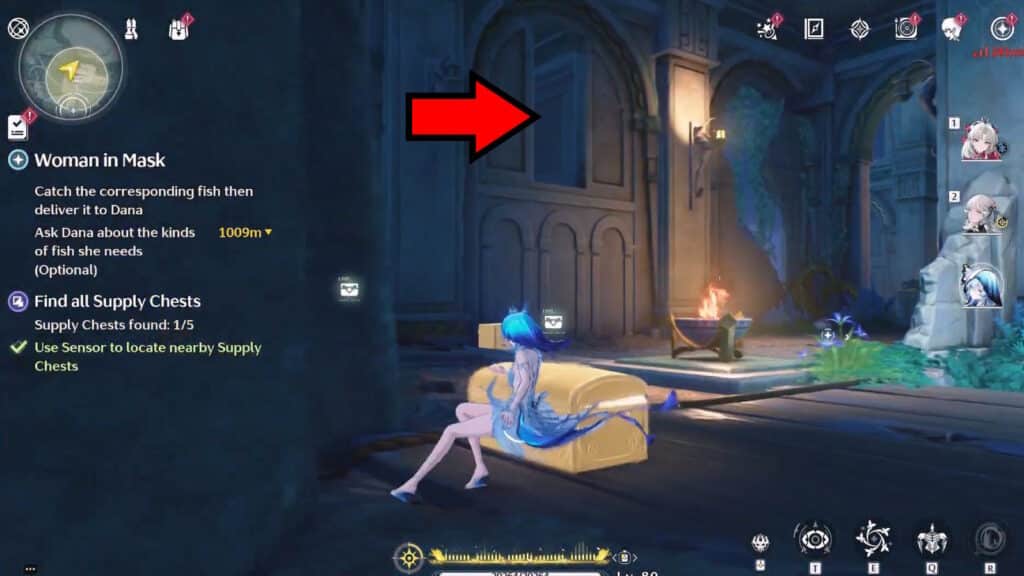
Next up, climb the wall directly south of the first Supply Chest to get to the top of the ruins. Then turn east to get onto what seems to be a broken-down tower. We’ve marked the tower for you in the image above.
The Basic Supply Chest is next to the western wall at the top of the tower.

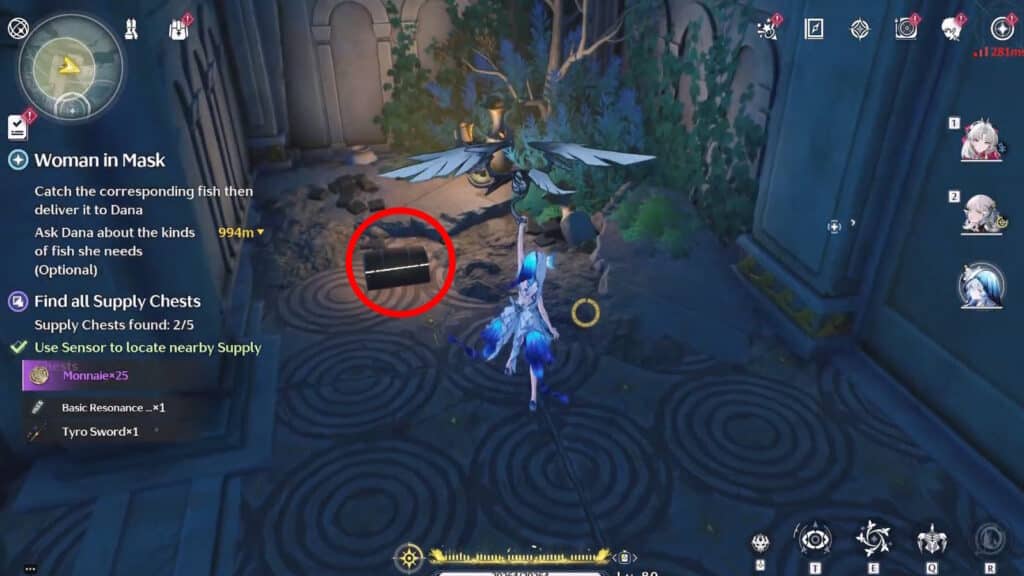
For the next one, climb the wall right behind the previous supply chest. Go directly west to find the third Supply Chest next to a large bush.
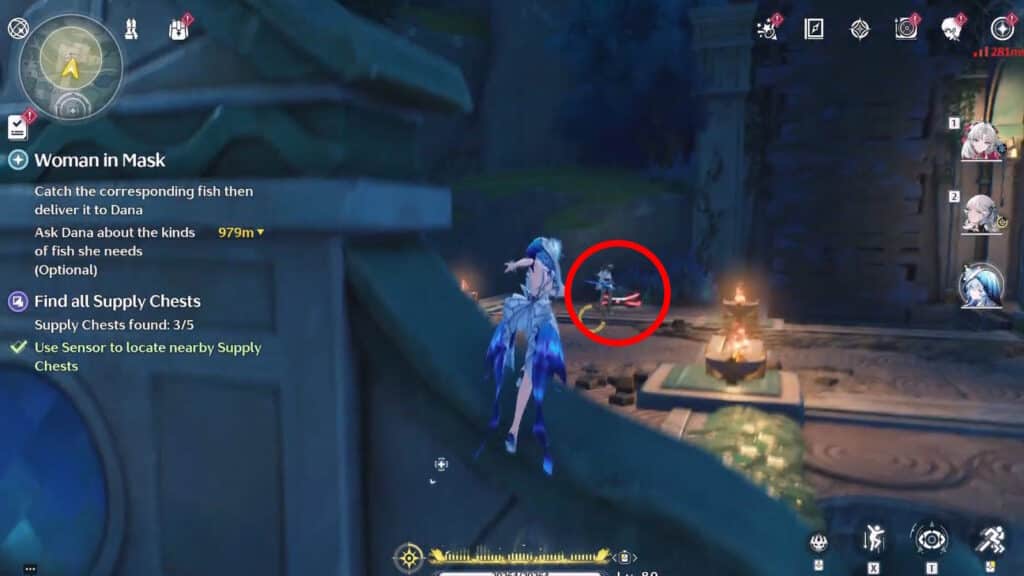
Moving on, climb all the way up the ruins in the center of the Treasure Spot area. The fourth Supply Chest is atop the southwestern pillar around the winged horse statue.
Lastly, face northeast from the winged horse statue and look down. You should instantly spot the final Supply Chest atop a beam in the ruins. Just glide down to it and open it up to complete this Treasure Spot!
Overflowing Palette

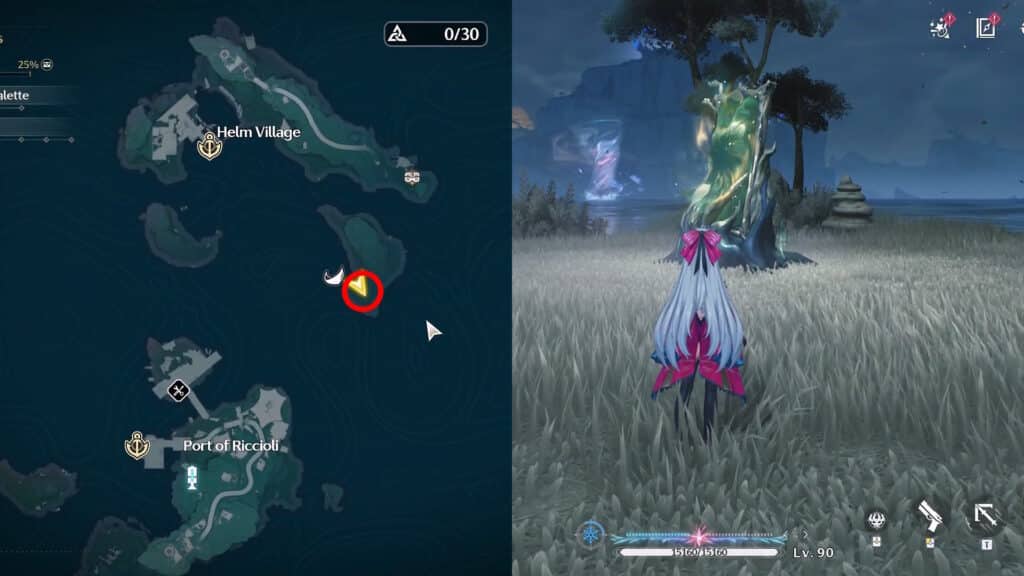
The Overflowing Palette on Drake’s Island is at the top of the hill on the northern part of the island. You should see the mirror-like canvas right under a large crooked tree. Just approach it and interact with it to start the puzzle, as usual.
For this puzzle, you need to turn all of the squares red within 4 moves. For the first move, turn the L-shaped set of green squares yellow.
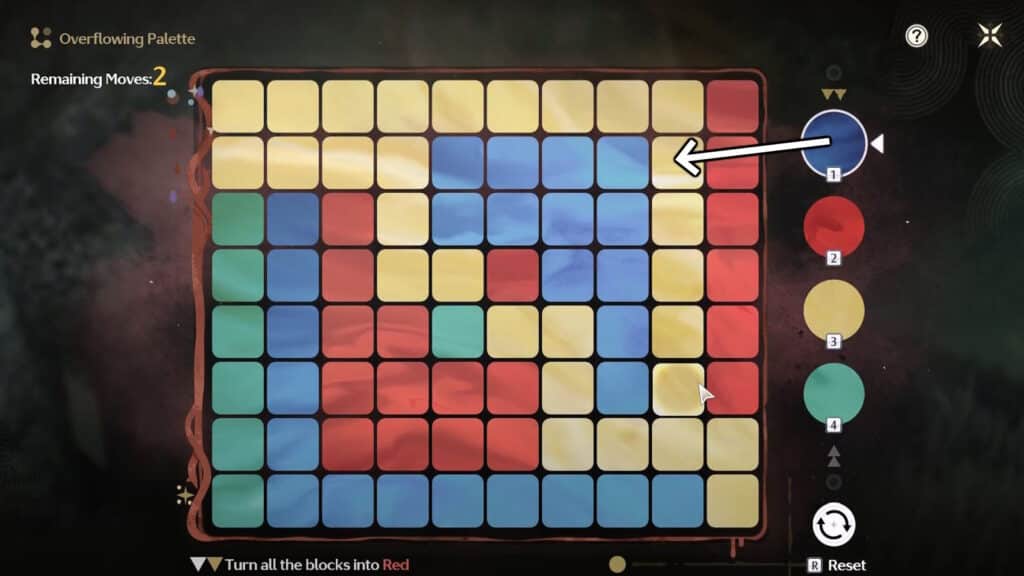
Then, use blue to paint all of the yellow squares. This will connect the separated sets of blue squares on the painting.
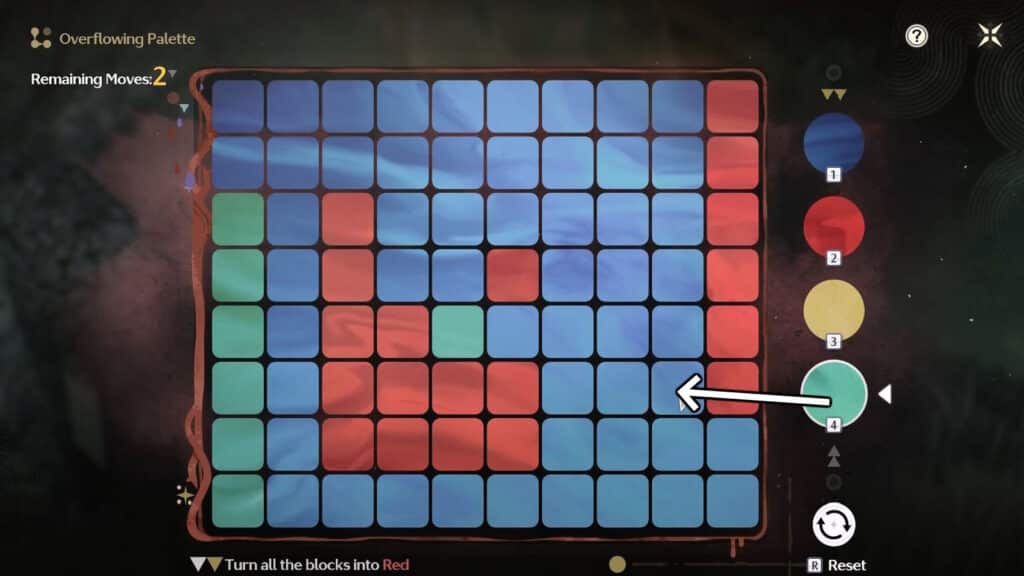
Next up, paint all of the blue squares green.
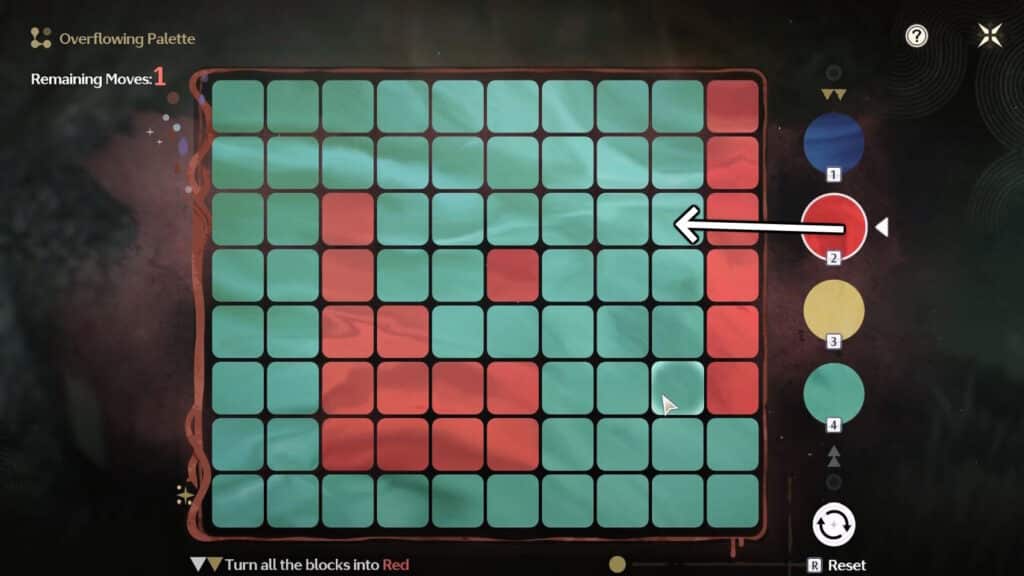
All that’s left for you to finish things up here is to paint all of the green squares red. One more painting is fixed! Now just watch as the color comes back to this hill atop Drake’s Island. Even the trees will become full of life despite being all withered before…
Musicfly
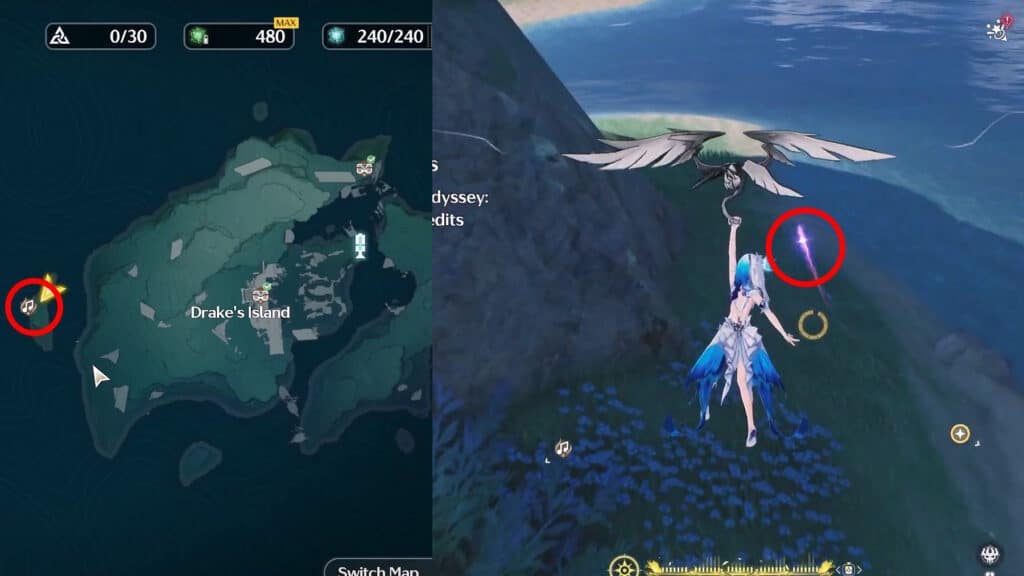
This Musicfly is a bit of a loner. You can find it in the tiny islet west of the main Drake’s Island itself. It’s running laps around the western shore of the islet, so it’s pretty easy to catch.
Just in case you don’t know, Musicflies are pretty simple. They appear as a purple glow when you get near their marked spot and then fly around trying to escape you. Chase them down and smack them to get a Melody Box. You can then give these Music Boxes to Aria Mummer in Rinascita to unlock specific songs from this game’s soundtrack.
Helm Village
Treasure Spot
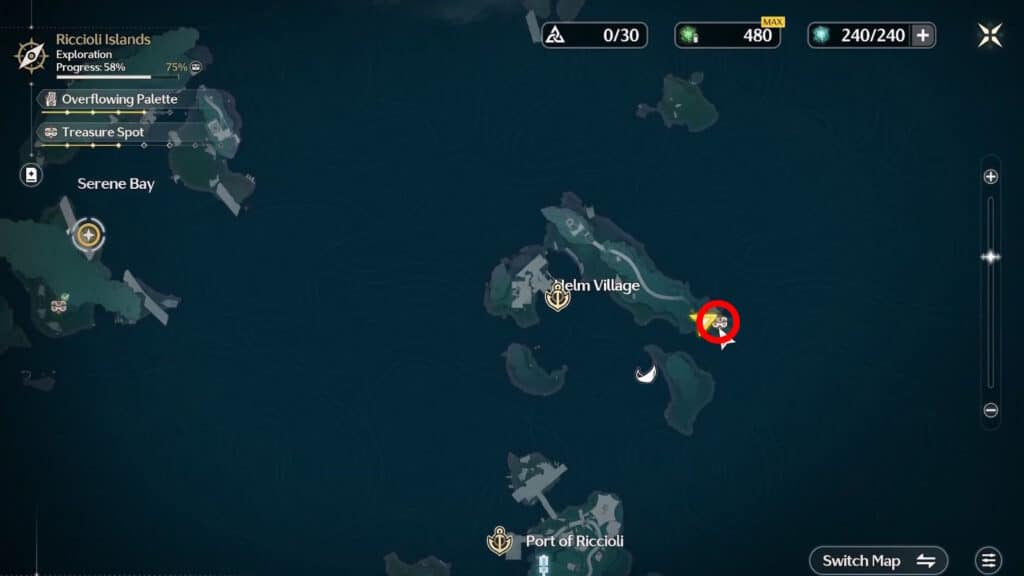
There’s only 1 Treasure Spot in Helm Village. You can find it on the easternmost edge of the island. Like all of the other Treasure Spots in this sub-region, it has 5 Supply Chests in total.
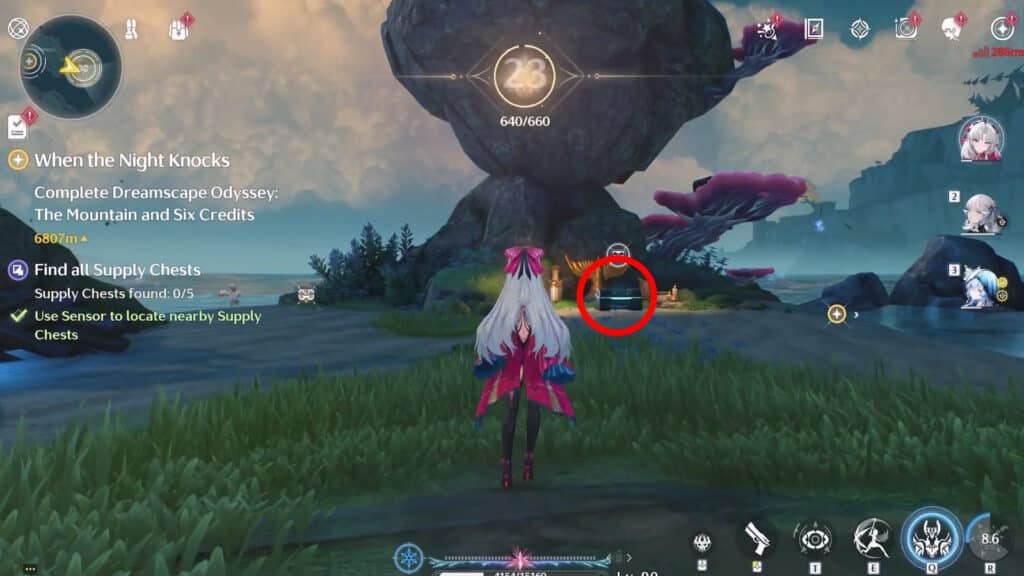
For our first Supply Chest, go to the very center of the Treasure Spot search area. You should instantly notice a massive balancing rock by the shore. The chest is right under the rock. Let’s hope that rock keeps balancing itself while you grab that loot!
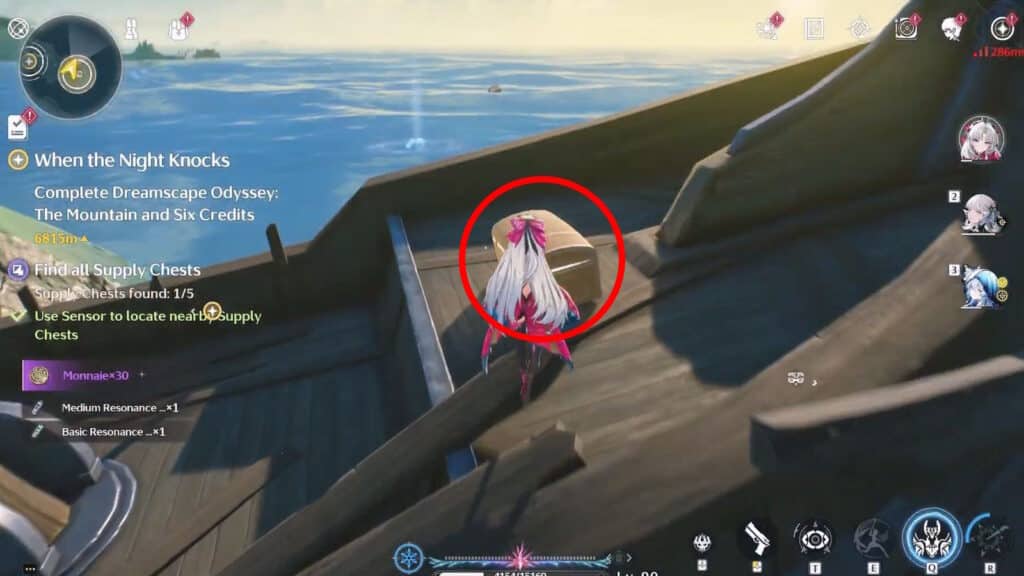
Right after you open the first chest, go northwest and you should spot a wrecked ship’s bow. Get aboard the shipwreck’s deck to find the second Supply Chest.
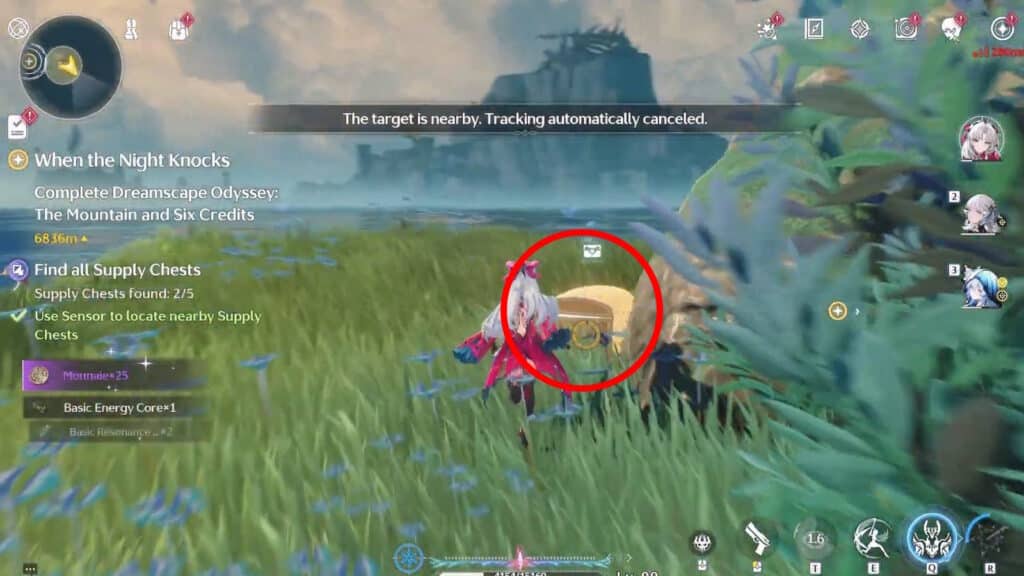
For the third Supply Chest, go back to the balancing rock from before. This time, check the eastern side of the rock. You’ll find another chest under the rock, just like the one from before.
Next up, go to the southern side of the balancing rock. Climb the atop the large coral there. The fourth Supply Chest is atop the tallest collar, in the rock’s shadow.
Lastly, for the fifth and final Supply Chest, you’ll need to climb up the balancing rock itself. The Supply Chest sits atop the balancing rock. Hopefully, the loot inside isn’t helping keep the rock’s balance…
Overflowing Palette
You can find this Overflowing Palette puzzle in the islet directly southeast of the main Helm Village island. The canvas itself is out in the middle of the plains by the shore.
This one requires you to turn all of the squares blue in 3 moves or less. For the first move, turn the large mass of red squares green.
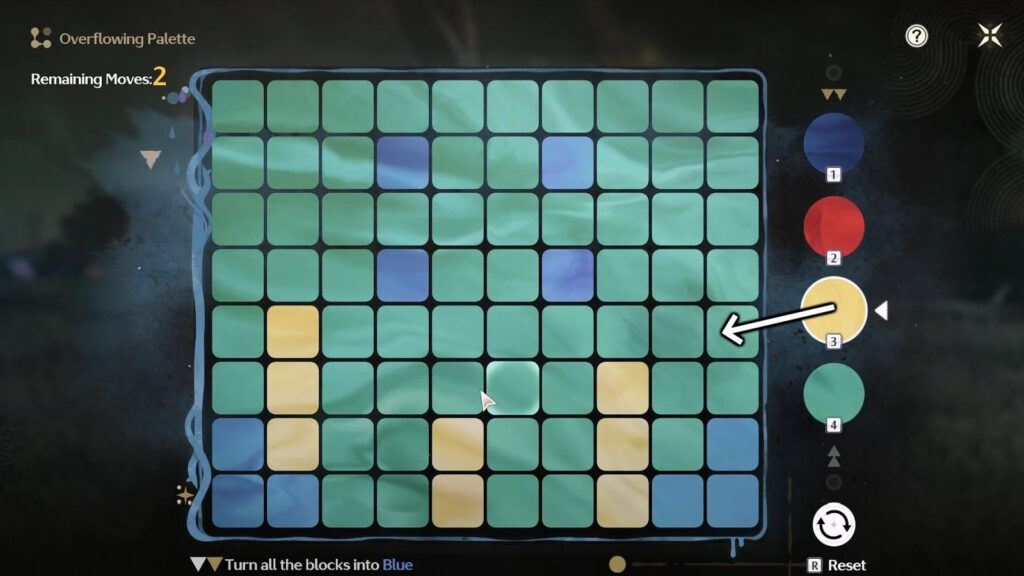
Then, turn those fresh green blocks yellow instead. This will connect all the small separated sets of yellow squares in the canvas.
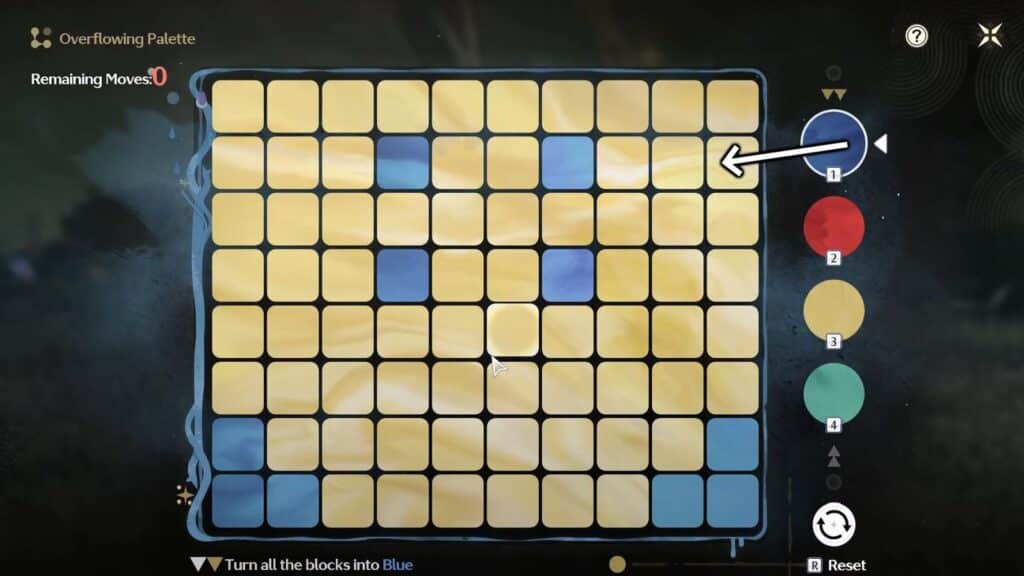
Lastly, paint all of the yellow squares blue. Puzzle completed, this small islet by Helm Village blooms again!
Musicfly
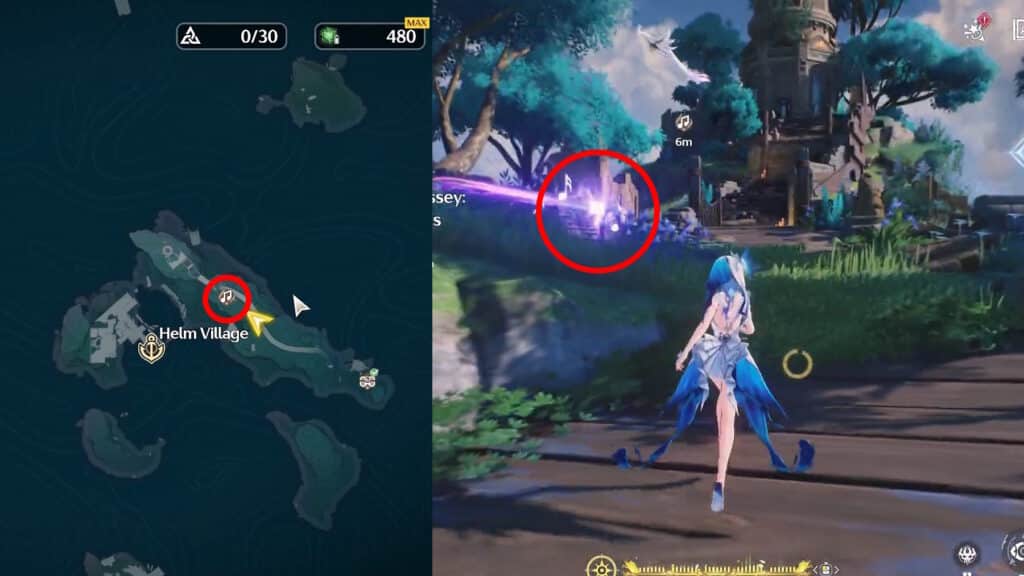
The Musicfly for Helm Village is right in the middle of the island, directly southeast of the lighthouse. This one runs in a pretty basic 8-shaped pattern, so it’s easy to hit!
Serene Bay
Treasure Spots
Southern Shipwreck
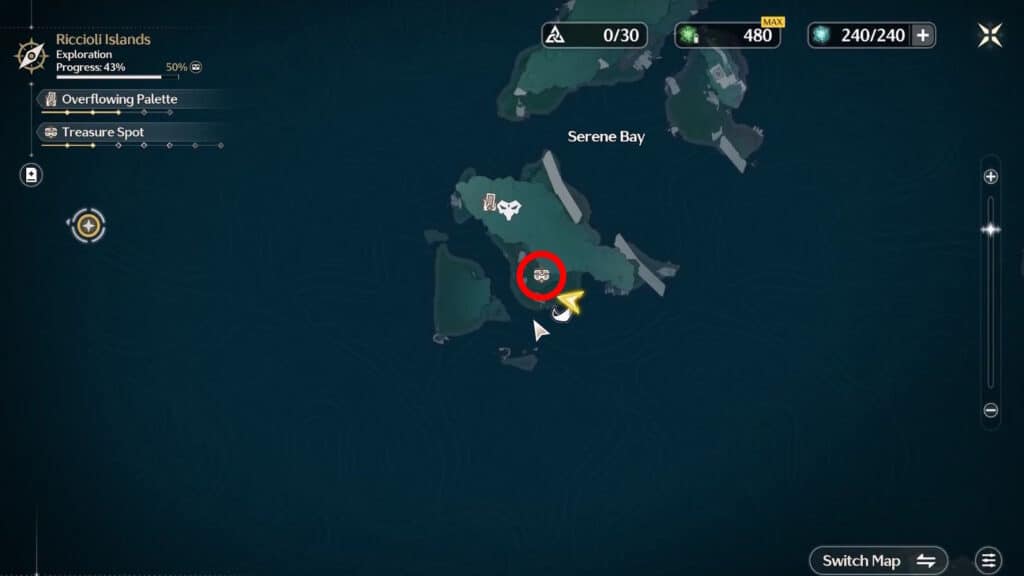
The first Treasure Spot we’ll go to is the one by the southern shore, near the large shipwreck. This one has a total of 5 Supply Chests for you to grab.
Our first Supply Chest is on the southeastern edge of the Treasure Spot area. It’s atop a rock facing the shore and next to a shipwreck. Pretty easy one to spot, really!
After you grab the first Supply Chest, go directly west to the nearby wreck. The Supply Chest is on the western side of the wrecked bow. It’s somewhat under the bowsprit and the nearby rock.
The next chest is on the westernmost edge of the Treasure Spot area coverage. Just go a bit north from the second Supply Chest to find the main deck of the shipwreck. Hop on board to find the chest.
Continue further north after you open the previous Supply Chest and you’ll reach the northwestern edge of the Treasure Spot. You’ll find the shipwreck’s stern there. Get onto the good ol’ poop deck to find the chest there.
Lastly, go southeast from the shipwreck’s stern and climb up the small cliff.
Face north after climbing the cliff to find the fifth and final Supply Chest under a taller cliff. That’s all 5 chest locations within this Treasure Spot in Serene Bay as of Wuthering Waves 2.1!
Northern Ruins
Our second Treasure Spot is in the ruins in the northern section of the Serene Bay. Just like the previous spot, this one also has 5 Supply Chests to grab.
Our first Supply Chest here is near the center of the Treasure Spot. It sits atop a section of the ruins protruding from a cliff. The cliff itself is just a little bit west of the center of the Treasure Spot, so it’s easy to find.
After you grab the first chest, jump off the ruins and glide to the east. You should notice the second Supply Chest atop some pink coral.
Next, look west and you should notice a wrecked ship’s stern. The supply chest is on the ground right next to the shipwreck. There sure are a lot of shipwrecks in the Riccioli Islands, geez!
Climb the large rock directly behind the previous Supply Chest. The fourth Supply Chest is atop the rock, overlooking the nearby shipwreck.
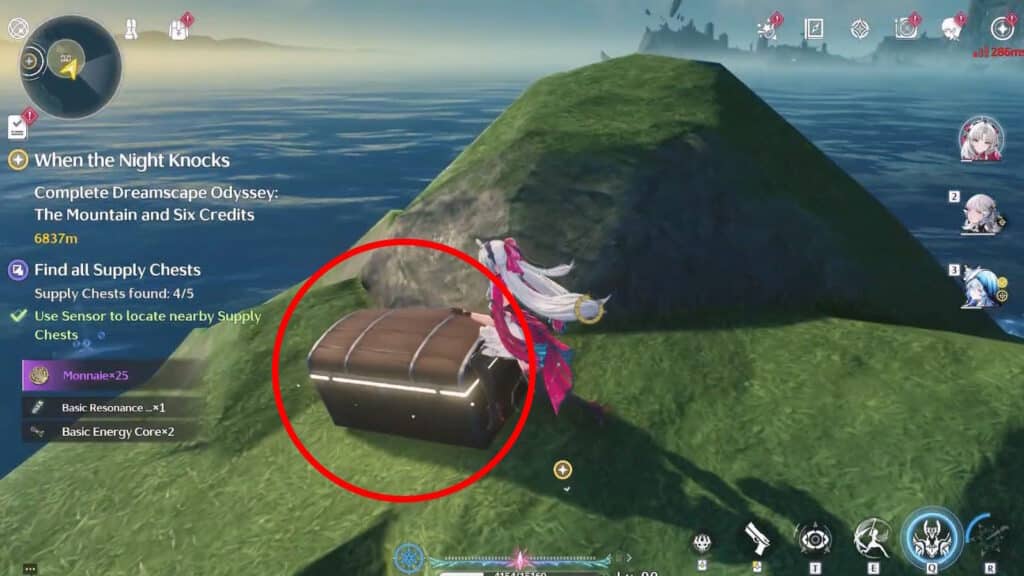
As soon as you grab the fourth Supply Chest, turn north. Get off the large rock and go to the large bushes by the shore to find the fifth and final Supply Chest. It’s somewhat hidden, but it’s easy to spot if you use the Sensor utility. Nonetheless, that’s the last Supply Chest in Serene Bay!
Overflowing Palette
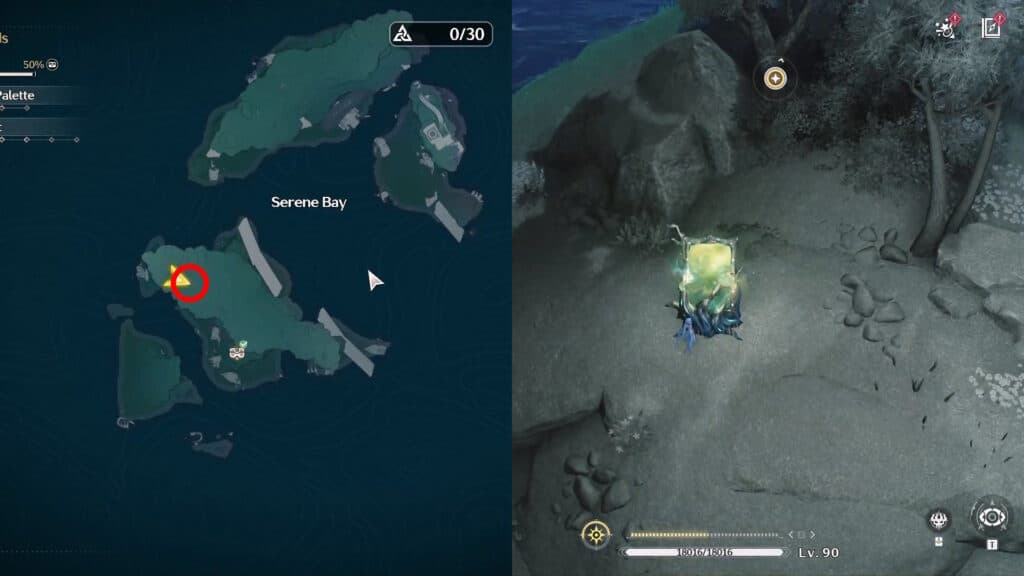
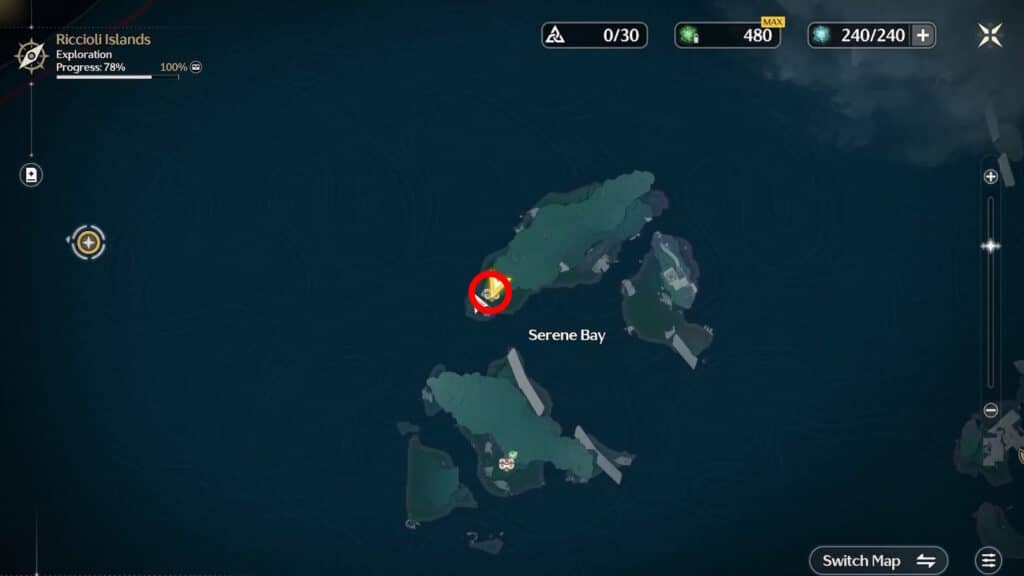
Next up is the Serene Bay Overflowing Palette puzzle. This one sits atop the hill on the westernmost part of the southern island at the bay. That’s kind of a mouthful, but the image above should make it easy to spot!
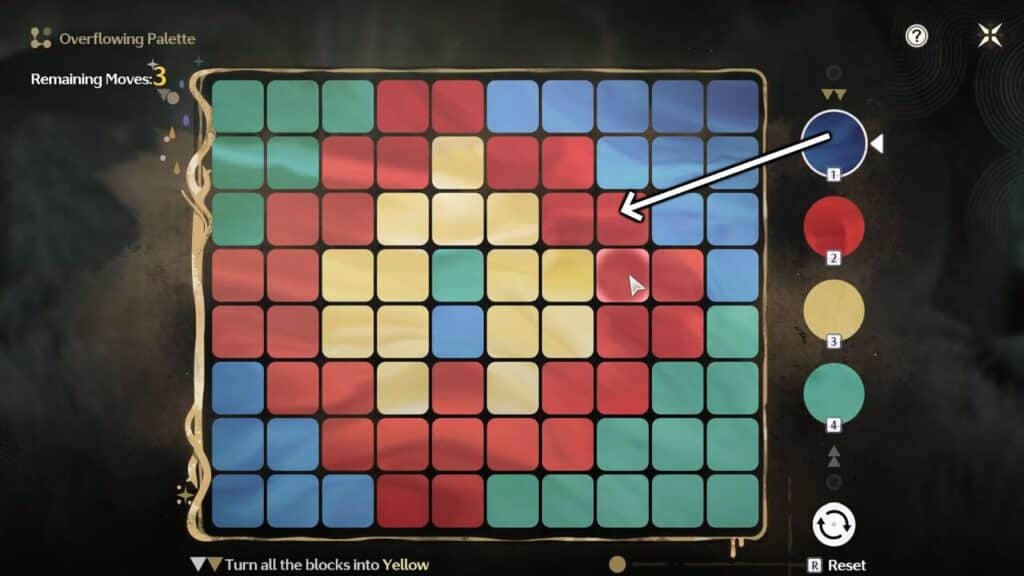
Your task here is to paint the entire canvas yellow within 3 moves. For the first move, paint the red squares blue.
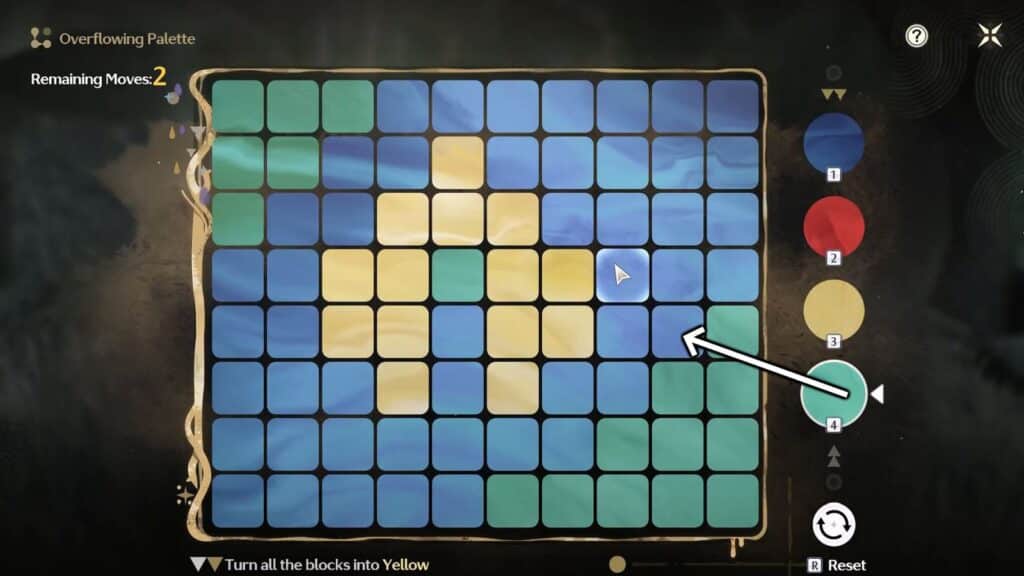
Then, paint those same blue squares green. All of the sets of green squares will be joined, now.
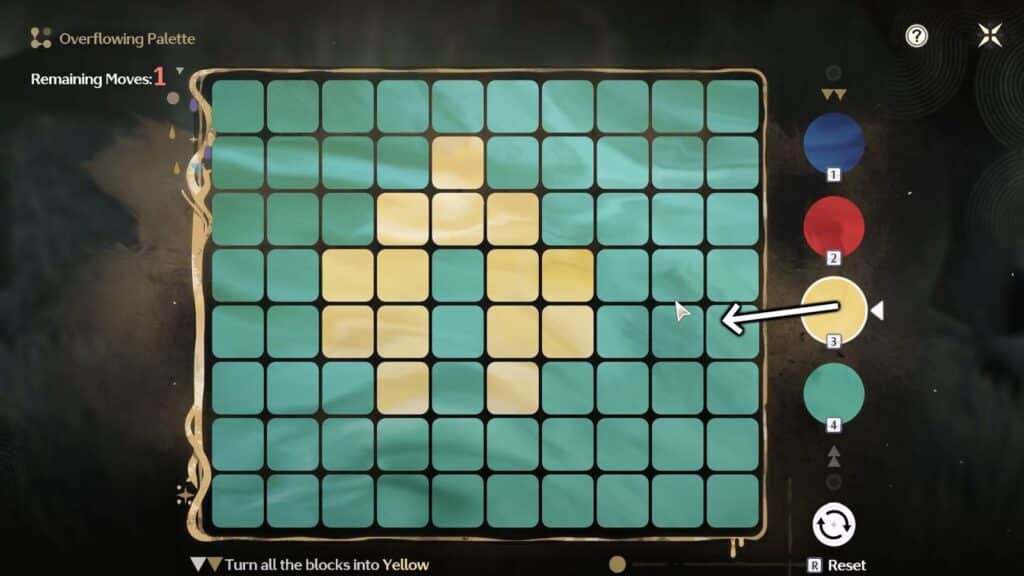
Lastly, use yellow to paint all of the green squares. The entire canvas is now green, and the green will also return to the nearby flora! It’s definitely a much nicer view now.
Musicfly
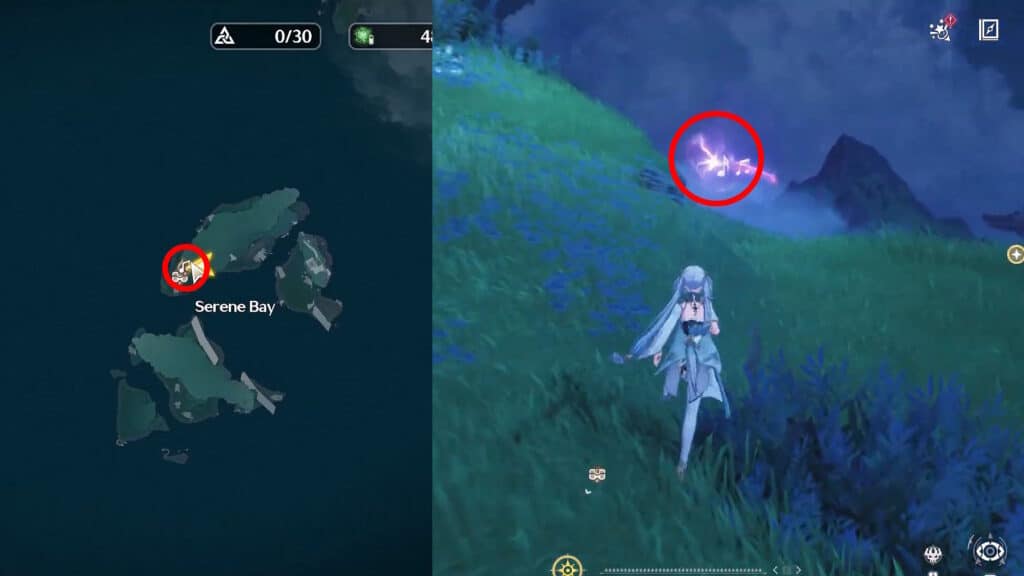
Time to hunt down Serene Bay’s Musicfly! You can find it music-flying on the southwestern corner of the northern island. It’s right where the Northern Ruins Treasure Spot from before is. This one is tricky, as it likes to fly around erratically around the nearby rocks. We recommend being patient when hunting it down.
Reyes Ruins
Treasure Spot
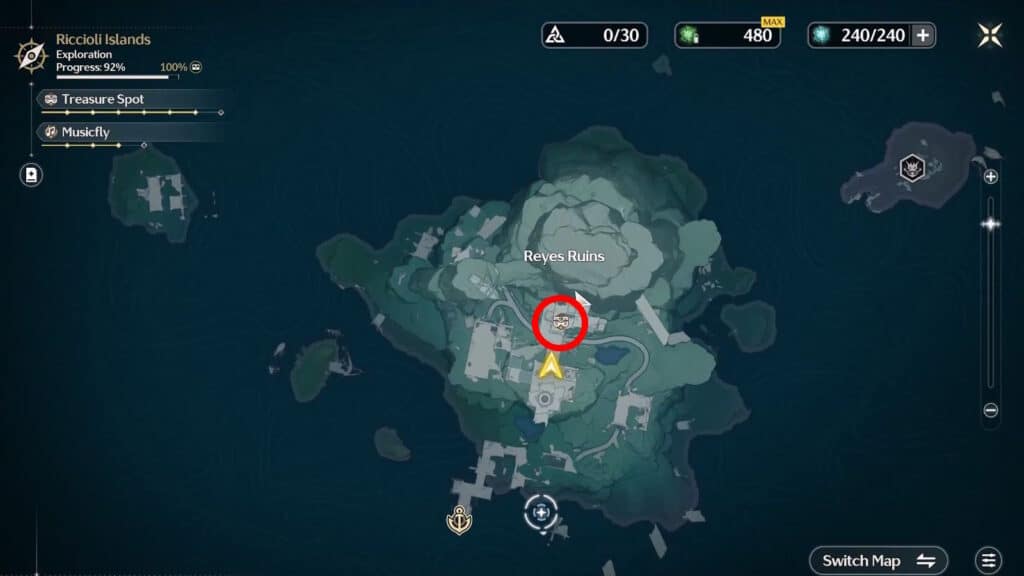
The final Treasure Spot you need to get the 100% Exploration Progress for the Riccioli Islands region in Wuthering Waves. That’s if you’ve been following our guide in order, at least! You can find this Treasure Spot smack dab in the middle of the Reyes Ruins island. Like all the ones before it, it has 5 Supply Chests.
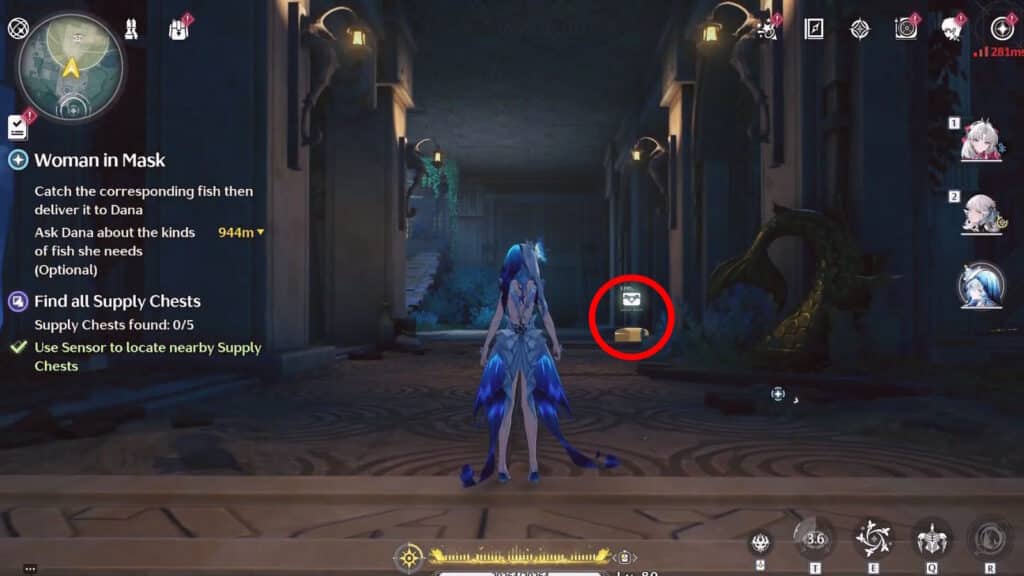
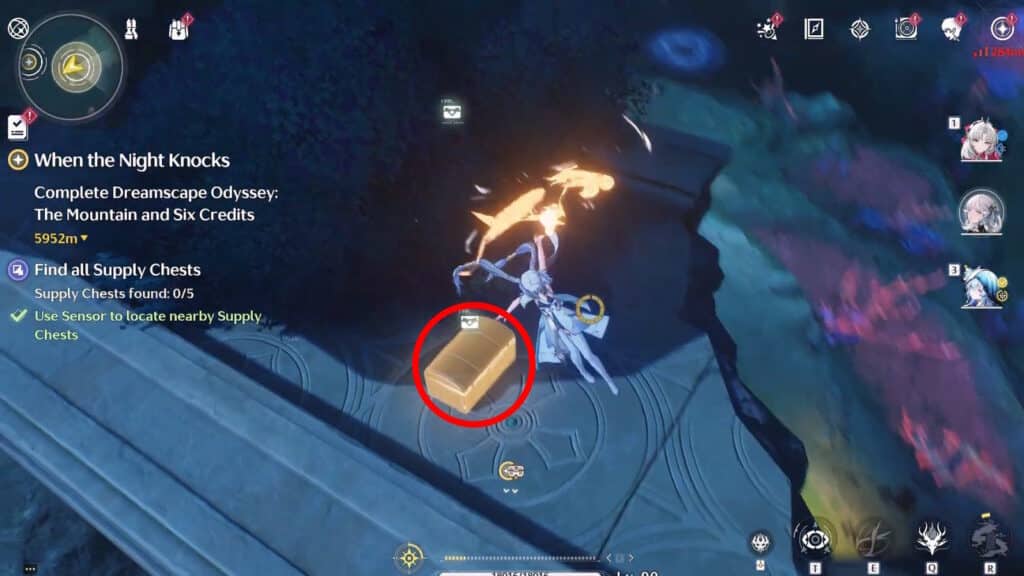
Our first Supply Chest is inside the hallway in the very middle of the ruins. It’s close to the southern edge of the Treasure Spot search area. The chest sits somewhere in the middle of the hallway, under a lantern.
As soon as you open the first Supply Chest, turn northwest. You should notice a slope made out of wooden planks leading to the upper level. Climb that.
The second Supply Chest will be directly in front of you as you climb the wooden wall.
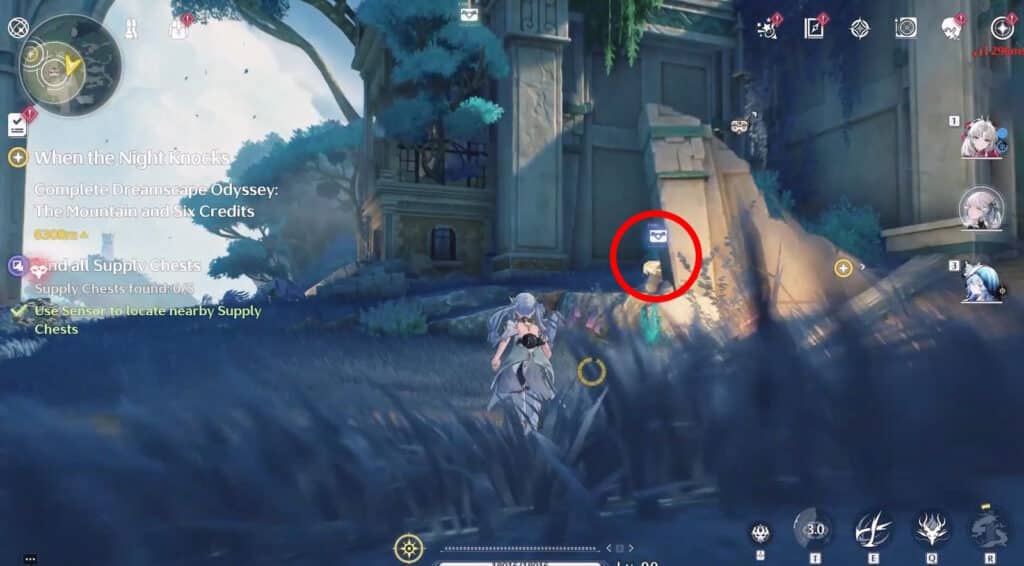
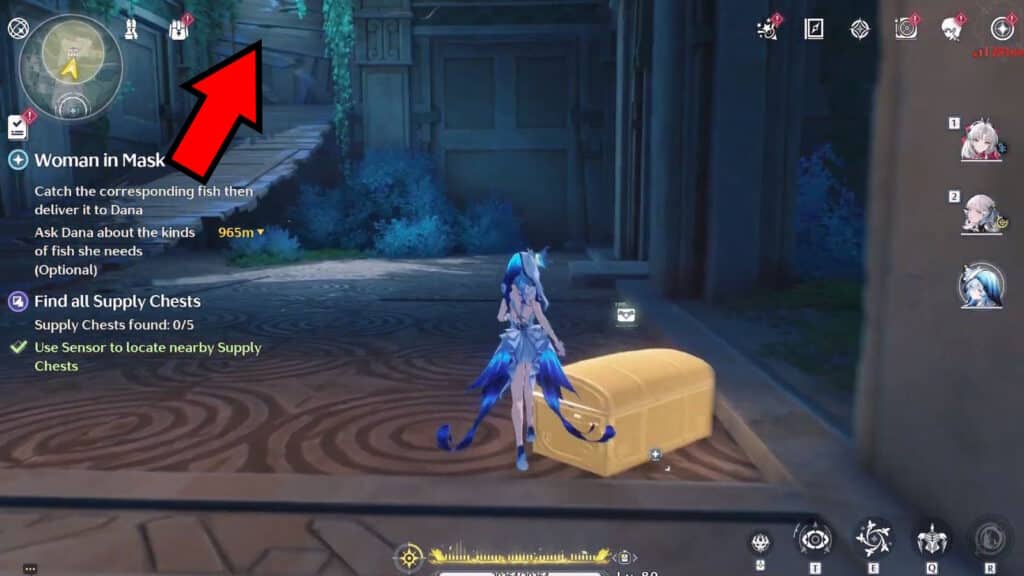
After you open the second Supply Chest, look east. You should a part of the ruins with a gap, marked in the image above. Go through the gap to reach the adjacent room.
You should instantly spot the third Supply Chest next to some plants after going through the gap.
Next up, get outside of the ruins. Climb the exterior of the ruins and you should reach a balcony smack dab in the middle of the Treasure Spot area. You’ll find the fourth Supply Chest there, protected by some Tacet Discords. Defeat them to be able to open the chest!
Once you open the previous chest, go east. You should notice another balcony on a higher floor. Climb up to it to find the fifth and final Supply Chest in this Treasure Spot!
Overflowing Palette

Our last Overflowing Palette puzzle. This one is east of the road traveling the middle of the Reyes Ruins island. It’s on a hill facing the shore to the east.
This time we have to turn to every square yellow in 3 turns. Let’s kick things off by painting all of the green squares blue.
Follow up by painting the blue squares red, next. This will connect the two separated red squares.
Then finish up by painting all of the red squares yellow. One more puzzle solved! Watch as the color and life returns to your surroundings. That’s the last of the Overflowing Palette puzzles in the Riccioli Islands, too…
Musicfly
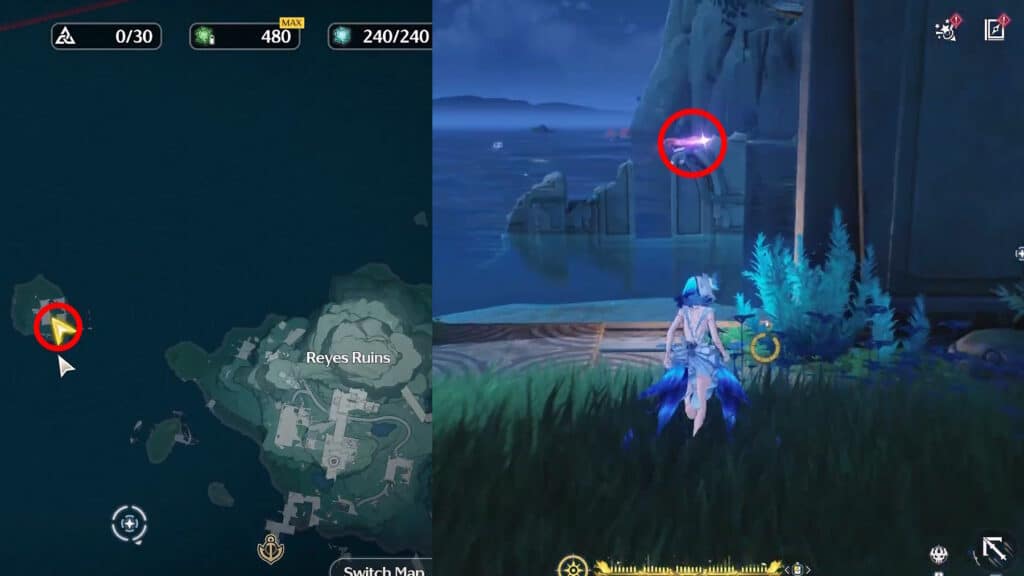
Similar to the Musicfly at Drake’s Island earlier, this one is a bit of a loner. To find it, go to the islet west of the main Reyes Ruins island itself. You’ll find it roaming the ruins on the southeastern corner of the islet. Its movements can be pretty erratic around the ruins’ pillars, don’t let it trip you up.
Phew, that’s the end of our guide! If you’ve been tagging along with us, you should now have 100% Exploration Progress for the entire Riccioli Islands region in Wuthering Waves 2.1! Congratulations!
This isn’t all there is to do out in the Riccioli Islands. There are also quests and the “Old Man and the Whale” fishing event. Speaking of quests, though, check out our guide on how to complete “The Sailor’s Treasure.”


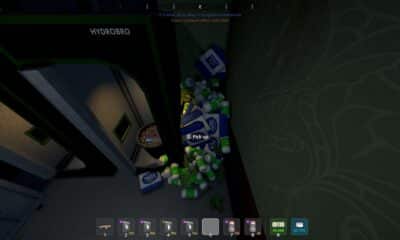

How To Get Rid Of Items In Schedule 1
Vanish unwanted items straight into the void with one simple trick!
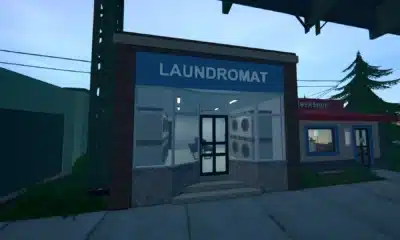

Should You Buy The Laundromat In Schedule 1
Laundering money at a laundromat is a straight-up genius, nobody will ever know!
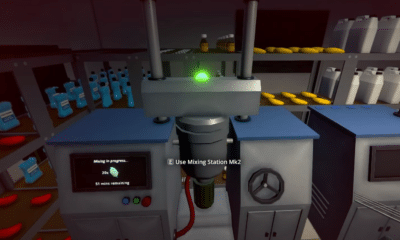

Should You Buy The Mixing Station Mk2 In Schedule 1?
The upgrade sounds quite appealing, but is it worth shelling out the big bucks for?


The First Berserker Khazan: Tips & Tricks Everyone Should Know
These tips and tricks will help make the game a tad less punishing.