2 articles
Deep Rock Galactic: Rogue Core is a standalone co-op roguelite spinoff set in the Deep Rock Galactic universe. Instead of traditional DRG mission structure and permanent loadouts, Rogue Core focuses on randomized runs, escalating enemy pressure, scavenged weapons, and temporary build progression inside dangerous mining facilities deep beneath Hoxxes IV.
If you are coming in from the original game expecting things to work the same way they did there, they do not. The structure here is fundamentally different and those base game instincts will actively work against you in the early runs. In this guide, I cover the classes, how progression works, and the survival tips that will actually make a difference in your first few runs.
Complete Beginner’s Guide
Before you drop into a run you need to choose your Reclaimer class. There are five available at launch and each one plays differently thanks to their unique signature ability and Enhancement deck. No two players in a squad can run the same class so coordinate with your team before locking in.
Five options feels a bit limited right now but the game is still in Early Access so more will likely be added down the line. Here is a breakdown of each class and what they bring to the table.
 How To Fix Deep Rock Galactic: Rogue Core Crashing and Not LaunchingMay 23, 2026
Spotter
The Spotter is built around identifying and exposing targets for the rest of the team. Its main ability is Crit Dart which lets you shoot darts at enemies to expose their weaknesses and increase the crit chance against them. The second active ability is called Ranger’s Pocket which lets you deploy a one time ammo pack to resupply either a teammate or yourself when needed.
The passive ability is called Scanner and it automatically scans enemies within a 35 meter radius every four seconds. Marked enemies show up as blips on the display giving your whole team better awareness of what is coming.
This is one of the more important classes to have in a squad if you are pushing deeper into a run. The Scanner passive alone makes a significant difference to how well your team can manage the escalating enemy pressure at lower floors. Having a Spotter on the team means you are rarely caught off guard by what is coming next.
Guardian
The Guardian’s main ability is Concussive Barrage. It fires out 12 concussive munitions in a cone in front of you. Each blast damages and stuns enemies for 6 seconds and consumes one charge per shot. A well placed activation in a corridor can hold an entire wave long enough to reset your positioning or pick off priority targets before the stun wears off.
The second ability is called Repulsion Field. It creates a small defensive field around you that pushes back all enemies within it for four seconds. It is not a damage ability but in situations where you are getting swarmed and need breathing room it can be a lifesaver.
The third ability is Armor Beacon. Place it down and it creates a defensive zone that rapidly replenishes severely damaged armor for any allies within a 6 meter radius. It is a passive support tool that pays off most in longer drawn out fights where armor takes a consistent beating.
Overall, the Guardian is the class that focuses the most on staying alive. It gives you a way to escape a tough fight and also offers some solid team support. That combination makes it the most forgiving choice for newer players who are still learning the map layouts and enemy patterns.
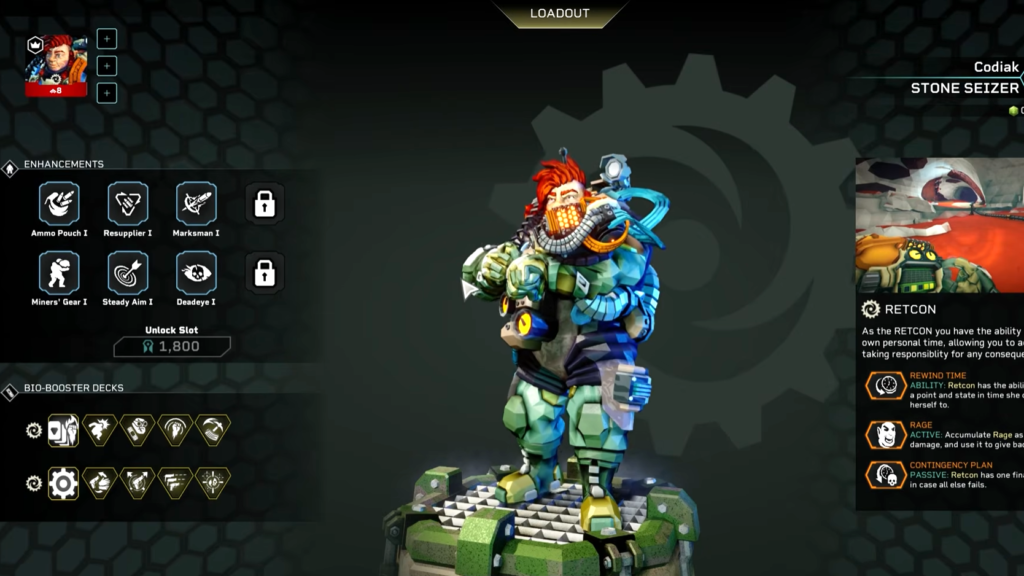
Retcon
Retcon is a fairly unique class in Rogue Core thanks to how her abilities interact with each other and with the flow of combat. Her first ability is called Rewind Time.
When activated, Retcon designates a point in time and space which initiates a 20 second Time Rewind window. The location where it was activated is marked by a distorted silhouette of her so you always know exactly where you will return to.
If you go down during the Time Rewind window you are immediately brought back to that marked location with your Health, Armor and Ammo all restored to the exact values they were at the moment you activated the ability.
This makes it an incredibly powerful safety net that rewards players who plan ahead and activate it before pushing into dangerous situations rather than waiting until things have already gone wrong.
Her second ability is Rage. It builds up passively as you take damage throughout a mission. Once your Rage meter is full, it allows you to trigger a 20 second window where you deal 100% bonus damage. The more punishment you absorb, the harder you hit back which gives Retcon a very satisfying high risk high reward dynamic in combat.
Her passive ability is called Contingency Plan and it is one of the most impactful passives in the game. If the last Dwarf on the team falls and the mission would otherwise fail, Retcon automatically revives with full Armor and Health.
It only triggers once per mission but in the right situation, it is the difference between a failed run and a completed one. Once you have a solid grasp of how all three abilities work together, Retcon becomes a genuinely powerful class that rewards experience and smart play.
Slicer
The Slicer is your primary frontline offensive class and the most straightforward damage dealer in the roster. His first ability is Slice. He unholsters a sword and performs a powerful horizontal slash that deals 560 damage to all enemies directly in front of him.
It is a high impact ability that rewards aggressive positioning and getting up close to enemy groups before triggering it for maximum targets hit.
His second ability is Blitz. It performs a gravity defying dash forward that covers ground quickly and can be used both offensively to close the gap on enemies and defensively to get out of a dangerous situation in a hurry.
The cooldown is only 4 seconds which means you can use it very frequently throughout a mission. This short cooldown makes it one of the more versatile mobility tools available across all the classes.
His third ability is Shield Belt. When activated it deploys a shield that protects both the Slicer and nearby allies from enemy ranged attacks for 15 seconds. This adds a layer of team utility to what is otherwise a purely offensive kit and makes the Slicer more valuable in group play than his straightforward damage focus might initially suggest.
As his abilities make clear the Slicer is built around simple and direct offensive output. He is the class you pick when you want to get into the thick of things and deal damage without overthinking your approach.
Falconer
The Falconer is a strong offensive class that also brings meaningful team support to the table. Her first ability is the Shock Drone and it is the core of her kit. She has 5 charges for it with each charge taking 10 seconds to replenish.
When activated the drone launches toward your aimed location. You can redirect its search target by pressing the ability again after it is in the air. The drone scans for enemies near the target point and along its flight path. You can also force it to focus on a specific enemy if you need to prioritise a target.
Once it locks onto an enemy, it fires 4 salvos dealing direct plus AOE damage. Each salvo also applies an electrocution effect to the target. If no enemies are found in the area the drone returns to you automatically. You can also manually recall it early if needed.
Her second ability is Remote Drone Revive. It gives the Shock Drone the ability to revive a downed teammate directly without anyone needing to physically reach them. This is an incredibly valuable ability in hectic situations where getting to a fallen teammate safely is not an option.
It has a 120 second cooldown so it will not be available every time someone goes down but when it is available it can be the difference between holding the mission together and watching it fall apart.
Her third ability is Thunder Rod. Placing it creates a defensive zone that grants all allies within an 8 metre radius a 100% bonus to Electric damage for as long as they stay within range.
Positioning this well during a swarm or a tough encounter can dramatically increase your team’s damage output and makes the Falconer a strong force multiplier in any group composition.
Which Class Should You Main?
There is no single best class in Rogue Core and anyone telling you otherwise is oversimplifying it. As the breakdown above shows each class fills a completely unique role and brings something different to both solo and team play.
The Falconer brings offensive power and team utility. Retcon offers unmatched survivability and a second chance mechanic. The Slicer delivers pure frontline damage. The right choice comes down entirely to how you like to play and what role you want to fill on your team.
That said I would strongly recommend spending at least a few runs with each class before committing to one. You might find that the class you assumed would suit you ends up feeling completely different in practice compared to one you initially overlooked.
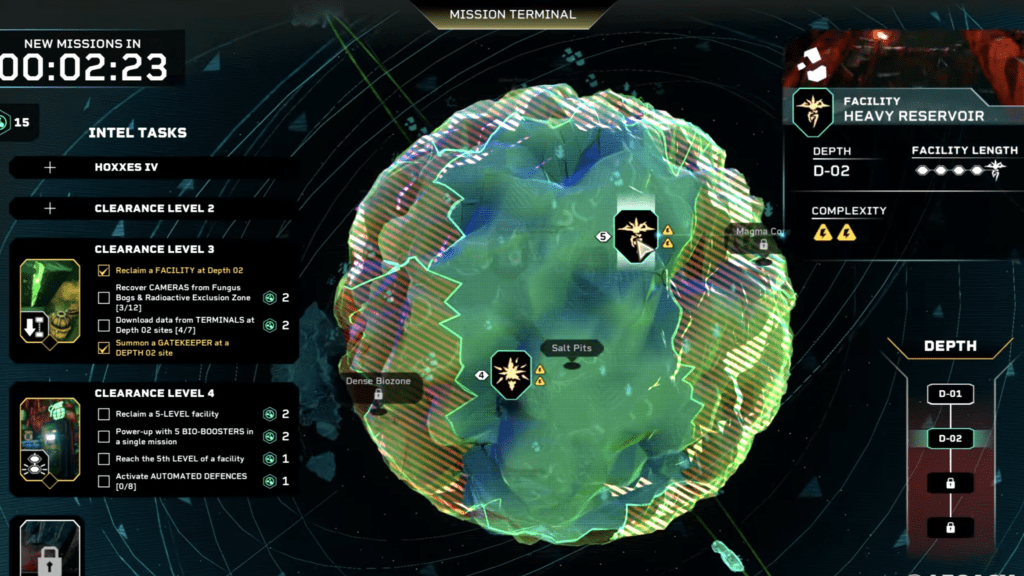
Mission Terminal
Let me quickly go over the Mission Terminal since it is something you will be interacting with constantly throughout your time in Rogue Core. This is where you will find various Intel Tasks available for you to complete. Each task you finish rewards you with Intel Points. Gathering enough of them unlocks the next Clearance Level which is what gates access to key upgrades and progression milestones.
One important thing to note is that Intel Points from completed missions do not come to you automatically. You need to manually collect them from the terminal so make sure you are checking back regularly and claiming everything that has built up.
When you click on a location on the map it reveals some key information worth paying attention to before committing to a run. The first is Depth which indicates the overall difficulty of the mission. You start with only Depth 01 unlocked which is the most accessible entry point. Depth currently goes all the way up to Depth 04 which is the most challenging tier available.
The second piece of information is Facility Length which tells you how many floors you will need to fight through before reaching the final boss floor of that run. The third is Complexity which gives you an indication of how straightforward or demanding each individual floor is going to be in terms of layout and enemy encounters.
Taking a moment to read all three before selecting a mission will help you make a more informed decision about whether you are properly prepared for what is ahead.
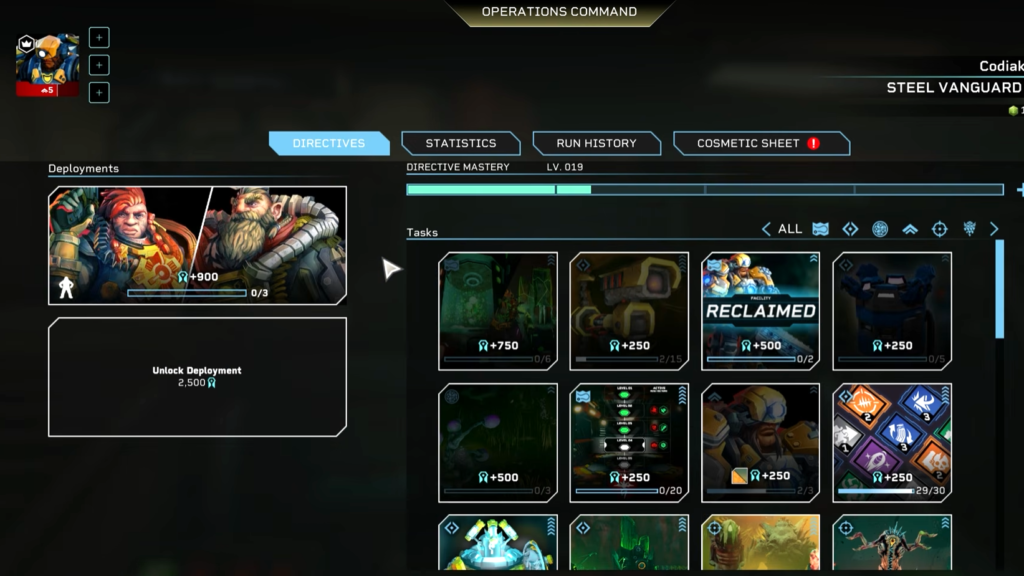
Operations Command
The Operation Command menu contains a range of useful information worth familiarising yourself with early on. You can find things like your overall Statistics and a full Run History that tracks your progress across every run you have completed. That information is useful for keeping tabs on how you are developing as a player over time.
The most important part of the Operation Command however is the Directives section. Directives are broad passive mission challenges that ask you to perform general combat and survival actions throughout your runs. They do not require you to change how you play drastically or chase specific objectives.
Most of them will progress naturally as you complete missions and engage with enemies the way you normally would. Completing Directives rewards you with Merits which are the currency you spend in the Enhancements system.
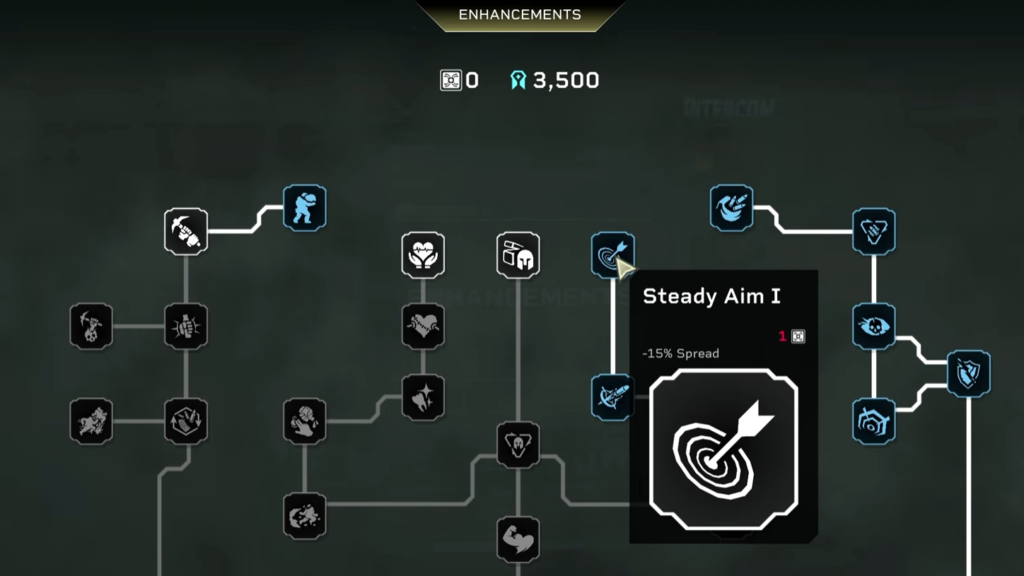
Enhancements
The Enhancements system is essentially a skill tree made up of multiple nodes. Each node provides a specific passive bonus that strengthens your character in a particular way. The tree is structured so that the further down you progress, the more powerful and impactful the nodes become.
The ones sitting near the top of the tree tend to offer smaller incremental bonuses that are useful early on but fairly modest in scale. As you work your way deeper into the tree, the nodes start offering significantly stronger effects that can meaningfully change how your runs play out. The most powerful nodes of all are sitting at the very bottom of the tree and are worth working toward as a long term goal.
Since Enhancements are purchased with Merits earned from Directives, staying consistent with your Directive progress is the most reliable way to keep unlocking new nodes and pushing further down the tree over time.
Loadout
In the Loadout screen you can select up to 8 Enhancements to bring into your runs. At the start you will only have 6 slots available but the remaining two can be unlocked by spending Merits.
It is worth prioritizing those extra slots as soon as you have the Merits available. Having 8 Enhancements active versus 6 makes a noticeable difference to your overall power level going into a run.
Beyond the Enhancement slots, the Loadout screen also displays both Bio-Booster Decks for your current class. You can switch classes here as well and view each class’s full skill information.
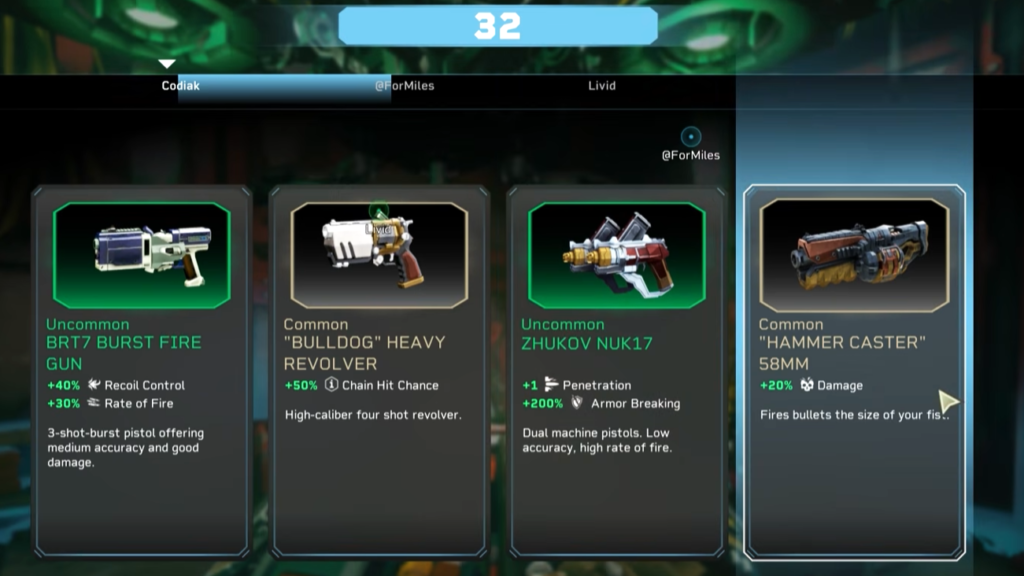
Weapon Selection
At the start of every mission the first thing you need to do is select a weapon. Your team will be presented with a choice of four weapons and each player gets to pick in a random order. Since only one player can take each weapon, who picks first can sometimes mean someone misses out on their preferred option.
This is why communication with your team before and during the selection matters. Take a moment to talk it out, so everyone ends up with a weapon they are comfortable using rather than being stuck with whatever is left over. A team where every player is confident with their weapon will always perform better than one where someone is struggling with an unfamiliar option they were forced into.
Upgrades
Throughout the mission map you will come across green crystals called Expenite scattered around the environment. Right click on them to mine and collect them. Once you have some, deposit them into your drone which you can by pressing C on your keyboard.
As the drone meter fills up from your deposits, it will eventually trigger an upgrade selection in the same way the weapon choice worked at the start of the mission. Everyone gathers around the drone and the team picks from the available options in order.
When it is your turn to choose make sure you are selecting something that genuinely complements your current build and playstyle rather than going after whatever looks the most impressive on paper. A well chosen upgrade that fits your build will always outperform a flashy one that does not synergise with how you are playing.

Level Aggression
During a mission you will notice a meter in the top left corner of your screen. It starts out green and indicates the overall aggression level of the current floor. As time passes the meter gradually shifts toward red.
Once it turns fully red, the mission enters a high aggression state and the game starts sending very strong enemy waves at your team continuously. These waves will not stop coming until you either clear the floor or go down.
The meter is something you always want to keep an eye on while playing. Taking too long on a floor without pushing forward will cause it to fill up faster than you want.
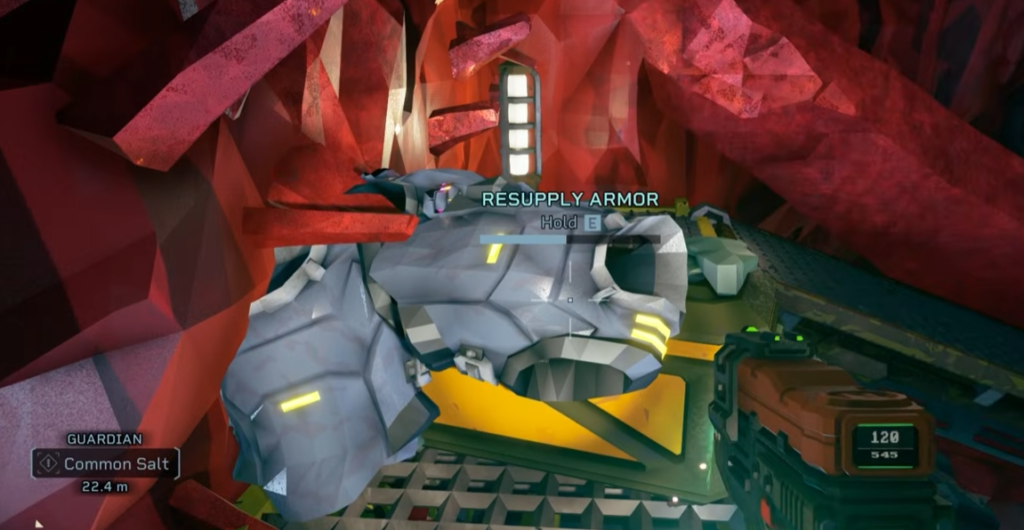
Resupply Crates
As you push through the map you will come across two types of resource crates worth keeping an eye out for. Armor crates replenish your armor and ammo crates restore 50 percent of both your ammo and armor in a single use.
Both crate types carry a number of charges equal to the number of players in your team. This means every player gets exactly one use out of each crate before it runs dry.
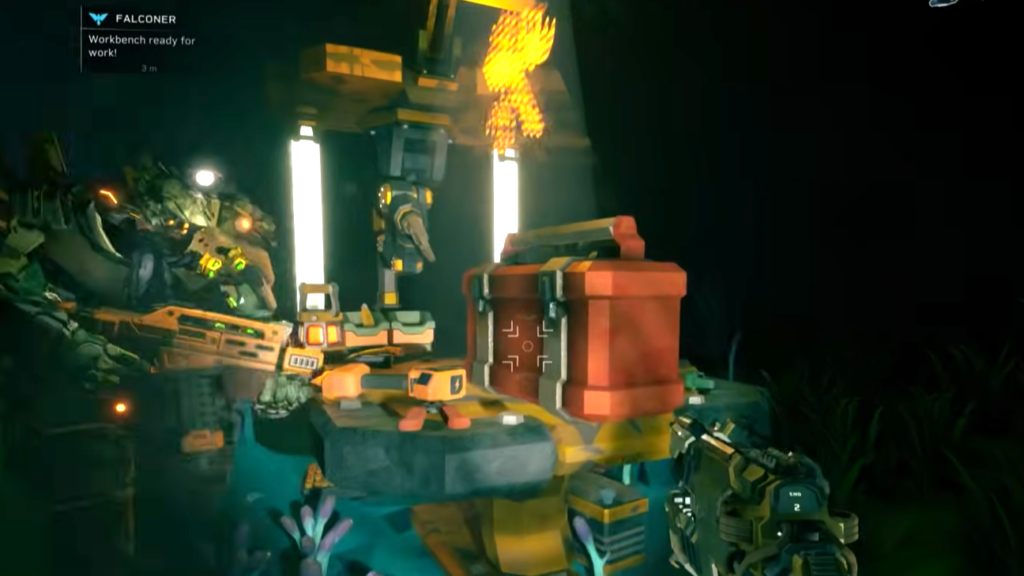
Workbench
Scattered throughout the map you will also come across workbenches. Interacting with one will reveal the location of a Toolbox somewhere on the floor. You need to track it down and bring it back to the workbench to activate the upgrade process.
Once you do, the workbench gives you the option to upgrade your class ability, upgrade your weapon, or unlock a new option for your weapon. The catch is that you can only choose one of these so it is worth taking a moment to think about which upgrade will benefit your current run the most before committing.
A weapon upgrade might seem like the obvious pick but depending on how your class ability has been performing there are situations where investing in that instead will serve you better in the floors ahead.
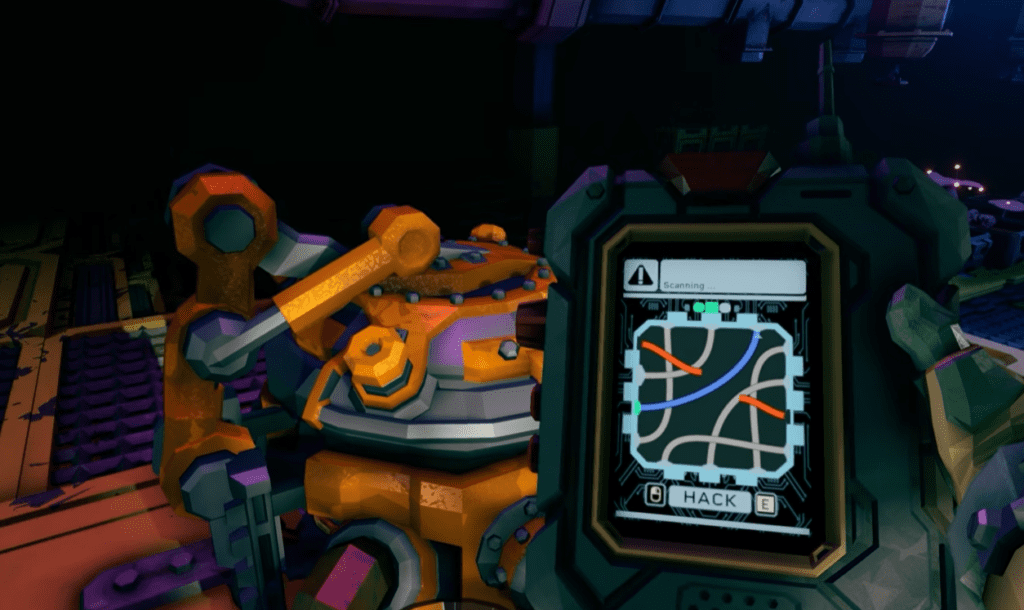
Bio-Boosters
Bio-Boosters are another valuable find scattered throughout the map. When you come across one you cannot just interact with it and take the upgrade immediately. You first need to hack into it by completing a short minigame.
Once you successfully hack in, you will be presented with a choice between two upgrade options that are unique to your class. These upgrades are separate from the ones available through the Expenite Drone and tend to be more tailored to your specific class kit.
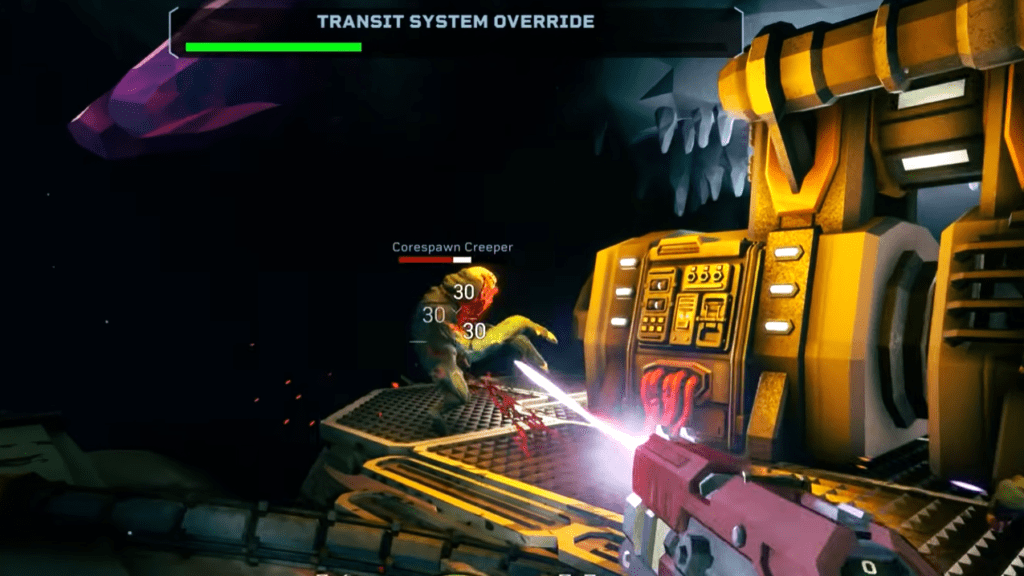
The Elevator
To reach the next floor, you need to press the button on the Elevator. Pressing it starts a timer for the Elevator to arrive. During this window, enemy swarms will push toward the generator and attempt to destroy it. Your team needs to hold them off and keep the generator alive until the Elevator arrives.
If the generator takes damage, you need to repair it. When repairing, make sure to let your teammates know so they can cover you while you are standing still and vulnerable. The repair process leaves you exposed, so having someone watching your back is important.
Once the Elevator arrives, get inside quickly. Enemies do not stop pushing in until the doors close, so every second you spend outside is a risk you do not need to take.
Wrapping Up
Rogue Core is one of those games that clicks the moment everything starts coming together. Your first few runs will feel chaotic and that is completely normal. Stick with it, learn your class and communicate with your team. The deeper you push into higher Depth missions, the more satisfying the whole experience becomes and the more your build decisions start to feel genuinely impactful.