 45 articles
The Survivalist Caches in Borderlands 4 are some of the most satisfying collectibles to track down. These oversized weapon crates are tucked away in bunkers, caves, and other hidden spots across the Fadefields, and opening them showers you with loot and SDUs (storage deck upgrades). They’re also tied to region completion, so if you’re aiming for 100% in The Howl, you’ll definitely want to scoop them all up.
While there are 10 total Survivalist Caches in Borderlands 4, this guide is all about The Howl, which features some particularly tricky ones. Don’t worry—I’ve got you covered with directions, tips, and what to expect when you crack them open.
All The Howl Survivalist Cache Locations
Survivalist Caches aren’t marked on your map right away. Instead, you’ll need to explore the area, keep an eye out for bunker-like entrances, and sometimes clear out enemies to unlock them. Once you get close, their collectible icons will appear on your map—blue if you haven’t opened them yet, green if you already have.
Some caches require story progression or side mission access, but none are missable—you can always come back later in free-roam or via mission replay. My advice? Play naturally, finish side missions, then circle back for the collectibles to clean up your map.
 Borderlands 4: Pearlescent Item Guide Soul SurvivorMar 31, 2026
 Borderlands 4 Released a Major Update with Some Quality-of-Life Improvements, Alongside a Free DLCNov 21, 2025
 Take-Two CEO Blames Troublesome PC Performance for Borderlands 4’s “Softer” than Expected SalesNov 7, 2025
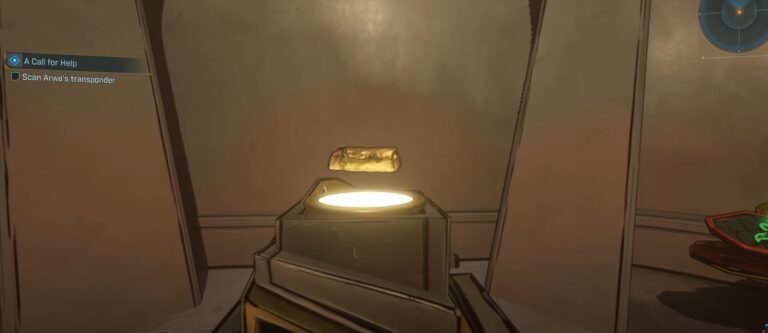
The Howl Survivalist Cache #1 | Gushing Turret
The first cache is tucked away at the Gushing Turret point of interest, southwest of The Kit Hole Order Silo. The map marker is a little misleading—you’ll actually need to head slightly southeast to find the real entrance. Look for a sewer pipe with big antennas above it (a handy landmark), and head inside.
Once you’re in, you’ll find the cache waiting. Cracking it open nets you an SDU and some extra gear.
The Howl Survivalist Cache #2 | Western Boundary Cave
Next up is a cache near the western boundary of The Howl. From the Kit Hole Order Silo, head west until you spot a cave entrance. Inside, you’ll run into a bunch of Threshers—but if you’re fast, you can just sprint past them. Luckily, the cache itself is in a relatively safe spot, so once you get there, you can open it in peace.
This one rewards you with 10 SDU and some loot.
The Howl Survivalist Cache #3 | Rootdown Estates Arena
The third cache is more of a fight than a find. Head to the center of The Howl, northeast of the Rootdown Estates fast travel station. You’ll see a sheet metal entrance—head inside, and you’ll eventually slide down into an arena.
Here’s the catch: the door won’t open until you clear out every enemy in the area. Once you’ve survived the brawl, the exit door unlocks, and inside you’ll find both a Survivalist Cache and a red chest. Like the others, this cache also gives 10 SDU plus loot.
Wrapping Up
That covers the Survivalist Caches I’ve detailed for The Howl—each one tucked away in classic Borderlands fashion, making you fight, explore, or puzzle your way to the loot. With 10 total caches across the Fadefields, you’ll want to track them all down if you’re chasing 100% completion.
The good news? Nothing is missable, so you can always come back after finishing the story. Just keep your eyes peeled for bunkers, caves, and enemy-filled arenas—you’ll usually find a Survivalist Cache waiting at the end.
Happy hunting, Vault Hunter. Up next, if you’re aiming for the 100% completionist run, you might also be interested on guide for all The Howl Dead Bolt locations in Borderlands 4, check it out!