 26 articles
The Finals is a chaotic competitive game, so you’ll need to make sure to boost your FPS as much as possible and fix any lag you get.
Even though the time-to-kill is rather long in this game, The Finals is still a game where every second counts!
In this guide, we’ll go over various potential fixes and solutions to common problems that cause stutters and lag.
FPS Boost & Lag Fix Tips
Laptop Users: Ensure Your GPU Is Being Used
A common issue with gaming on laptops is that sometimes games will default to using the CPU for graphics instead of the dedicated GPU.
 The Finals: Is the Battle Pass Worth Buying?Jan 17, 2024
 The Finals: Top Players Allegedly Caught CheatingJan 11, 2024
 The Finals: Toxic Gas Complete Guide | How To UseDec 30, 2023
This can lead to abysmal framerates, as your PC isn’t effectively using the right components. It’s pretty easy to fix, however!
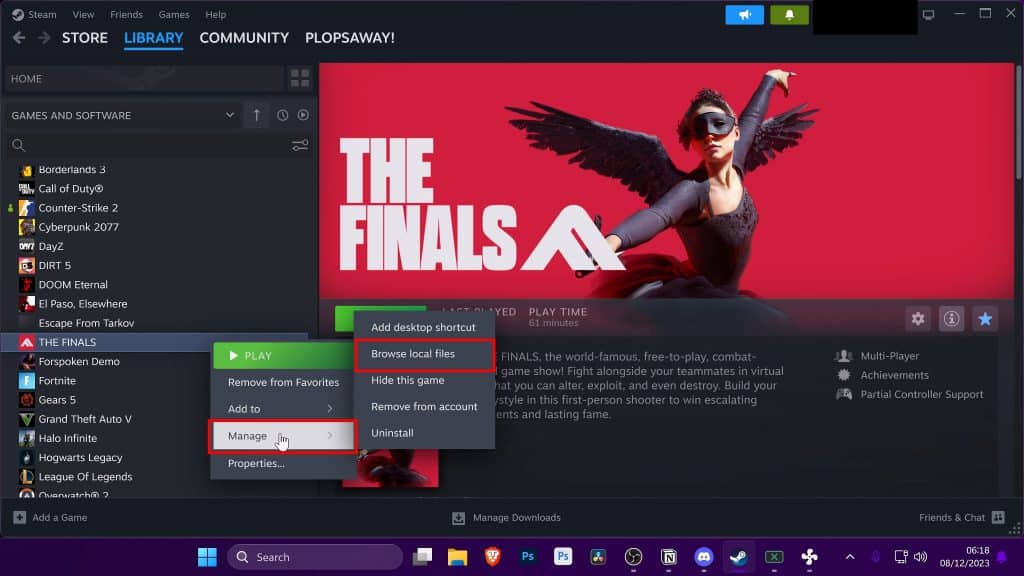
First of all, find The Finals in your Steam Library and right-click on it. Then, select “Browse Files” from the “Manage” sub-menu.
This will open the game’s folder in Windows Explorer. Click on the folder’s address and Copy it.
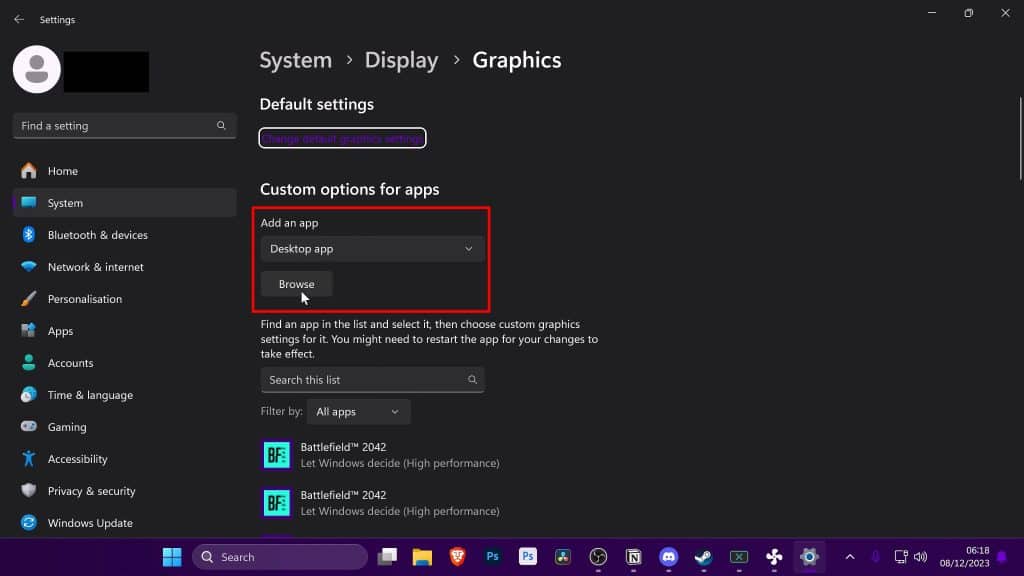
Next, type “Graphics Settings” into the Windows search bar and open the settings app.
In here, choose to add a new Desktop App and click “Browse”. Paste the address for The Finals’ installation directory you copied earlier.
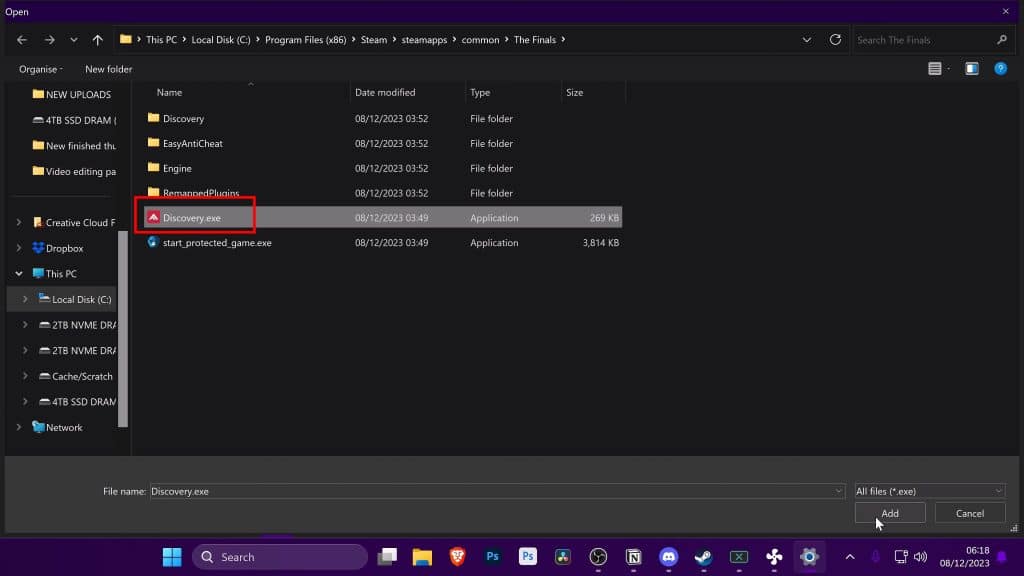
In this folder, select “Discovery.exe” which is the game’s main executable.
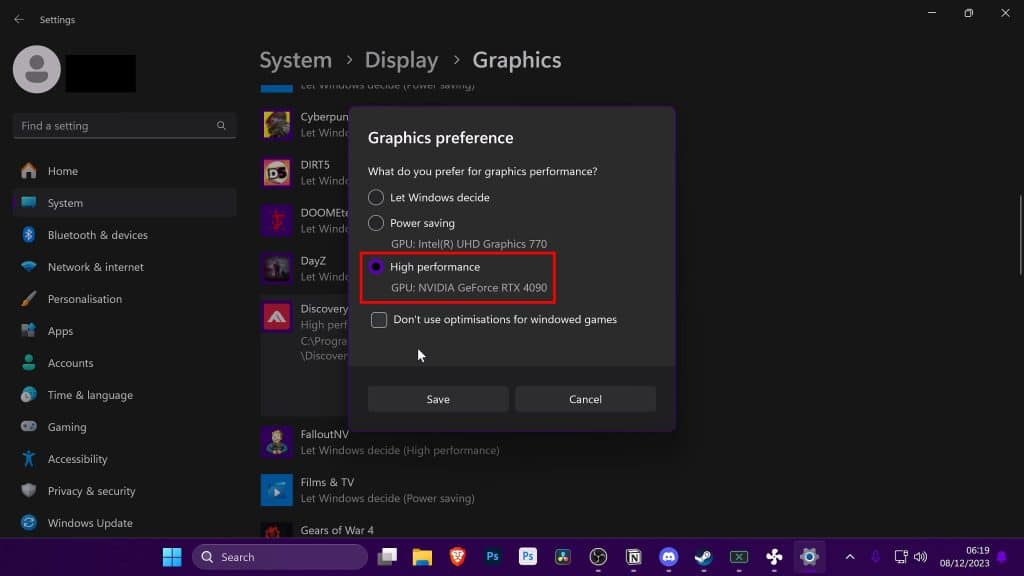
Now just make sure that “Discovery.exe” is set to High Performance, which guarantees that The Finals will use your GPU from now on!
Honestly, this is all you should need if you’re a laptop user. But, if you’re on a desktop or this wasn’t enough, continue reading!
Update Your GPU Drivers
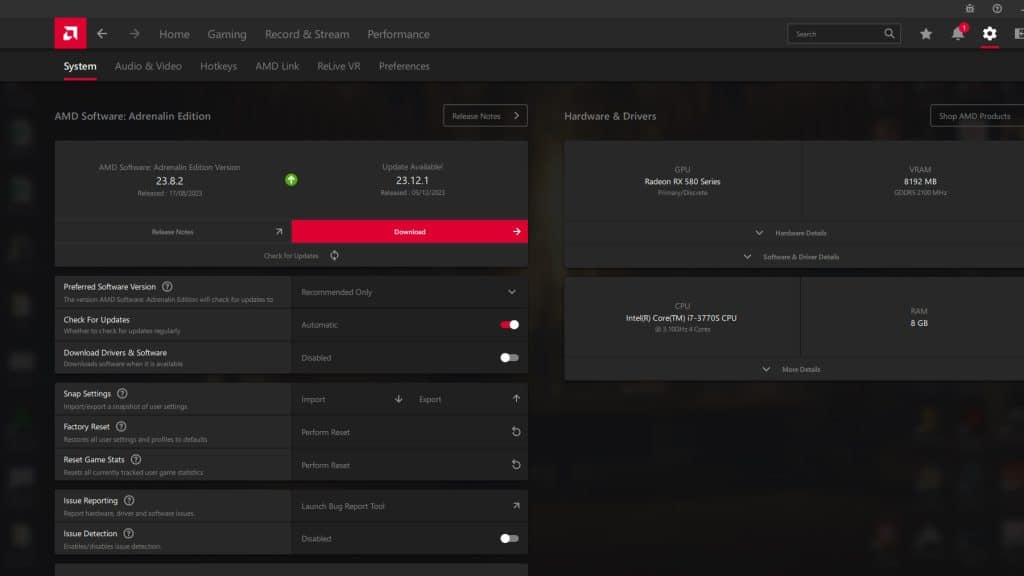
Technology is always advancing, especially software. You should make sure to have up-to-date GPU drivers when playing new games like The Finals.
This is quite easy to do, just check your manufacturer’s website and download the drivers from them.
Alternatively, you can also update from within the control panels of your GPU.
Just in case, here are the websites for the 3 main manufacturers of modern GPUs:
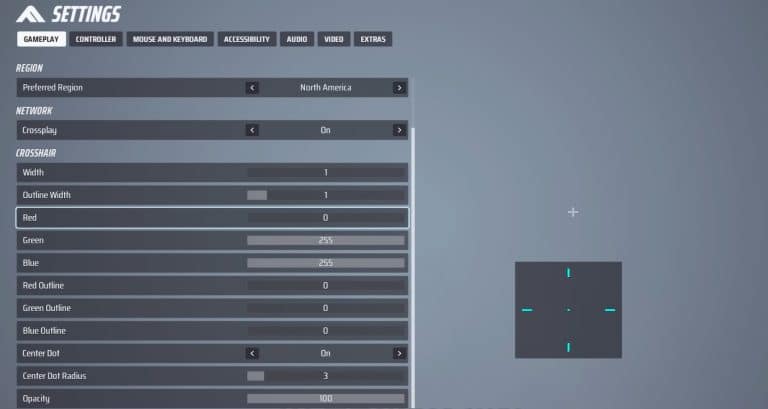
Use Optimized Settings
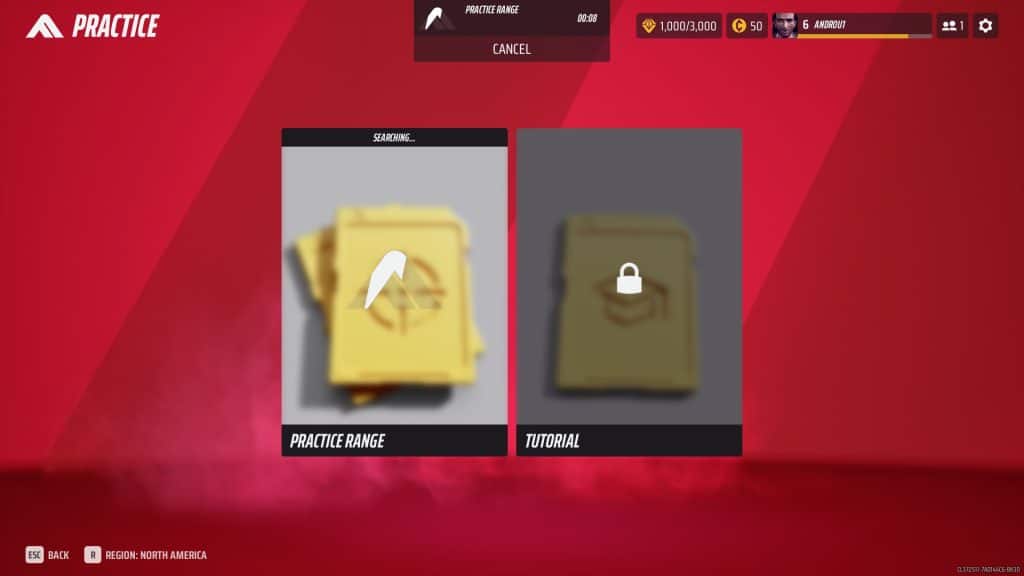
Next, you should start the game and head into the Practice Range mode. This will allow you to make changes to your video settings and see their performance effects in real-time.
After that, you just need to press the ESC key, select “Options”, and navigate to the Video settings tab!
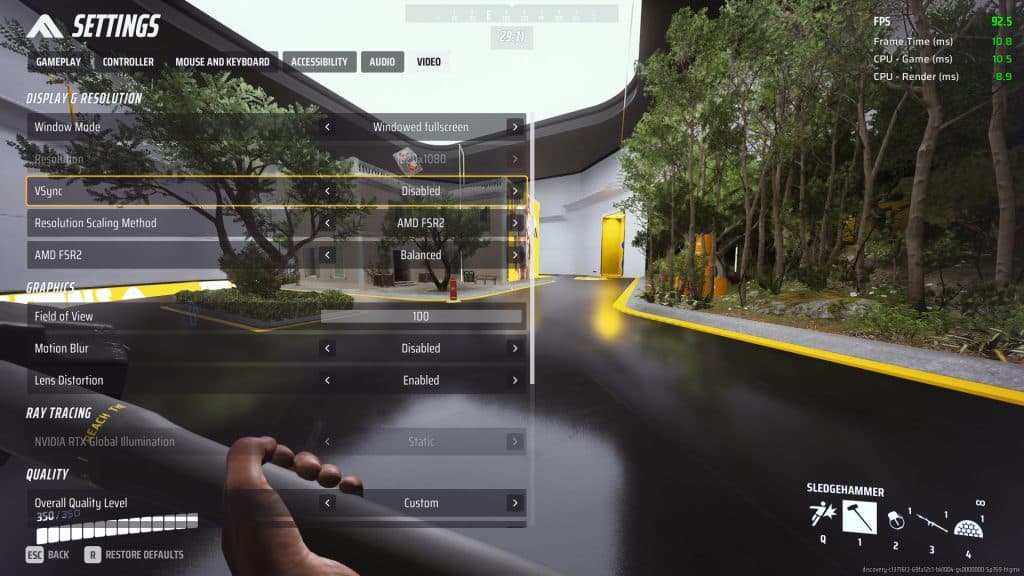
Since we’re looking for the best performance possible, our settings will be as follows:
- Windows Mode: Fullscreen.
- NVIDIA DLSS Frame Generation: Disabled.
- Vsync: Disabled.
- NVIDIA Reflex Low Latency: On + Boost.
- Resolution Scaling Method: Choose NVIDIA DLSS if you have an NVIDIA GPU. Otherwise, choose either AMD FSR2 or Intel XeSS.
- Resolution Scaling Quality: Balanced. You can choose Performance for worse visuals and better performance, but Balanced is usually more than enough and doesn’t hinder visuals too much.
- Field of View: 100.
- Motion Blur: Disabled.
- Lens Distortion: Disabled.
- Ray Tracing / RTX Global Illumination: Static. Disables RTX effects for a large FPS boost.
- Overall Quality Level: Low. This will default every advanced visual setting to its minimum.
- Textures: Medium. This is the only advanced visual setting that you should consider bumping up from Low. Revert to Low if it causes performance issues, however!
These optimized settings should give you the best performance possible. On top of that, a lot of annoying visual effects like Lens Distortion and Motion Blur are disabled for better clarity!
What’s more, it’s actually surprising how great the game still looks even at its lowest settings!
Set An FPS Cap
With all the settings done, you will want to set an FPS cap. This will provide more consistent framerates, which can feel a lot smoother when gaming.
The FPS cap should be set to match your average framerate in the game. For example, if you consistently get 140-150 FPS, you should set it to 144 FPS.
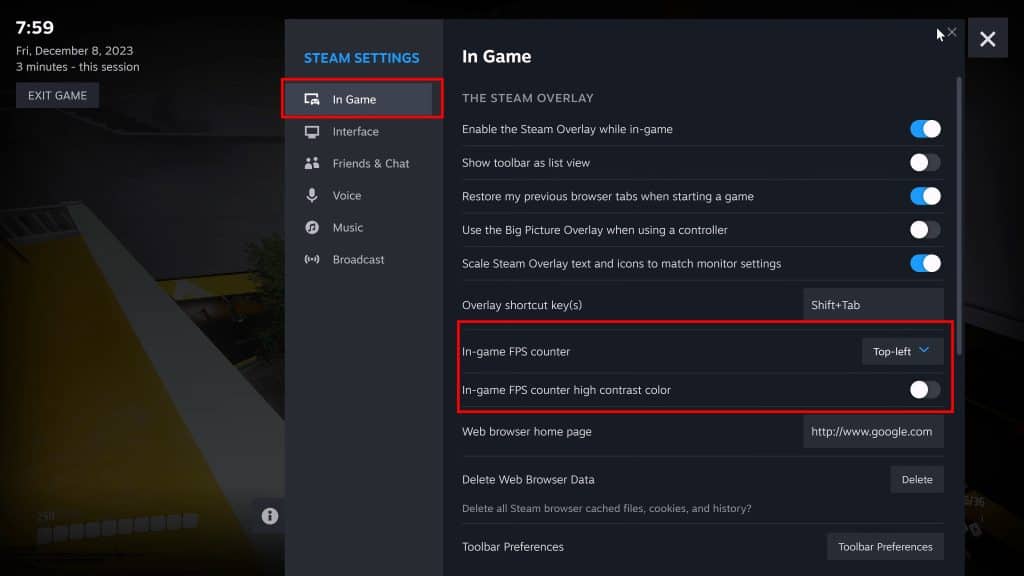
Also remember, you can always monitor your in-game FPS by using the built-in Steam Overlay FPS display or the performance overlays provided by your GPU’s control panel.
Anyway, there’s sadly no in-game FPS limit setting and the game has Easy Anti Cheat, so you should avoid using external software like RivaTurner.
Instead, you’ll need to manually set the FPS limit by modifying the game’s configuration file. Don’t worry, it’s a lot easier than it sounds!
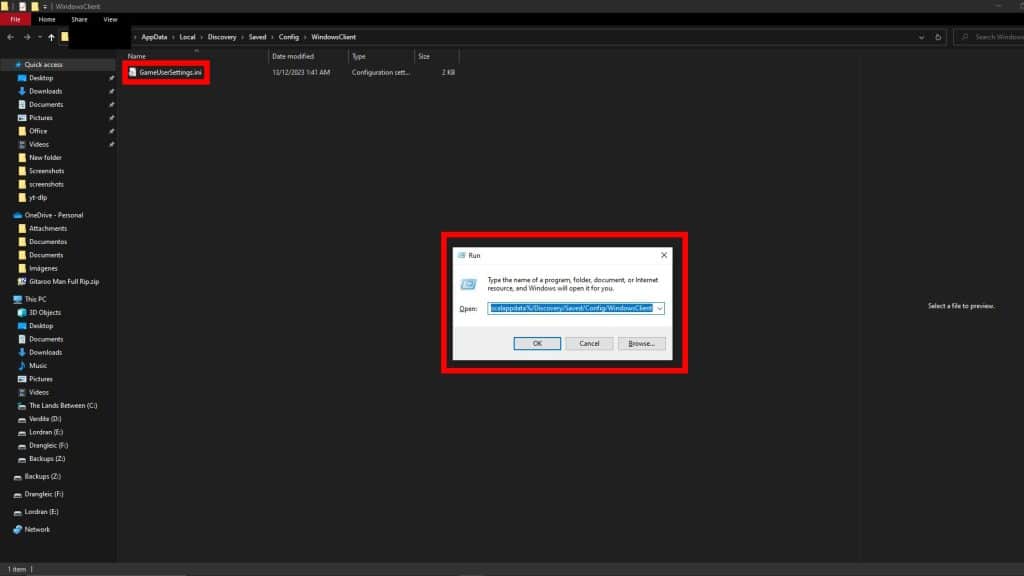
First, press the Windows Key + R to make the “Run” window appear, then paste the following address:
%localappdata%/Discovery/Saved/Config/WindowsClient
This should open a folder with a file called “GameUserSettings”, double-click on it and it should open with Notepad.
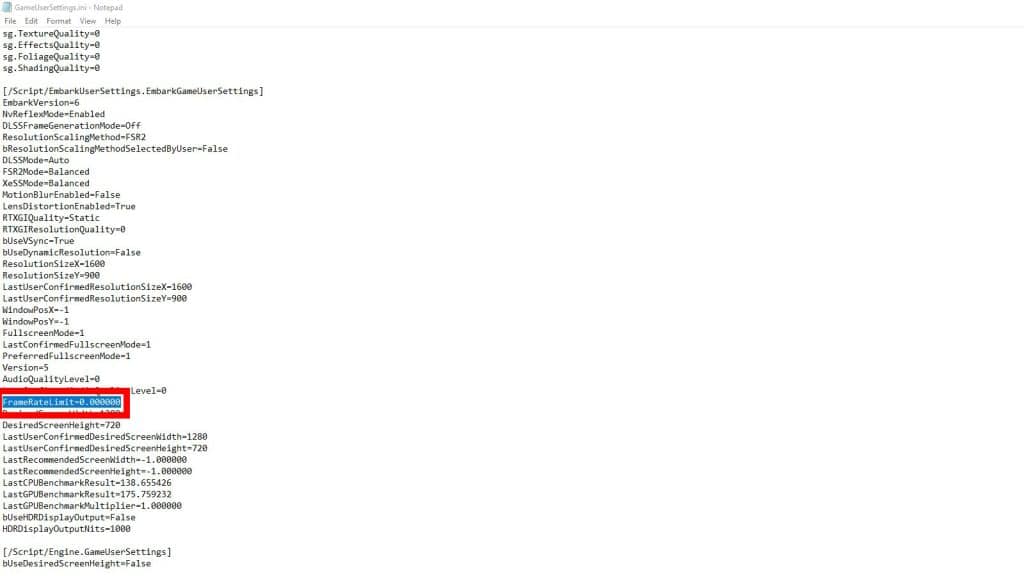
Look for a setting called “FrameRateLimit” in the file, it should look like “FrameRateLimit=0.000000”.
Lastly, just change the first 0 to whatever framerate you wish to use! For example, “FrameRateLimit=144.000000” for 144 FPS.
That’s all we have for now; we hope at least one of these tips helped make The Finals perform more smoothly for you. All that’s left is to dive into the virtual arenas and start cashing out!
ALSO READ: The Finals: Best Tips & Important Hidden Mechanics