 3 articles
Kena Anniversary Update is out now, and part of all the new content is the Spirit Guide Trials and unique outfits that are unlocked by completing the Trials and Bonus Challenges!
In this guide, we’ll show you how to do so.
How to Beat All Spirits Guide | How to Get All Outfits in Kena: Bridge of Spirits
Rusu Falls Trial
A target practice challenge. Its bonus challenge is:
- Shooting at least 20 Golden Whirly Birds
- Shooting at least 80 Whirly Birds
- Completing the trial within 1 minute
In this trial, you’ll be shooting Whirly Birds while advancing as fast as you can, pretty straightforward. It’s recommended to slow down time to make sure you don’t miss and lose time taking multiple shoots per bird and because the timer will slow down as well.
 Kena: Bridge of Spirits: Best Charmstone to Use In the Game and How to Get ItMar 22, 2023
 Kena Bridge of Spirits: All Charmstones Location GuideMar 22, 2023
Another recommendation is to wait for the Golden Whirly Birds to settle in position between normal Whirly Birds, as when you shoot one they explode hitting all the rest around them, making job your easier. If you try shooting Whirly by Whirly, you won’t finish the trial on time.
Forest Courtyard 1
A combat challenge. . Its bonus challenge are:
- Completing the trial within 2 minutes
- No healing
- Taking no damage
On this trial, you’ll be up against a number of opponents that you have to defeat. My advice is to always have your enemies in line of sight as any of them could throw a rock and with a single hit taken you have already failed a challenge.
Two good tactics to apply are using Spirit Bomb when enemies are grouped together to deal massive damage and using Rot Infused Arrow when they are lined (one behind another). This will let you get rid of them faster and on time. The zero health flowers challenge is redundant as you’ll have that one completed if you manage the no damage one.
Shrine Guardian
A combat reflection. Its bonus challenge are:
- Completing the trial within 3 minutes
- No healing
- Destroying the Shrine Guardian’s Deadzone Heart
In this trial, you’ll be facing off against the Shrine Guardian boss. This one is as simple as being aggressive.
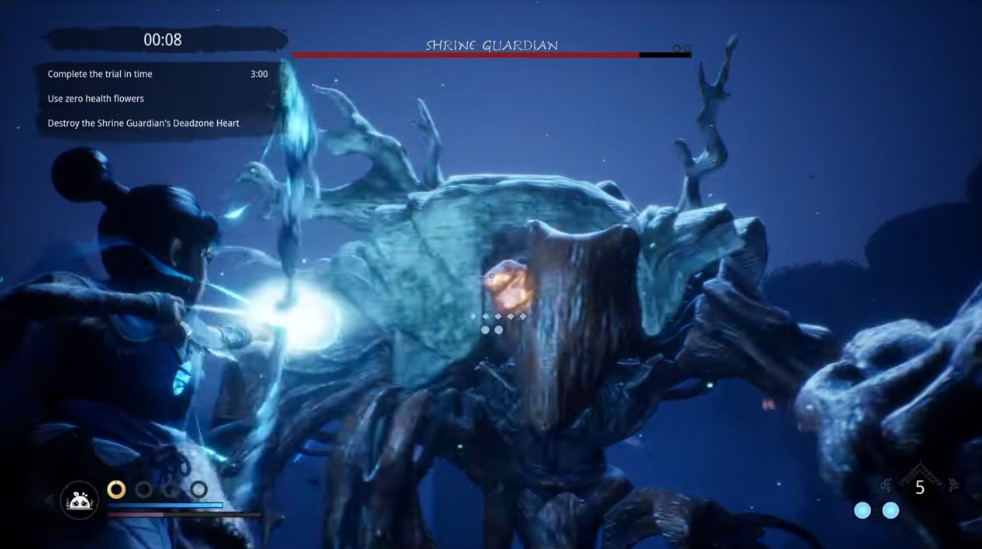
Attack the boss without letting up, targeting the yellow crystal of its body when you can. The boss has a summoning ability where it will bring out some minions to help – it’s your choice to ignore or fight them, but the better option is to focus on the boss and apply Area of Effect attacks to make the kill on time.
Forest Courtyard II
A combat challenge. Its bonus challenge is:
- Completing the trial within 8 minutes
- No healing
- Defeating 20 enemies by shooting exploding pustules in the arena

The hardest part of this challenge is using the pustules of the arena to kill the enemies, as there is a limited number of them and the explosion is not that big.
The best way to go about this is lowering your enemies’ health as much as possible, baiting them near one of the pustules, and then shooting it to take down as many as possible. If you focus on this early then you can take out the rest as you please.
Corrupt Taro
A combat reflection. Its bonus challenge is:
- Defeating the boss within 3 minutes
- No healing
- Shooting Taro’s Lattern
Another trial where you are against a boss, Corrupt Taro.

To take on Taro uses plenty of Spirit Bombs to deal damage rapidly and without worrying for punishment, and being too eager to dodge. Taro has great tracking, so early dodges will end up hitting you as much as late ones.
For the third challenge, you’ll have to wait for Taro’s 2nd phase once they hit half health. Their sword will break and they’ll run around, circling and then charging toward you. At that moment you’ll want to use Focus to slow down time and aim at the lantern. If you fail to get it you could possibly die, so take your time, but not too much of it.
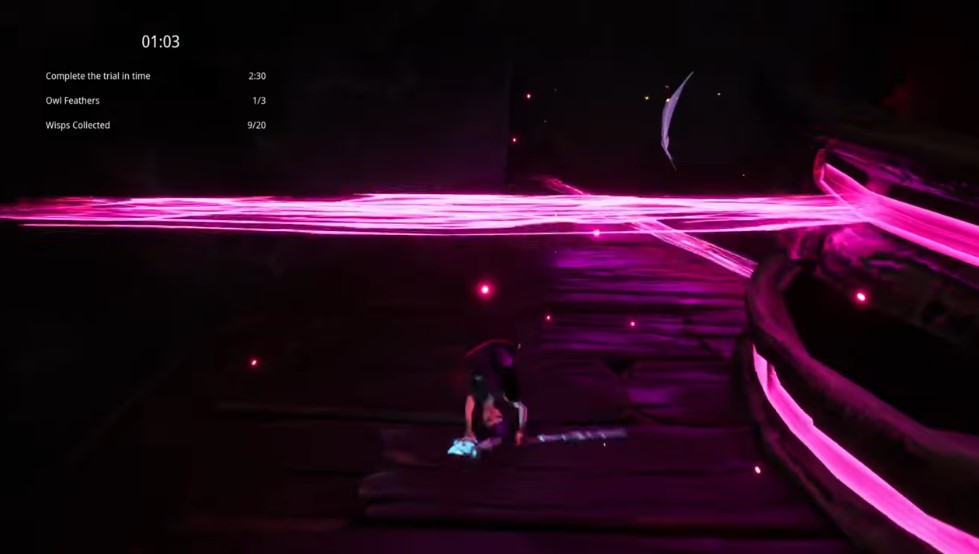
Collapsed Quarry
An obstacle course trial. Its bonus challenges are:
- Completing within 2 minutes and half
- Collecting 3 owl feathers
- Collecting 20 Light Wisps
You just need to make it on time to the finish line while collecting all the Wisps: luckily, the Wisps serve more or less as a guide to where you have to go, but the feathers will force you out of your way. Do a run on the place to see the location of everything so that you can plan your route, and then it’s all about doing it quickly.
Remember that double jumping slows time down. This will work in your favor as you will be able to see around you while the timer is slowed and you have to jump lots anyway.
Plateau Reservoir
A target practice trial. Its bonus challenges are:
- Energizing 5 Bomb Targets
- Shooting 20 bomb targets
- Shooting 130 Whirly Birds
This is a hard one but there isn’t much advice to give that wasn’t applied in the first. Follow the indications of the challenges and use Focus for time slowdowns as much as you can, as you’ll need it. Target Golden Whirly Birds for the explosions to reach the necessary amount of kills.
Stone Guardian
A combat reflection. Its bonus challenges are:
- Defeating the boss within 3 minutes
- No healing
- Shooting all 5 weak spots
This is like a harder version of the Shrine Guardian boss fight, so the same advice applies. The difference is that the Stone Guardian weak spots (the yellow crystals) show when you throw Bombs at him and that after hitting one they will hide. You’ll want to get Courage, reveal its weak spots, and destroy them in as few shots as possible.
Rufu’s Barn
A combat challenge. Its bonus challenges are:
- Completing the trial within 9 minutes
- No healing
- Defeating 5 enemies with the Rot Cloud
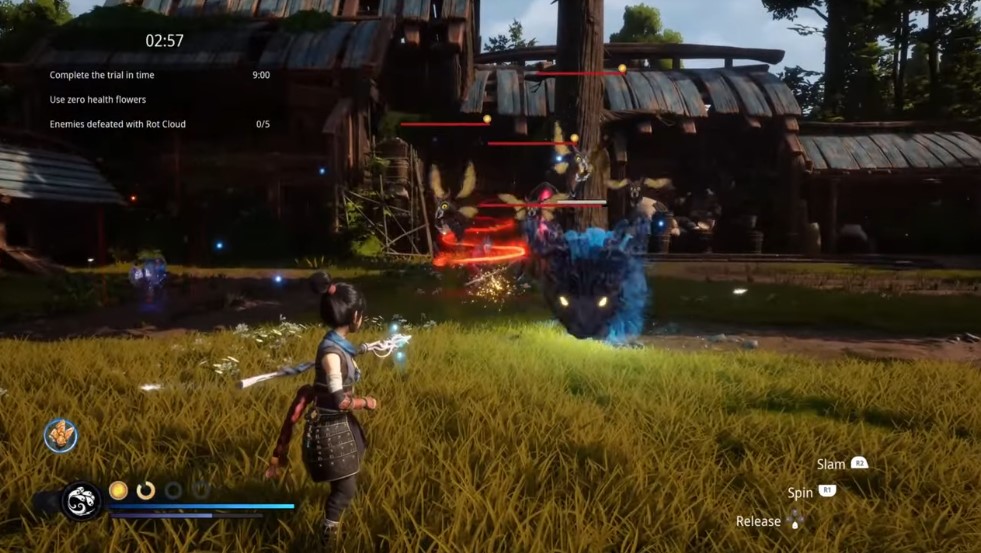
Similar to Forest Courtyard II, you have to defeat all enemies. The tricky part of this trial is that you can’t summon Rot Cloud at will, and you’ll instead have to wait for an enemy to drop the item to use it. At that point, lower enemies’ health and group them to get the 5 Rot Cloud defeats in one or two uses.
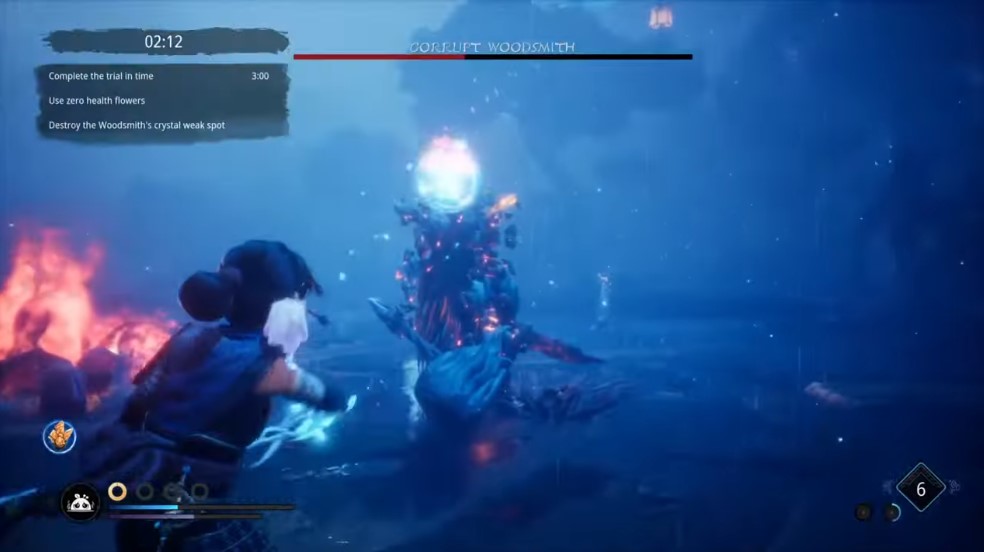
Corrupt Woodsmith
A combat reflection. Its bonus challenges are:
- Defeating the boss within 3 minutes
- No healing
- Destroying her crystal weak spot
Another boss fight! To win this one you’ll have to attack the core the Woodsmith is linked to. Her crystal weak spot will reveal itself for the 2nd phase, so be ready to use your Bombs or Courage and get aggressive.
Valley Overlook
A target practice trial. Its bonus challenges are:
- Shoot at least 80 Whirly Birds
- Shoot at least 10 Whirly Birds
- Take no damage
Similar to the first one, right? You’ll want to do the same things you did in that one. Just be careful because midway through the trial a lot of enemies are going to spawn and you can’t take any damage. Don’t worry if you miss and restart if you miss some Whirly Birds either, there’s plenty in the trial.
Ravine Pathway
An obstacle course trial. Its bonus challenges are:
- Completing within 2 minutes and half
- Collecting 3 owl feathers
- Collecting 20 Light Wisps
The same as Collapsed Quarry, same challenges, even! The Wisps will tell you where to go.
Don’t fret over not getting the trial right in your first run – it’s not made for that in the first place. Do a run to familiarize yourself with the scenario and the location of the feathers and plan your route.
Corrupt Toshi
A combat reflection. Its bonus challenges are:
- Defeating the boss within 3 minutes
- No healing
- Parry an arrow
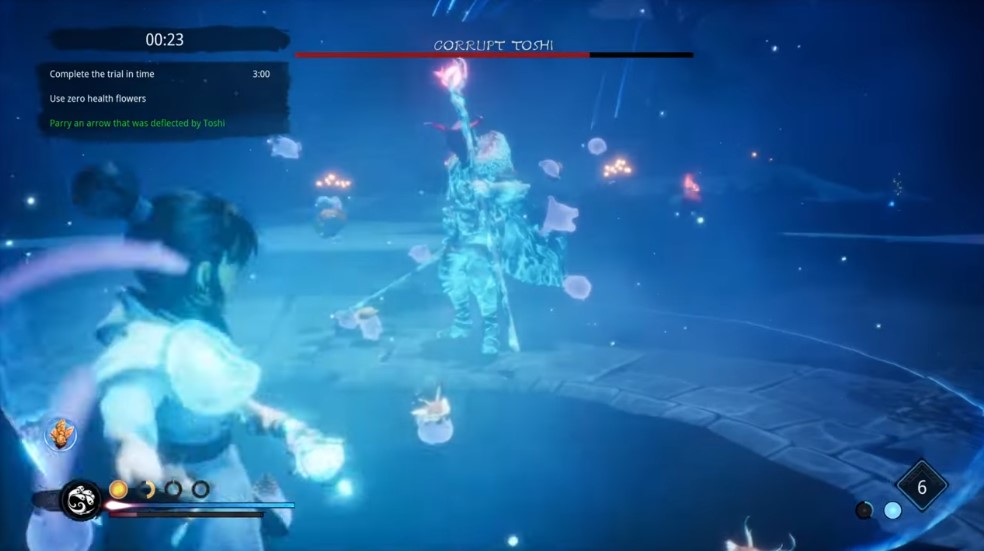
Like others boss trials, get aggressive on this one. The third challenge is relatively easy to get: if you shoot an arrow at Toshi he will deflect it back to you, and you have to parry that arrow. Note that you have to be close or Toshi can deflect the arrow in any direction but yours.
Village Center
A combat challenge. Its bonus challenges are:
- Completing the trial within 8 minutes
- No healing
- Parry a Shadow Sprout

Parry those guys to complete the bottom challenge. The hard part of this combat challenge will be surviving all the way through: give it your best and fight the better you can and you’ll manage to succeed on this trial.
Village Leader
A combat trial. Its bonus challenges are:
- Shoot off the Warrior’s hat
- Parry an explosive arrow back at the Hunter
- Only shoot the real Mask Maker during his trap attack
The last trial and for sure the hardest one. The bonus challenges are pretty self-explanatory: take aim at the Warrior’s hat and keep shooting it until it falls off, and watch out for the Hunter to parry the explosive arrow back at them. You’ll know it’s explosive because it glows before its shot.
The hard part of this challenge is the fact you’re facing two bosses, and the second you bring one down, a third is going to spawn.
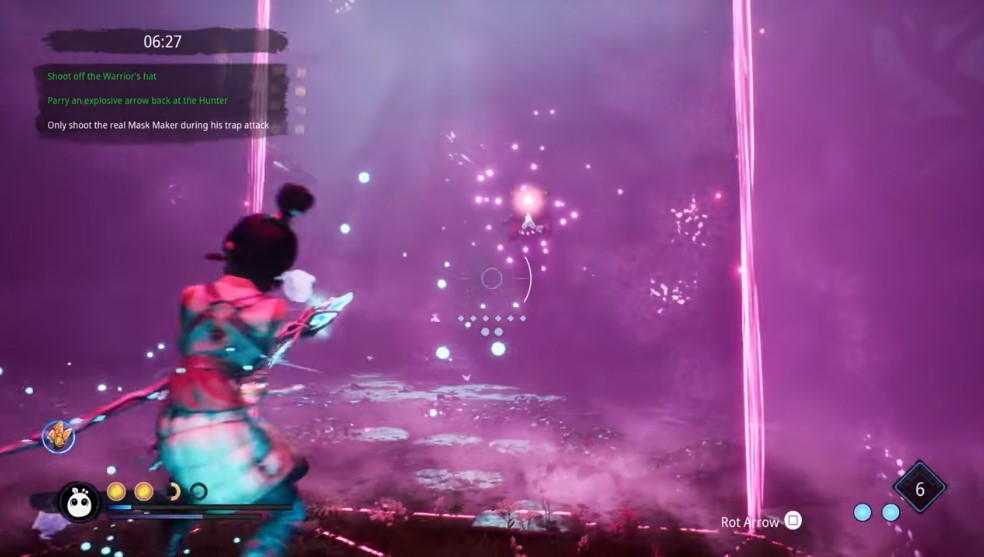
The best way to give yourself an advantage is to distribute your attacks between both Warrior and Hunter so that when you kill one, the other is very close to dead. In this way you can face the Mask Maker 1vs1. Remember to shoot the real one during his trap attack to clear the last bonus challenge – you’ll know it’s the real because it’ll try to shoot you like in the image above.
After you get it, all that’s left is finishing the job. Good luck!