 5 articles
The Warrior is one of the most straightforward classes to pick up in Farever and one of the strongest choices if you want to be in the middle of every fight without worrying too much about staying alive. The entire class is built around Strength scaling and a Rage resource system. What makes the Warrior particularly well rounded is that its kit balances pressure and safety in the same package.
In this guide I will break down everything you need to know about the Warrior class including its skills, talent tree and the best weapons to pair with it so you can get the most out of it from day one.
Ultimate Guide for the Warrior Class
Before getting into the skills and talents, it is worth understanding the core mechanic that the entire Warrior class is built around. That is the Rage system. Rage is the Warrior’s primary resource and it builds up naturally as you fight. Every regular attack and every weapon skill you use generates Rage, and the longer you stay in a fight the more of it you accumulate.
Once you have built up enough you spend it on your main class ability, Raging Smash. This is an AOE based attack that deals a solid chunk of damage to enemies around you and the best part is that it only consumes half of your Rage bar per use rather than draining it entirely.
 How to Get the Best Gear For Your Class in Farever (Best Dungeons)May 15, 2026
 Farever: How the Crafting System Works (Stations, Professions)May 14, 2026
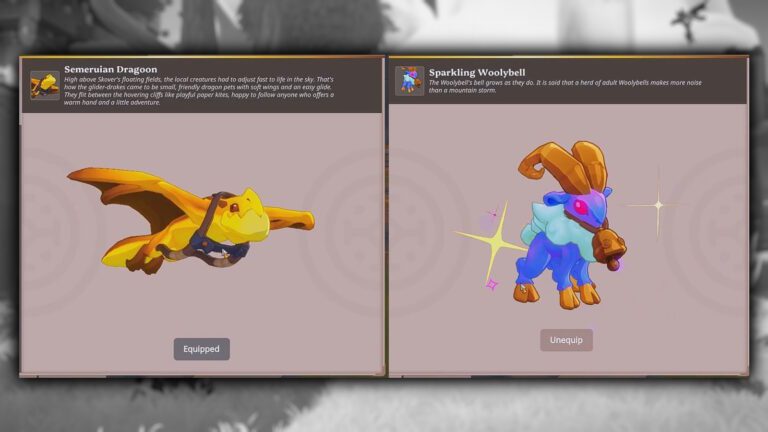
 How to Get Sparkling Woolybell and Dragoon Glider in FareverMay 14, 2026
This means you can chain it more frequently than you might expect and keep the pressure on without having to wait long for your Rage to refill between uses.
Class Skills
The Warrior has five class skills that unlock as you level up. Here is a breakdown of each one:
Charge
Charge unlocks at level 3 and is one of the most versatile tools in your kit. It closes the gap between you and an enemy instantly and stuns them for a second on impact. You can also steer it mid charge which gives you a degree of control over where you end up.
While it is primarily an offensive tool for opening fights and interrupting enemies, it also doubles as a movement option for getting out of danger or dodging heavy attacks when needed. It has a 15 second cooldown.
Ignore Pain
Ignore Pain unlocks at level 5 and is your main defensive button. Activating it reduces all incoming damage by 40% for 12 seconds which is a significant damage reduction that can keep you alive through some serious pressure. It has a one minute cooldown so you want to be saving it for moments where you genuinely need it rather than burning it casually.
Battle Shout
Battle Shout unlocks at level 10 and is particularly valuable in group play. It grants you and all nearby allies a 20% critical chance boost for 15 seconds. Coordinating this with your party’s burst windows can lead to some serious damage output. It has a two minute cooldown.
Surging Force
Surging Force unlocks at level 15 and deals damage while stunning enemies in a small cone shaped area directly in front of you. It is a solid ability for controlling groups of enemies in tight situations. It has a 45 second cooldown.
Berserk
Berserk unlocks at level 20 and is the strongest of the five. It boosts your damage output by 20% for 15 seconds and also increases the rate at which you generate Rage during that window.
Since you can only have four skills active at any one time, I would recommend replacing Surging Force with Berserk once it unlocks. The damage boost combined with the faster Rage generation makes it a significantly more impactful skill in most situations.
Talents
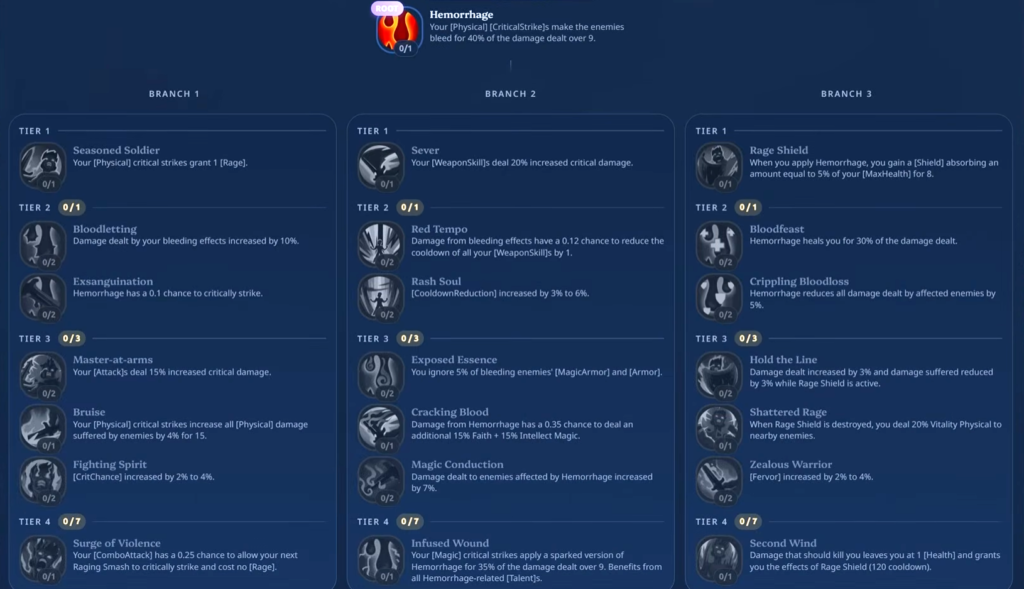
The root talent of the Warrior class is Hemorrhage. This passive makes your attacks apply a Bleed effect to enemies, dealing additional damage over a couple of seconds based on 40% of the damage you dealt. It is a strong foundation for the entire talent tree since it adds consistent damage on top of every hit you land throughout a fight without requiring any extra input from you.
From Hemorrhage the talent tree branches off into three distinct paths, each focusing on a different aspect of the Warrior’s kit. The first branch is focused entirely on increasing your overall damage output. If you are playing a more aggressive style and want to push your numbers as high as possible this is the branch worth investing into.
The second branch revolves around cooldown resets and critical hit buffs. This is particularly useful for keeping your key skills available more frequently and maximizing the windows where your critical chance is elevated, which pairs naturally with Battle Shout.
The third branch shifts the focus to sustain and healing, giving you tools to stay in fights longer without relying as heavily on potions or external support. This branch is especially valuable for solo players who need to be self-sufficient in tougher encounters.
Each branch complements a different playstyle so the direction you take will depend on whether you are prioritizing damage, ability uptime or survivability.
Shields
When it comes to shields the Warrior has four options available. The starting shield, the Rough Shield, is a decent enough tool to get you through the very early game but it is fairly basic compared to what comes later.
The other three shields are where things get genuinely interesting. Each of them comes with both a strong active skill and a solid passive skill that meaningfully change how you play and open up different approaches depending on whether you want to focus on group utility, healing or raw offensive pressure.
Rough Shield
- This is the shield you start with from the very beginning. It comes with one active skill called Shield Bash which lets you deal damage to an enemy and stun them for 1.5 seconds. It is a simple but useful tool for interrupting enemies early on. It has a 12 second cooldown.
Dominion
- This shield can be found in the Overworld inside any of the contested chests after Primevalley.
- Its active skill is Fortifying Cry which gives all allies within a 40 meter radius a 100% armor boost for 10 seconds. It is an excellent group utility skill that can make a real difference in tougher fights and dungeon runs. It has a 35 second cooldown.
- Its passive skill Heartsteel makes your final combo attack deal an additional 15% physical damage with a 15 second cooldown. A solid all round shield that is well worth grabbing as soon as you reach the Primevalley area.
Crabgantua’s Kneecap
- This one can be found in the Overworld or earned by clearing the Crabgantua’s dungeon. It is primarily a healing focused shield which sets it apart from the other options.
- Its active skill Depth Shield spawns a bubble with four charges. Each time an enemy gets close to the bubble one charge is consumed to deal magic damage to enemies while simultaneously healing nearby allies. It has a 15 second cooldown.
- Its passive skill Shield of the Devourer builds stacks of Water Infusion through final combo attacks and blocks. Once you reach four stacks your next block becomes empowered and deals magic damage to nearby enemies.
- A strong choice if you want to contribute healing to your group while still staying in the thick of the fight.
Magma Mia
- This shield drops in the Overworld or through the Ruins of Gorgon Hollow dungeon.
- Its active skill Furnace Roar deals magic damage in front of you continuously for 3 seconds and has an 18 second cooldown.
- Its passive skill Cinder Coat makes your block engulf you in flames for 4 seconds afterward. During this window you deal magic damage to any enemies that get close to you.
- It is a more offensive shield option that rewards aggressive play and staying right in the middle of enemy groups.
One Handed Weapons
The Warrior has four one handed sword options to choose from and each of them brings something different to the table. The starting sword is serviceable enough to get you through the opening hours of the game but the options you unlock as you progress are where things get genuinely interesting.
Some of them come with active and passive skill combinations that can completely change how your Warrior plays and a couple of them are strong enough to carry you well into the later stages of the game. Here is a breakdown of all four.
Light Practice Sword
- This is your first sword option and the one you will be starting out with. It has a standard 4 hit combo chain and the final attack of the combo reduces the cooldown of all your weapon skills by half a second each time it lands.
- Its active skill is Cleave which deals AOE physical damage in front of you with an additional 25% critical chance on top of your base crit. If the attack lands as a critical hit it will also apply a Bleed effect to the enemy that lasts for 10 seconds.
- A solid starter weapon that gets the job done in the early game.
Glory
- This sword can be found in the Overworld from contested chests. It has a 4 hit combo chain where the final attack has a 40% chance to reduce your off-hand weapon skill cooldown by 3 seconds. When this effect triggers your attack also deals bonus magic damage on top of the physical hit.
- Its active skill Conquer makes your character spin around and deal physical damage to all nearby enemies with a 9 second cooldown. The best part about Conquer is what happens when you pull off a perfect block. A perfect block resets its cooldown entirely and also makes your next use of the skill deal an additional 25% damage.
- This means that if you learn the attack patterns of the enemies you are fighting you can essentially spam Conquer back to back and keep the damage flowing consistently.
- Its passive skill Righteous Resolve heals nearby allies every 3 seconds as long as you have two or more enemies within 6 meters of you.
Cheese Moon
- This sword drops from the King Ratsar dungeon and is one of the strongest weapon options available to the Warrior. It has a 4 hit combo where the final attack resets the cooldown of Bonethrow. If that final attack lands as a critical hit it also increases your critical chance and damage output for a short window afterward, which can chain into some seriously impressive burst if the timing lines up.
- Its active skill Bonethrow lets you hurl a sharp bone at an enemy dealing physical damage and applying an 8 second Bleed effect. The bone then bounces to up to three additional enemies after the initial hit which makes it excellent for applying Bleed to multiple targets at once. It has a 15 second cooldown.
- The passive skill Bloodrage Aura is arguably the strongest part of this weapon. On a very short 3 second cooldown it increases the critical chance of all allies within 40 meters by 5%. On top of that every critical strike you land heals you for 10% of your total HP.
- The sustain and group wide crit buff this provides is exceptional and I would highly recommend slotting this weapon into your Arsenal slot so you can benefit from Bloodrage Aura without needing it as your main weapon.
Beefury, Blessed Blade of the Farseeker
- This sword can be found in the overworld or by defeating the Lady Bee dungeon boss. It has a visually impressive 4 hit combo chain where the final attack deals physical damage while simultaneously healing you and any nearby allies. This alone makes it a strong option for players who want to contribute some passive sustain to their group without changing how they play.
- Its active skill Hive’s Sunder delivers a wide cleave attack that deals physical damage to nearby enemies and reduces their resistance to magic damage by up to 40% for 10 seconds. This is a particularly valuable debuff in group play since it amplifies the magic damage output of any Mage or Priest on your team for the duration. It has an 18 second cooldown.
- Its passive skill Swarm Lord triggers whenever you use a weapon skill and spawns a Hive Swarm that lasts for 10 seconds. The Hive Swarm deals magic damage to nearby enemies every 2 seconds and heals you for the same amount it damages them.
- The combination of the healing on the final combo attack and the sustained healing from Swarm Lord makes Beefury one of the more self-sufficient weapon options available to the Warrior, and a great pick if you are regularly finding yourself low on health during longer fights.
Two Handed Weapons
The Warrior also has three two handed weapon options available. Since these take up both your weapon slots they come equipped with two active skills each instead of one. The tradeoff is that two handed weapons are noticeably slower to swing than their one handed counterparts.
But what they lack in speed they more than make up for in raw damage output. If you want to hit hard and are comfortable managing the slower attack pace, two handed weapons are absolutely worth considering. Here is a breakdown of all three options.
Judgement
- This is likely the first two handed weapon you will get your hands on. It has a four hit combo chain where the final attack smashes the ground and deals physical damage to nearby enemies. It also knocks them back and increases your Physical Mastery by 300% for 15 seconds. This effect stacks up to three times which means keeping your combo chain going consistently rewards you with a significant and growing damage boost.
- Its first active skill is Shockwave which heavily slams in a frontal cone dealing physical damage and stunning enemies for 3 seconds. It has a 25 second cooldown.
- Its second active skill is Rampage which charges up for up to 3 seconds before violently smashing the ground and dealing physical damage to nearby enemies. The knockback distance scales with how long you hold the charge. If you kill an enemy with Rampage it also resets the cooldown of Shockwave entirely.
- Its passive skill Domination increases your damage against any enemy currently affected by a crowd control effect. Between the knockback on the final combo, the stun from Shockwave and the knockback from Rampage, you will almost always have enemies in a crowd controlled state when you need them to be.
- Judgement is ideal for clearing large groups of enemies and is an excellent choice for mob heavy content.
Lady Bee’s Ceremonial Stinger
- This two handed weapon also comes with a four hit combo chain. The final attack strikes forward and deals physical damage to an enemy while generating a Dart stack, building up to a maximum of three stacks. Once you hit three stacks your next final combo attack releases all the Darts and deals physical damage to random enemies.
- Its first active skill is Stingerang which has an 8 second cooldown. It fires a piercing stinger in your targeted direction dealing magic damage and knocking enemies back. After 2 seconds the stinger returns to you dealing physical damage on the way back and pulling enemies toward you.
- Its second active skill is Apix Dash which has a 12 second cooldown. It dashes you forward and releases a burst of honey dealing AOE magic damage to nearby enemies.
- Its passive skill Unstable Goo makes magic critical strikes coat enemies in goo for 8 seconds slowing them by 40%. Physical critical strikes then ignite the goo and deal additional magic damage.
- The combination of the returning stinger pulling enemies in and the goo slow makes this weapon excellent for controlling the battlefield and setting up big damage windows.
Pocket Hive
- Pocket Hive has a four hit combo chain where the final attack smashes the ground dealing physical damage and knocking enemies back. It also generates 2 stacks of Buzzing per use.
- Once you reach 10 stacks of Buzzing an angry bee is summoned that deals magic damage to nearby enemies every 3 seconds for 15 seconds. The final combo attack also has a chance to reset the cooldown of Brood Leap.
- Its first active skill is Brood Leap which has a 24 second cooldown. It launches you into the air toward a targeted area dealing physical damage on landing and leaving behind a zone that continuously deals physical damage over 12 seconds. There is also a 25% chance that the landing zone will heal your allies as well.
- Its second active skill is Reverse Honey Spin which has a 16 second cooldown. It draws all nearby enemies toward you dealing magic damage and then slams the ground dealing even more magic damage in a follow up hit.
- Its passive skill Mad Buzz gives you a 20% chance to generate a stack of Buzzing every time you deal or take damage. This means you are building toward your angry bee summon constantly throughout the fight without having to rely solely on your combo finisher to do it.
Dual Wielding Weapons
Dual wielding weapons are the fastest attacking option available to the Warrior and that speed advantage has a direct impact on how the class plays. Because you are landing hits so much more frequently than with one handed or two handed setups, you generate Rage significantly faster than any other weapon type.
This means you can spam Raging Smash far more often and keep a much more consistent stream of AOE damage going throughout every fight. The faster Rage generation also means you get more out of skills like Berserk.
There are three dual wielding options available to the Warrior and all three of them come equipped with two active skills and one passive skill each. Here is a breakdown of all three.
Iron Fins of the Leviathan
- You will get this from the first area of the game or the first dungeon. It has a five hit combo chain where the final attack strikes with both weapons dealing physical damage and increasing your critical damage for 15 seconds. This effect stacks up to five times. At full stacks all your attacks gain a 35% chance to automatically throw a piercing axe forward dealing additional physical damage.
- Its first active skill is Abyssal Fury which has a 20 second cooldown. It imbues your weapons with tide power for 8 seconds giving all your attacks a 30% chance to blast physical damage on hit. It also grants you a shield equal to 35% of your missing health which makes it an excellent panic button when you are running low.
- Its second active skill is Groundswell Strike which has a 10 second cooldown. It deals around 26 physical damage to nearby enemies. Every attack you land reduces its cooldown by 1.5 seconds and it ignores armor entirely. If it kills an enemy it also heals you for 30% of the damage dealt.
- Its passive skill Tide Warlord increases your Physical Mastery by 1500% while you are below 50% health and also increases your movement speed by the same factor. When you drop below 35% health it automatically triggers the effects of Abyssal Fury on a 120 second cooldown.
Wingsabers
- These can be found in Honeywoods or as a drop from Queen Honeyzabeth. They have a fast multi hit combo with the final attack striking with both weapons and dealing physical and magic damage to enemies in a frontal cone while generating a stack of Bladeleaf.
- Bladeleaf stacks up to four times. Using your Signature Skill consumes all stacks and throws them at the nearest enemy. Each stack deals magic damage on impact. You also have a 10% chance per enemy hit to generate an additional stack on top of the normal stacking rate.
- Its first active skill is Hiveborn Blossom which has a 12 second cooldown. It spins and deals physical damage to nearby enemies. You can recast it within the next 4 seconds with the damage increased by 100% on the second spin. The second spin also ignores magic armor entirely. On top of that, the damage dealt to enemies above 80% health is increased by 200% making it an extremely powerful skill for opening fights.
- Its second active skill is Swarmstrike Accord which has a 30 second cooldown. It grants a blessing to all allies within 30 meters causing all their attacks to deal additional magic damage for 12 seconds. A strong group buff worth coordinating with your party’s burst windows.
- Its passive skill Queen’s Decree has a 20 second cooldown. The next time one of your skills deals magic damage, it is increased by 100%. While the passive is on cooldown, all your critical strikes deal additional magic damage.
- A very well rounded dual weapon option that balances personal damage with solid group utility.
Twin Pillars of Justice
- These drop from endgame content including the Cheese Station dungeon boss so expect to be working toward these later in your progression.
- They have a four hit combo where the final attack strikes with both weapons dealing physical damage and applying a Sentence to the target. The Sentence increases all damage you deal to that specific enemy for as long as it lasts. making it excellent for focusing down priority targets quickly.
- Its first active skill is Zealous Spins which has a 10 second cooldown. It spins forward dealing physical damage to enemies three times along your path. If an enemy is hit, you can recast it within 3 seconds. The second cast reduces the armor of hit enemies by a percentage for 12 seconds.
- Its second active skill is Iron Cyclone which also has a 10 second cooldown. It charges straight ahead dealing four hits of physical damage each to enemies along the path and stunning them for 2 seconds. Damage dealt to enemies that are immune to crowd control effects is increased by 30% which means this skill stays effective even against bosses and elite enemies that cannot be stunned.
- Its passive skill Zeal generates a stack every time you land an attack or use a weapon skill. At 10 stacks, your next final combo attack consumes all of them to reset the cooldown of Zealous Spins and increase its damage by 50%.
- Given both active skills share a 10 second cooldown and Zeal lets you reset Zealous Spins frequently, the uptime on your active skills with this weapon is excellent.
Wrapping Up
That covers everything you need to know about the Warrior class in Farever. It is one of the most satisfying classes to play. Experiment with the different weapon options as you progress since swapping weapons can completely change how your Warrior feels and there is no single correct setup for every situation.
If you want to gear up your character fast, check out my guide on the best early game chest farm route to stack up gold and gear as quickly as possible.