84 articles
Honkai Star Rail released yet another update, and with this latest patch, a new set of golden scapegoat puzzles have been released. There are a lot of these in the past, and if you still remember how to do them, then these should pose no issue to you at all. With that said, in case you need some help for whatever reason, we will go through how you can complete all of the new ones!
Honkai Star Rail – All Warbling Shores Styxia Golden Scapegoat Puzzles Guide
Before we can get started, it should be noted that some of these can only be started if you complete certain missions first, so make sure to do every quest that you run into so that you can avoid any issues.
As with the previous golden scapegoat puzzles in the game, you can complete these by just following the exact directions specified in this guide. You do not need to overthink anything, just follow the directions that we show you so you can get it all done.
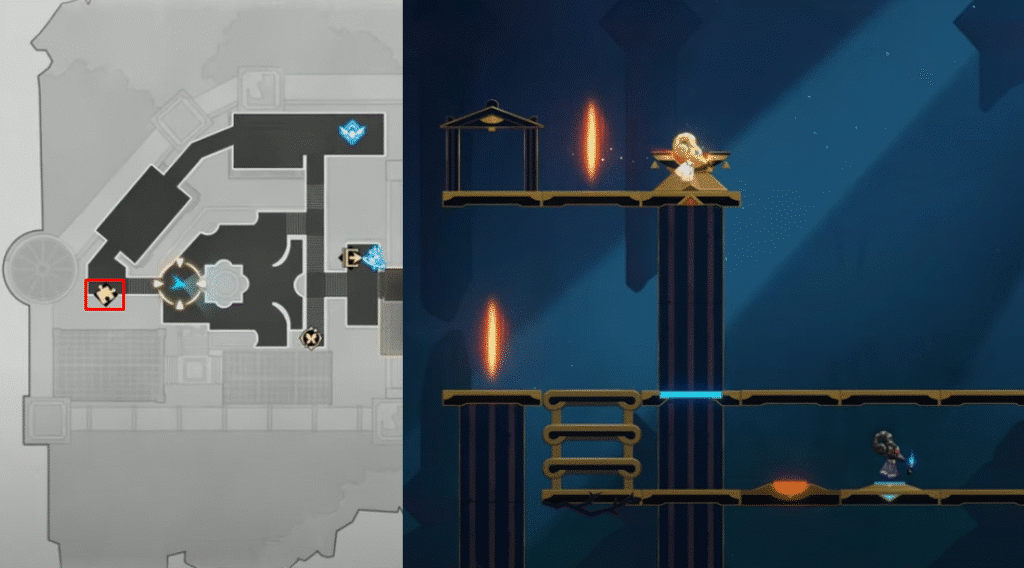
“Warbling Shores” Styxia Golden Scapegoat Puzzle #1
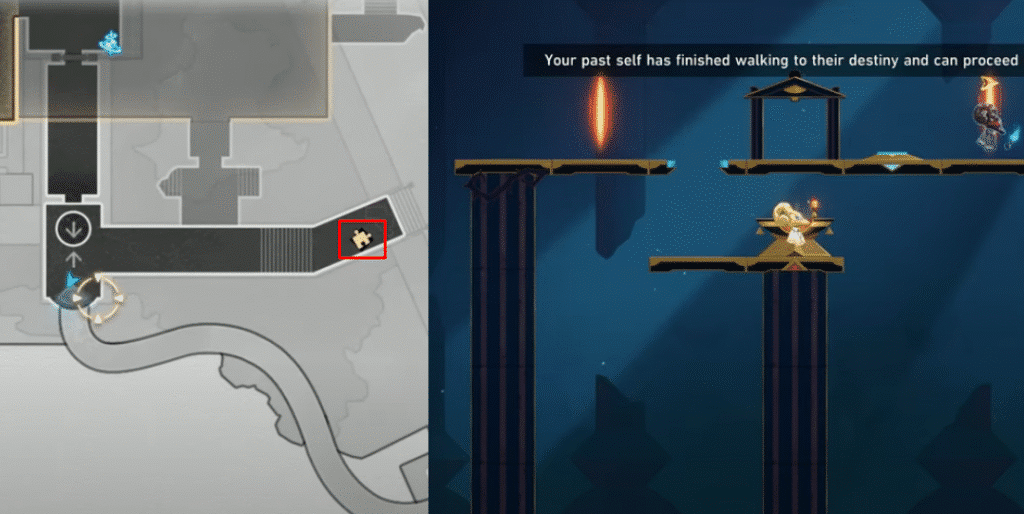
For this first one, you will find it in the map image below, which is in the F1 part of the map. Just follow the highlighted icon in the image, which is the exact spot where you start the first golden scapegoat puzzle.
 A Bouquet for the Blessed in Honkai Star RailFeb 17, 2026
 Fundamentals of Imagenesis in Honkai Star Rail 4.0Feb 16, 2026
 Enter Black Cat Instacam’s Delusional Theater Once in Honkai Star RailFeb 16, 2026
Upon starting the puzzle, follow these steps as soon as the challenge begins to get it done:
- Step #1 – Right
- Step #2 – Right
- Step #3 – Right
- Step #4 – Right
That’s right, all you need to do for this one is to keep running to the right all the way until you reach the end point. It’s as simple as that. Now, proceed to the next one!
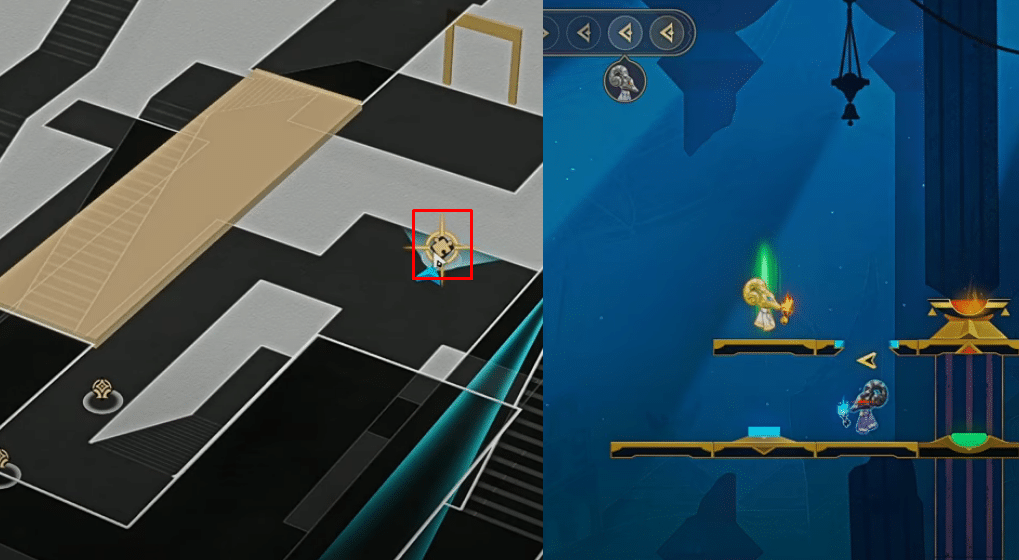
“Warbling Shores” Styxia Golden Scapegoat Puzzle #2
The second puzzle is also found around the F1 area, just a light jog away from the large fountain in this zone. Near the fountain, simply head up a flight of stairs and you should see the next golden scapegoat floating right there.
Investigate it and then follow the exact order of movements below in order to get it done.
- Step #1 – Right
- Step #2 – Right
- Step #3 – Down
- Step #4 – Right
- Step #5 – Right
- Step #6 – Right
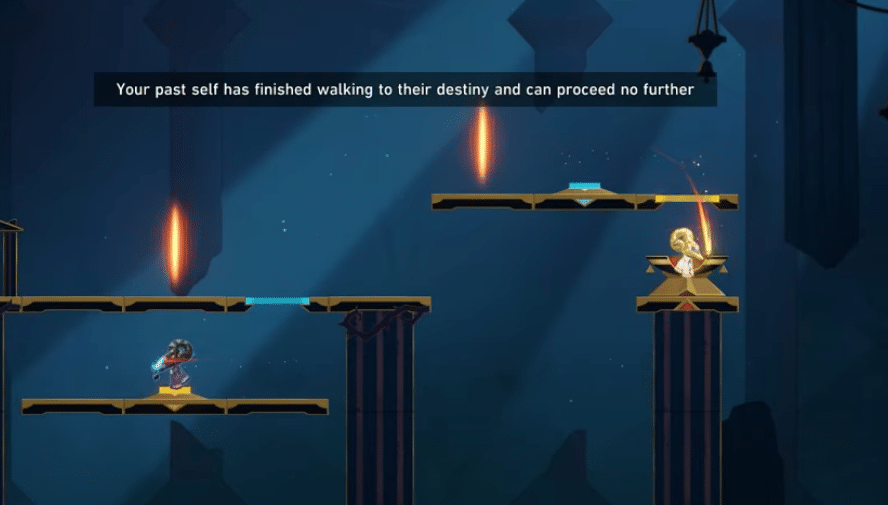
This will then summon your past self. Since this is a longer puzzle, there will be more steps compared to the first one, where you would simply keep moving right no matter what. Follow these steps to finish the rest of the puzzle:
- Step #1 – Right
- Step #2 – Right
- Step #3 – Up
- Step #4 – Left
- Step #5 – Left
- Step #6 – Left
- Step #7 – Left
- Step #8 – Left
- Step #9 – Left
- Step #10 – Right
Upon taking your last step, you should now be at the end point as you have only just exited through the portal. Congratulations, you can now proceed to the next one!
“Warbling Shores” Styxia Golden Scapegoat Puzzle #3
This next one requires you to first go to one of the Passage of Treasure points at the F1 area. Enter through the large door and descend down the stairs until you find the golden scapegoat down below, which should now put you into the B1 zone of the map.
Once you find the golden scapegoat, you will now have to follow these steps in the correct order to complete the first part of it:
- Step #1 – Right
- Step #2 – Right
- Step #3 – Right
- Step #4 – Left
- Step #5 – Left
- Step #6 – Left
After the last step, your past self will now spawn. As usual, you will need to follow a different set of steps afterwards. Follow these next few directions to fully complete the puzzle:
- Step #1 – Right
- Step #2 – Left
- Step #3 – Up
- Step #4 – Right
- Step #5 – Right
- Step #6 – Right
It will look sketchy at first as you will be walking over gaps, but if you did it correctly, your past self should activate the bridge that you need to step on in the same turn that you walk to the right. After that, just touch the end point to finish the puzzle.
“Warbling Shores” Styxia Golden Scapegoat Puzzle #4
Finally, to the east of the large fountain from earlier, enter through the door and use the elevator to go down. At the bottom, continue forward and keep running until you find a floating platform that you can operate to your left. This will take you up to where the last golden scapegoat is.
This puzzle is actually extremely simple compared to the other ones, including the very first example. Simply follow these steps to get it done in one quick go:
- Step #1 – Right
- Step #2 – Right
- Step #3 – Right
- Step #4 – Left
- Step #5 – Right
- Step #6 – Right
- Step #7 – Left
- Step #8 – Right
By following these steps, you will not only spawn your past self halfway through the puzzle, but you will also immediately open the way to the end point down below. No need to think about it too much, just press the buttons in the right order.
And that is pretty much all there is to these simple golden scapegoat puzzles, which should now be hilariously familiar to you by this point as there have been several of these introduced in multiple other patches back then.
If you want to solve more golden scapegoats, make sure to check out our guide on how to complete all of the golden scapegoat puzzles within the Murmuring Woods of the Grove of Epiphany for more info on how to get these done, especially if you have found yourself doing past content from older updates for the first time.